Showing posts with label Shadow Box. Show all posts

Monday, August 12, 2019

Another Baby Shark Card

After creating the cutting files for the "Baby Shark" first birthday card I put together a couple weeks ago, I felt the need to make another Baby Shark themed card... for our granddaughter... just because!

This time I created one additional cutting file, for the character, "Pinkfong" and added her to the front of the card together together with a school of tiny fish from Cricut Create A Critter cartridge.

Inspired by Francis Byrne's fun ocean shadowbox card I decided to add a shadowbox in my card too, where I placed Baby, Mommy, and Daddy Shark and friends. Seaweed and coral are from Cricut Life's A Beach cartridge.

 Lawn Fawn's Stitched Hillside border die was used for the sand and attached to the center strut in the shadowbox together with Baby Shark and a funny crab friend.

I had fun playing with toothbrush style foundation brushes again to apply Tim Holtz Distress Oxide inks (Salty Ocean, Broken China, Cracked Pistachio) onto white cardstock for the blended ink deep sea ocean background. After applying the inks, I randomly splashed droplets of water onto the cardstock for the neat splotchy design.

Sunday, July 8, 2018

Floral Frame Shadowbox Card

I was pretty excited when I found out that the Lori Whitlock shop would be carrying svg cutting files for the beautiful and intricate papercut designs by SAS Creative. I purchased the Blank Floral Card file, thinking it would be perfect to use for personalized wedding card for our very special friends who tied the knot this summer.

I decided to try a shadow box style card using this pretty floral file which has a heart shaped opening. Starting from the back, I used my favorite American Crafts Opalescent Glitter cardstock as the backdrop. The next layer, a heart shaped window with the bride and groom's names welded inside was created in Make the Cut using a heart shape, LD Charming font and the shadow function. The SAS Creative floral cutting file was used as the third layer and for the fourth final layer I used just the scallop border from the same file backed with a sheet of clear acetate. Banner with the wedding date was created as a print and cut and adhered to the front of the acetate with foam tape.

Here's the top view showing the layers inside the shadow box. I tried to space the layers about a quarter of an inch apart.


On the backside of the shadowbox, I added a card for our sentiment. Kassie's Brocaide embossing folder from Cuttlebug was used on the card front, embellished with a fancy label cut from a free svg by Images By Heather M and some satin ribbon. A tab closure was added to keep the card closed, and the shadowbox flattens nicely to slip into an envelope. I really enjoyed using the papercut design by SAS Creative to put this card together. I'm really not very good at "elegant", but with the help of Samantha Sherring's intricate cutting files, elegant cards have now become a lot easier!

Saturday, November 18, 2017

Autumn Thank You

I wanted to send a thank you card to someone who recently went way beyond the call of duty to help me find a solution to a problem I had nearly totally given up on. The entire process took nearly 3 months, but he remained patient and determined to help until the problem was finally solved.

I needed to do something that would come together fairly quickly so I chose to do a mini shadowbox card, similar to the ones I made for Halloween. The template I created for this card can be found here.

Paper pieced squirrel and acorns are from Cricut Create A Critter cartridge, all cut in white cardstock then colored with Copic pens. Leaves were cut using an old Paper Adventures punch. The cut file for the folded banner at the top of the card was created in Make the Cut design program and the row of fall trees backdrop was created in Printshop using clipart from Doodlebug's Flea Market collection, purchased at the Lori Whitlock Shop.

I added a pocket on the backside to for a gift card holder and my sentiment inside. Thank You die cut is from Elizabeth Crafts. I was inspired by all the fun fall themed crafts being posted on crafty sites lately when trying to come up with ideas for this thank you card. And although it wasn't my original intent, I guess this could easily pass as a Thanksgiving card as well.

Friday, October 27, 2017

Mini Halloween Shadowbox

Halloween is next week already so it's time to post some of the fun Halloween projects I've been working on. My turn to share at my craft club was last month, and this was the shadow box Make and Take project I came up with.
Been noticing a lot of these mini shadowboxes on the internet lately and after watching a few You Tube video tutorials and seeing how quick and easy they can be, I decided to do a Halloween themed one to share with my craft club.

The template for the shadowbox was created in Make the Cut, but simple enough to recreate without a cutting machine. The height and width of my box is 4-1/2 inches square, with a depth of 1-1/2 inches. The window is 3 inches in height and 3-1/2 inches wide cut on my Silhouette, but you could use any shaped die to cut the window. A stitched landscape die was used to make the struts, cutting them to a length of 5-1/2 inches, scoring 1/2 inch on each end for the tabs to attach them inside the box.
The cute haunted house and ghost is an image from Miss Kate's Cuttables, The purple sky, moon, and bat were added in Printshop to create a backdrop for the inside of the card. Vampire Hello Kitty and pumpkins is a freebie printable file found at the Hello Kitty Coloring Pages website found here. Images were printed, then cut on the Silhouette using Make the Cut's print and cut function.

I'm usually too lazy to draw up templates, but since this was a Make and Take share project, I did make one this time. Each square represents 1/2 an inch, solid lines are cutting lines, red dashed lines are scorelines.

Here's a top view of the card to show the placement of the struts. I placed my struts 1/2 an inch apart. The video tutorials I've noted on the template screenshot above show the easy assembly of this card.

And since the intent of this card was for giving  treats to my "kids at heart" friends, I added a pocket to the backside to slip in a gift card. Using gift cards for Mickey D's or Wendy's makes this a great non-candy alternative for real kids too!

Nicest thing about this card is that it folds flat and fits into an A6 size envelope. Stay tuned for more Halloween projects to be posted soon!

Saturday, September 23, 2017

Shadow Box Gable Box

I had the opportunity to spend a couple mornings this past summer with two amazingly creative friends to share crafty ideas and projects. Only problem is that I always have a tough time coming up with a creative project worthy enough to share with these two uber talented ladies! Just so happens during that time I was on a quest to find "the perfect pound cake recipe", baking nearly everyday, testing different recipes. This kitchen experiment left me with more loaves of pound cake than hubby and I could ever eat, which gave me the idea to put together a fun gable box as my share project so I could share my pound cake overload with my friends at the same time.

The template for this gable box comes from the Classic Gift Boxes Collection from SVG Cuts. I decreased the size of the original cutting file a bit to fit a mini loaf pan plus an additional 1/2 inch to the depth to allow room for the shadowbox insert.  I used the fill and print and cut functions in the Make the Cut Program to do the top of the box so it would look like a roof . Still learning how to properly use the fill feature which lets me fill shapes with patterns from digital paper files. Finding it lots of fun with so many creative possibilities!

To make my gable box unique, I decided to create a shadowbox on the front of the box. Inspiration for this comes from the very cool shadowbox giftbag/giftcard holders by Lori Whitlock which she sells at her shop. I purchased the file for this and increased the size of the pop up insert to fit my gable box. My Melody and Hello Kitty images were created using the print and cut feature in Make the Cut and adhered to the pop up insert. Oval scallop frame was created by welding circle shapes together. A piece of clear acetate was glued to the inside to create a window effect.
Really had fun putting this together and I'm hoping my friends did too. I'm enjoying playing with the fill feature and print and cut functions in Make the Cut now. Although it will probably never replace my love for paper piecing, it definitely is a time saver and great to use when I need to do multiples and time is a factor.

Saturday, August 19, 2017

Chinese Lion Dance Celebration


Here's the latest shadow box style card I made, this one for my dear crafting buddy Patti, of Creations By Patti blog who celebrated her birthday last month.

Isn't this paper pieced Chinese Lion the cutest? He's part of the Chinese New Year Chibi collection from SVG Cutting Files. Although Chinese Lions are probably best known for making their appearance during Chinese New Years, they often show up at other special occasions too, like wedding and birthday celebrations to bring good luck. And this adorable little paper pieced Chinese girl comes from Marjorie Ann Designs Kids Around the World collection.

Celebratory Chinese red lanterns hung from the top of the first layer of the card are also from Marjorie Ann Designs. The Chinese gate you see way back on the last layer of of card is a cutting file created in Make the Cut Design program from a clipart image found on the internet. If you look closely, you'll see I added the Chinese characters for "Happy Birthday" onto the gate.

The final touch: Asian architectural corners and border designed in Make the Cut by welding square shapes together.

This time around I used extra heavy cardstock for my shadowbox card. It really made a world of difference when it came time to try to evenly space the layers apart to assemble the card. Lesson learned...use extra heavy cardstock for shadowbox cards.

My sentiment was added to the back of the box. It's nice that this card flattens easily to fit in an envelope for mailing. If you'd like to give the shadowbox a try too, I used the instructional video by Lori Whitlock on You Tube found here as a guide.

Saturday, July 8, 2017

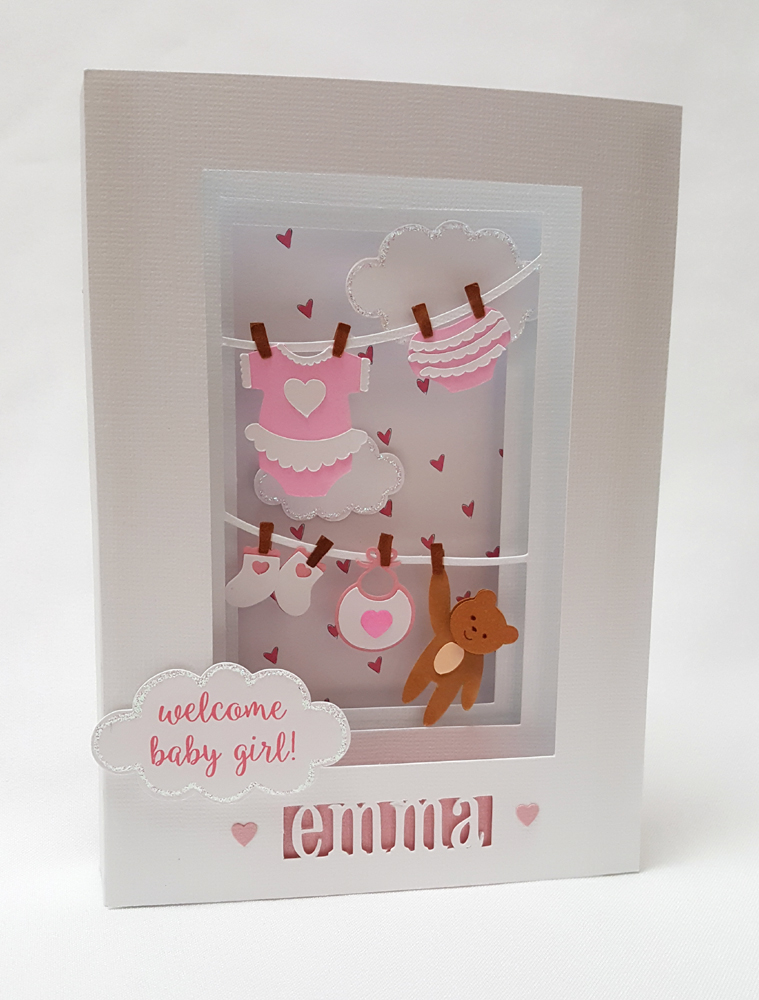
Clothesline Baby Shadowbox Card

I have another layered shadowbox style baby card to share today. This one was created for a friend's granddaughter, Baby Emma who was born a month before our granddaughter.

The inspiration for this card came from a Hallmark card that was sent to my granddaughter at her birth. I thought it was so cute, and wanted to try the same idea in a shadowbox style card. The cutting file for the little onsie is a freebie from Quilling Patch. (I added the heart and ruffled skirt to make it more girly).  Panties, socks and bib are from Cricut Baby Steps cartridge; and hanging teddy is one of my drawings rendered into a cutting file in Make the Cut program.

Added a fun personalized touch by adding baby's name, using Pharmacy font and Make the Cut to create a cutting file for the front of the card.


View from the top shows the two layers that were added inside for the shadowbox effect. As you can see from the photo, my layers are not aligned quite right...I'm learning that accurate placement of the layers is essential!

And here's the back of the card where I added our sentiment. Still having fun and learning as I continue making more of this type of card.

Sunday, June 18, 2017

Golfer's Shadow Box for Fathers Day

Today is Fathers Day and this is the card hubby got from me before he headed out to the golf course with his buddies early this morning.

Yup, yet another golf themed card and yet another shadow box card. Happily, I had most of the cutting files needed to put this card together already saved on my computer from previous cards I've made. But even so, I struggled with the sizing, placement and welding of each of the images onto the different layers of this shadow box.

Golfer and golf cart images were rendered into cutting files from images found on the internet and the trees are from Cricut Zooballoo cartridge.


To get the right amount of dimension I wanted, I used three layers inside the box. The layers each have a window that gets smaller as they get closer to the back of the box; and I tried to place the layers about a fourth of an inch apart.

      
Fathers Day sentiment was added to the back of the box. This card actually folds flat to fit in an envelope, but I decided to make a box for this instead since some of the cuts on this were pretty thin and I didn't want to risk the chance of any of the cuts and layers getting tangled.
Enjoy celebrating with all your dads, hubbies and grandpas today. Don't forget to let them know how special they are!

Saturday, June 3, 2017

A Star Is Born

Our daughter gave birth to a sweet baby girl in April...I'm a gramma! Baby's name is Evelyn Leilani and here is the first card gramma made for her.

Being that I've recently become intrigued with layered shadowboxes, I decided to try another one for Baby Evelyn. Before I go on, I should mention that the original card has baby's full name on it, I just blocked her last name out in the photos to protect her privacy. Yeah, that's why it looks kinda off centered and weird.

View from the top shows the two layers that were added inside the box. The window openings for each of the layers is about half in inch smaller than the one before it, with the last layer inside the box having the smallest opening. Each of the layers was cut half an inch wider than the width of the finished box so I could fold 1/4 inch on each side as tabs to adhere the layers in the box. I used Lori Whitlock's instructional video on Youtube as a guide to assemble my card.

Paper pieced baby and moon come from Cricut's Baby Steps cartridge. I used a strip of acetate glued to the second layer in the box to suspend her in the center of the shadowbox. Tiny stars were hung using fishing line. 

Pharmacy font and Make the Cut were used to cut out baby's name and backed with pink cardstock.

Added our sentiment to the back of the box using digital paper from Bella Blvd. Love this paper! Also used this same paper to line inside the box as the back drop. Having too much fun with these layered shadowbox style cards and hope to continue making more of them!
Oh! And of course I couldn't end without sharing a few photos of our precious new granddaughter... because that's what grammas do, right?


Monday, May 29, 2017

Belated Mothers Day Celebration

Whoa! Life took me into quite a tailspin this past month!  Thankfully things have finally begun to settle down now so I can get back into some sort of normal routine.  We didn't have the chance to properly celebrate Mothers Day with family until just yesterday, had to really scramble to put a few things together.

Thank goodness for the Lori Whitlock Shop! I chose to use her Butterfly Shadowbox file to make super quick but beautiful shadowboxes as Mothers Day cards for our moms.

Here's the view from the top showing the three intricately designed layers inside the box which give this shadowbox impressive depth and dimension.


Baked up batches of pound cake for the special moms in our family and put them in gable boxes which I quickly put together using a file from SVG Cuts. Resized the box file to fit the mini loaves in Make the Cut  and kept the decorating to a minimum with a just few butterflies and pearls.

Here we are at our belated Mothers Day celebration. Heartfelt thanks to all these wonderful moms  in our lives who helped us get through all that life has thrown at us this year. We never could have survived without you. Love you all.