Enjoyed making the Stadium Wave Card for our granddaughter so much that I decided I should do another. I thought a floral one would be fun to do so I chose to do one with die cut cherry blossoms as a Mothers Day card.
Happy to finally have had the chance to use my iCrafter Cherry Blossom Bursts die to cut and piece together all the flowers for this card. Sentiment on the card front was cut from gold foil board, using Brisk font and shadow on the Silhouette for "Mom" and a Gemini Swash Sentiment die for "love you".
Finally remembered to do a short video showing the Stadium Wave Card in action.
On the inside, I added more cherry blossoms and leaves onto each of the eight accordion panels of the stadium wave mechanism.
Side view of the card shows the strips of cardstock folded and adhered together that create the fun stadium wave effect for this pop up card.
Lots of room on the left side of the card to add our sentiment, matted with gold foil board.
Before closing, I want to also share this fabulous Mothers Day card I received in the mail from my very dear friend, Bev.
Bev added a beautiful bouquet of flowers tied with a bow onto a rubberband activated pop up ball for a fun pop up surprise card. Love, love, love everything about this card, and especially how she perfectly matched the colors of the flowers in the bouquet to the flowers in the patterned paper!
The fun pop up floral bouquet was collapsed and hidden in this lovely gatefold card with dry embossed panels and kept closed with a belly band embellished with flowers and a cute medallion. I'm truly blessed to have such creative and thoughtful friends! Thank you for stopping by today. Hope you're having an enjoyable, relaxing day.
We recently learned that our granddaughter had started watching the Pokemon anime series and has become quite a fan of little Pikachu. Well, you know this gramma loves a theme, so I grabbed the Pikachu theme and ran with it for Valentines Day.
I found a svg cut file template for this cute Pikachu domed candy holder by Mirachefamira Studio on Etsy which I thought our granddaughter would enjoy. I used half of a clear plastic ball ornament for the domed candy holder. The base of the original template is a circle, but since this was for Valentines Day, I glued it onto a heart shaped base.
The original template included a fancy notched rotating window underneath to access the candies in the dome but I decided to switch it to the simpler hexagonal petal envelope closure that I am more familiar working with.
I also preferred that the petal style envelope gave me a place to add a fun card enclosure. Access to candies is inside the envelope behind the card. I created a simple "Pokeball" card in the shape of a heart with our sentiment inside. This included a clipart of another Pokemon named "Evee", which happens to be the nickname we lovingly call our granddaughter by.
This personalized hinged box decorated with another paper pieced Pokeball held a surprise pop up Valentine inside. When the hinged lid of the box is lifted . . .
little Pikachu pops up inside!
"We Pika-Choose YOU to be our Valentine!"
Inspired by several creative members on the Karen Burniston Pop Up Peeps Facebook group, I wanted to try recreating Pikachu too, using Karen Burniston's Mini Ball Pop Up dies and stacking two of them on top of each other. These rubber band activated pop up balls have been used to create so many different fun creatures and characters!
After adding on Pikachu's ears, face, arms, feet and tail, I had him hold two glittered hearts and secured him to a glittered heart shaped base with a brad so he could swivel around. If you look closely at the previous photo you may be able to see that I added two pieces of the printed cardstock on the right and left inside the box to create a channel where Pikachu's heart shaped base could be slid into. Not certain if this creature resembles Pikachu enough or not but I had lots of fun putting him together!
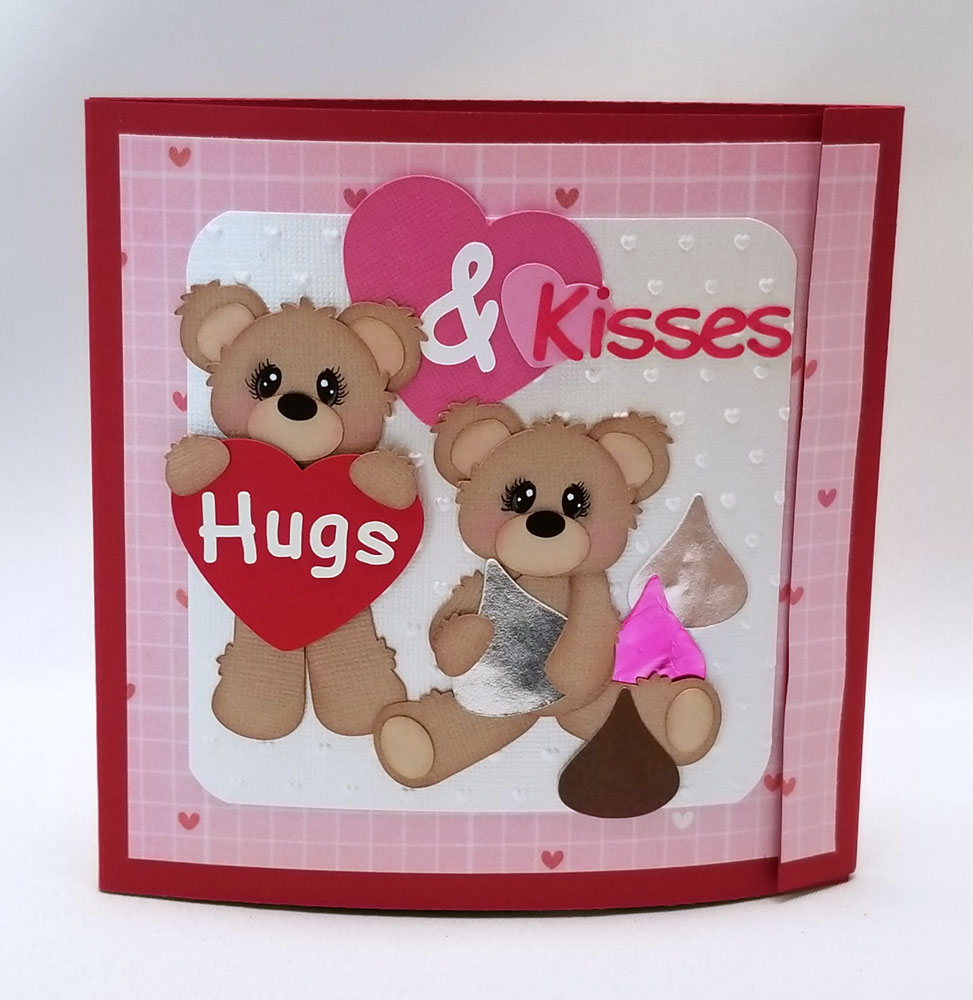
Happy Valentines Day! This is the cuddly teddy bear and card that we packed into a box and mailed to our favorite Valentine this year. Like many kids her age, I'm sure our granddaughter has more plushies than she needs, but this Hallmark teddy was just too hard to resist... when you press on his foot paw, he sings "Skinnamarinki Dinky Dink" as he rocks his head side to side to the music... so ADORABLE! We decided he was the perfect bear to go with this Valentine card I made...
The inspiration for the card front layout as well as the cutting files for the paper pieced teddies come from Cuddly Cute Designs.
I used silver foil board for the wrapped candy kisses and colored one of them pink using Copic markers. Comic Sans font was used to create the title and the rounded square white panel behind the bears was run through a Cuttlebug Heart Dots embossing folder.
Hubby helped me with this short video to show the fun pop up surprise inside the card.
Voila! A pop up ball teddy bear! He's my second attempt at creating a creature using Karen Burniston's Surprise Ball Pop Up die... it's so much fun! This time I used two balls glued, one on top of the other to "build" my bear. I was totally inspired by Frances Byrne's super adorable panda pop up seen here on her blog, Stamp Owl's Studio; as well as all the incredibly talented KB fans who share their wonderful creations on Karen Burniston Pop Up Peeps Facebook page.
I actually had to spend quite a bit of time carefully studying how everyone had put their creatures together... where on the ball should I glue the nose and eyes and ears? the arms and legs? I used enlarged paper piecings from Cuddly Cute Designs' teddy bear svg cut files for the arms, legs ears and eyes. Teddy's muzzle was a little tricky; I initially did a rough hand cut of the shapes, then scanned the pieces into my computer where I could edit them into symmetrical shapes and cut them using the Silhouette.
Teddy's string of hearts was made by doing a print and cut for the pink hearts with the words, and layering them onto the larger red hearts, then stringing onto bakers twine. Scripty "happy valentines day" greeting was die cut from a Mama Elephant die.
Lastly, I added our Valentine message to the opposite side of the card using the print and cut function on a scalloped heart shape. This double pop up ball card was a lot of trial and error but a fun learning experience. Hmmm... so now the burning question is... will there be a pop up ball leprechuan or Easter bunny coming soon?
I gave teddy bear hugs to my "Galentines" in the form of these treat boxes for Valentines Day this year.
As with the Sizzix card, to open the box, the right and left sides of the heart fold together to slide through a slit on teddy bear's tummy to allow the top flap of the box to open.
The heart closure is simply a heart shape folded in half and attached on the fold to the inner box flap with strong adhesive. Happy Valentines Day sentiment was done as a print and cut with LD Charming Bold font.
On the inside: pretty foil wrapped Dove chocolate hearts; the perfect little hug for any Valentine.
Fathers Day cards...more guy cards and yet another challenge. Fathers Day cards, and for that matter all cards for my dad and dh are especially challenging because I know they have big expectations. For my cards to dh, who sponsors most of my high ticket crafting "toys", and my dad, who is extremely artistic and crafty himself, I always try to push for the "wow factor". Ya know, if they don't say "wow!" when they open my card, it just ain't worth it!
After much deliberating, I decided to go with this pop-up ball card. First saw this ball a while back while browsing through miscellaneous paper engineering books at Borders. My first thought was, "okay, cool...but what the heck would I use it for?" Sizzix came out with their version of this hexagonal ball earlier this year, and I found a pattern created and posted by Jenny Red, which she calls "the jumping box". But it wasn't until I stumbled across Karen Burnisten's blogthat I thought "okay, maybe I might want to try this... Karen is the designer of the Sizzix version of this ball and has posted some wonderful projects created with this. Be sure you take a look-see at the transparency version...totally, totally awesome! Later, Cricut Messageboard member Laurinda created a cutfile for the two piece version similar to Jenny's in two sizes on Design Studio. Incredible! Cuts with a whole lot of specific angles make me crazy, it would have taken me forever to create this. Thank you for sharing this Laurinda, you are amazing! The beauty of this two piece version is that it's pretty easy to assemble. Laurinda used George, Accent Essentials and Pooh Font files to design her cutfile. Since of the three, I only own George, I had to change the file a little so I could get a cut.
I used a brad in the bottom panel of the ball to attach it to the card This way the ball is very securely attached with no worries that it might pop off the card due to faulty gluing, and it allows the ball to rotate...very cool!
The card above with the Asian undertones was created for my dad, and for dh, I did a version with his favorite golf theme.
For the card base, I used Karen Burnisten's idea of using a petal fold type card. It's a good way of keeping the ball flat inside until it's opened, plus it's super neat how all four sides of the card pop open to reveal the ball. Karen created and shares the template for this petal card on her blog. For my card, I added a 1/4" spine to all four sides so that the ball would not be completely flat inside the closed cards. I decided to do this because I wanted to be completely sure the ball would pop up the instant the card was opened. I then added a belly band to keep the card in this closed position.
The golf bag on the belly band of dh's card is a digital image from a Darcie Hunterclipart CD colored with copics. On the inside, to make it look more like a golf ball, I embossed glossy photo paper with the Cuttlebug bubbles embossing folder to embellish the top and bottom panels of the ball. The golf club is a cutfile I created using George.
Quickutz Skinni Mini Rollerskate die was used to cut the "love you" sentiment on the top of the balls. "Dad" on the bellyband of my dad's card is Cricut Stone Script welded in DS. Printed cardstock for both cards are DCWV, which I found to be nicely thick and sturdy enough for this project.
Dh got his card before he went out to the golf course this morning . "WOW! That's the neatest card you've made so far!" (smile) Grandpa will get his card tonite at dinner...hope he likes it too! These "wow factor" type of cards do take a quite a bit more time and effort but it's all worth it, right? Afterall, these two are the most important guys in my life, and I want to let them know how special they are.