Showing posts with label Z-fold Pop Up Card. Show all posts

Sunday, March 6, 2022

Double Z Fold Birthday Card

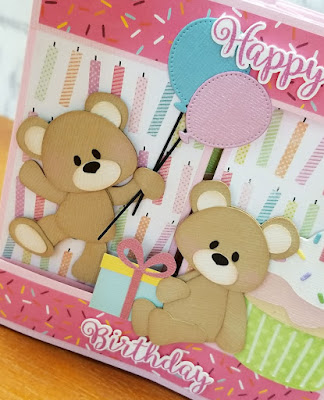
Here's a fun Double Z Gate Fold birthday card I put together for our daughter's birthday last year but haven't had the chance to post until now.

For this card I cut and pieced together several of my favorite bears by Kristi W Designs named "Patches". I think he's adorable and love that he's simple to piece together. Paper piecing cut file for "Patches the Birthday Bear" can be found at Marjorie Ann Designs.

Decided to do a Double Z Gatefold style card so there would be room enough for all four of the paper pieced teddies.  In addition to the balloons and gift cuts included with the cutting file from Marjorie Ann Designs, I also used the  "Happy Birthday Cat" cutting file from Kadoodle Bug Designs for the cupcake and a stitched balloon die, "Balloon Galore" from Craft Emporium. Happy Birthday sentiment on the front was created as a print and cut using Ballerina font.

Pulling on the right and left sides of the card opens this gatefold card.


In this view you can see the "boxes" that are created in the card by adding border strips on the top and bottom edge of the card

Struts were added inside these "boxes" where I could adhere the bears, balloons and presents.


Birthday sentiment was added onto the backside of the card. Really had fun putting this Double Z Gate fold card together. Template and instructions for this style card may be purchased at Addinktive Designs. The base of this card spans 15 inches, providing lots of room for plenty of fun embellishments. 

Sunday, October 4, 2020

"PANDAstic" Birthday

My card today is a variation of the Double Z-Fold style card I created for my mother in law's birthday in my last post. The inspiration for this one comes from the very talented Bronwyn Eastley, who designs and shares some of the most amazing and fun Double Z-Fold cards on her blog, Addinktive Designs.
 
I believe Bronwyn calls her card a "Double Pop Up Gatefold Box" card, but I will simply refer to this as a variation of a Double Z fold card since its easier for me to remember.

As you can see from this view from the top,  the double z-folds create two "boxes" into which struts and pop up boxes can be added.

I added a strut to the inside of the first "box" and used a strip of clear acetate to adhere a panda with balloons to make him appear to be suspended in the air by his balloons.

A simple pop up box mechanism was glued into the "box" created by the second z fold, where I added a panda with a birthday cake. Paper pieced pandas, cake and gifts are from Marjorie Ann Designs "Panda Love" and "Birthday Girl" cutting files. Stitched balloons were cut using Craft Emporium's "Balloon Galore" die set, and an Elizabeth Craft Designs' die was used to cut the "Happy Birthday" sentiment.

I added my sentiment to the back panel. I really enjoyed putting together this variation of the double Z-fold card and am looking forward to trying another one very soon. This card is almost 15 inches long when stretched open and offers plenty of space to add lots of fun images and embellishments. I was in quite a rush to finish this card in time for our dear friend's birthday, and I see now that my finished card looks a little bare. I probably could have added more pandas, balloon, presents, and maybe some stars and confetti to fill it in and give it a more festive look.


Monday, September 21, 2020

Lantern Birthday Card

 Today's card is one I recently created for my mother in law's birthday. I knew I wanted to go with an Asian theme so I pulled out some of the Spellbinders Destination China dies I had purchased a while ago, together with all shades and textures of red and gold papers and cardstock I could find in my stash.

I really love the intricate dies in Spellbinder's Destination China collection, and although I have used the Traditional Fence dies often, this was the first time I used the Lantern set. I wanted to try to include all of the Chinese lanterns in the set on my card, but knew my card would have to be rather large to accommodate all three lanterns. 

After a little experimenting, I realized that a Double Z style card could be sized perfectly to fit all three of the beautiful lanterns. I used Stardream gold cardstock to cut the borders, the Chinese character "Shou" (for longevity) and the Traditional Fence panel. "Happy Birthday" was cut from an Elizabeth Craft Designs die.

Lanterns were die cut from metallic gold cardstock and backed with pearlescent red Stardream jupiter text weight paper. Red glitter cardstock was adhered behind the gold Traditional Fence panel.

The first lantern was attached to the front panel, and the remaining two lanterns were adhered to strips of clear acetate and "hung" on the struts inside the "box" of the Double Z card.

I found room on the back panel to add our sentiment and birthday wishes. I really enjoyed  playing  and experimenting with re-sizing the Double Z style card to meet my specific needs. Sometimes you can come up with some interesting variations just by increasing or decreasing the height or width of  a card template by half an inch or more.


Tuesday, February 6, 2018

Keepsakes from Patti

I have a couple more crafty birthday treasures to share with you today. Both amazing projects were created by none other than my dear friend Patti of Creations By Patti blog.

As many of you may already be aware, Patti is in a league above with all her paper crafting projects. This card is no exception...so beautifully done and incredibly well made with every attention to details. Patti used Lala Land Crafts Kimono Paper Doll Marci stamped image for the front of her card, so artfully colored with Copics...see the design on her kimono?...that's penned in with Copics!
Surrounding the stamped image...the circle, filigree borders, bridge, sakura and koi...all cut from Lala Land dies.


This beautiful card opens up to a stunning Z fold pop up style card. I love all the different prints of paper Patti used on this card and how they work so well together...how does she do that? Even more die cuts on the inside. I think I counted a total of 12 different dies she used to embellish this card...wow!

And as always, Patti finishes everything to perfection...look, even the back of the card is covered with layered panels of designer papers!

Ready for more? This breathtaking beauty is what Patti calls an "envelope" project. It's sort of like a double pocket file folder you might keep hanging near your desk to keep little notes in.

Patti used a newly released Lala Land Kimono Marci stamped image for this project. So pretty! Again, check out her undeniably amazing Copic coloring skills...look at the print on the kimono! 

I totally love the effect she achieved by adding color to the koi and sakura die cuts. I think I counted a total of 11 different dies used on this project!

Wow, right? I am so blessed to have someone as creative and talented as Patti as a friend. I am always in awe of her work and inspired by her...I only wish some of her amazing creativity would rub off on me some day!


Saturday, November 12, 2016

On Track for a Fabulous Birthday

Last year when my daughter and son in law took hubby and I to Disney's California Adventure Park to celebrate our birthdays, I found out that my son in law is a huge fan of the movie Cars. So when it was time to make his birthday card this year, I knew it had to be with a Cars theme. Had so much fun learning to make the Z-fold Pop Up card for hubby's birthday last month that I wanted to give it another try.

Here's what the  z-fold card looks like when it's opened.

A view from the top shows where struts were added inside the z-fold similar to the struts in a pop up box style card.

Here's paper pieced Lightning Mcqueen...

...and my son in law's favorite Mater.

Unfortunately I don't own the Cricut Cars cartridge, but happily, I found svg cutting files for the Disney Cars characters for sale on Etsy. The cutting files I purchased came from seller Clipartoon. The Disney Cars bundle included 30 cutting files for about $7, which I thought was a bargain considering the many many hours it would have taken me to make my own cutting files. From now on, I'll definitely have to remember to include Etsy in my searches for cutting files! 

To complete the scene of Radiator Springs' Ornament Valley, cutting files for the Cadillac Mountain range and the hood ornament rock formation were created in Make the Cut using some of my free hand drawings. The cactus is a cutting file from Miss Kate's Cuttables. Had tons of fun putting this card together, tho once again it took me quite a while to figure out how to put together the whole "scene". Looking forward to trying this card style again, and hopefully it will start to get easier each time.

Sunday, October 16, 2016

Right on Course

We celebrated hubby's birthday last weekend and this is the card I made for him. Hubby likes to get golf themed cards, but it's getting harder and harder to come up with something new. Been seeing a lot of pins lately on Pinterest of a new twist on the Z fold card... the Double Z fold, or a Z-fold Pop Up card...and decided to give it a go.

Here's what the card looks like when it's opened. I was especially in awe of the Z-fold Pop Up cards created and posted by Bronwyn Eastley on her blog, "Addinktive Designs". Bronwyn adds yet another twist to this card by adhering struts to the z fold inside the card, similar to the struts on the ever popular Card in a Box type card. Her Z-fold Pop Up cards are beautifully intiricate and full of little details...definitely go check them out for some amazing inspiration.

Here's a top view of the card where you can see I added Snoopy and background trees to the struts. The actual construction of the base card is really very simple, I used a video tutorial by France Martin of Frenchie Stamps for the measurements of the base card and went from there. The neat thing about this card is you can change the folding points of the z fold and the pop up strip to get a different look.  Changing the width of the pop up strip as well as moving it higher or lower on the card also changes the effect.

For my golf themed card, I used Cricut's Everyday Paper Dolls cartridge for the golf cart. Snoopy, the golf bag and trees are cutting files created in Make the Cut using coloring book images found on the internet. A Dienamics border die was used for the grass and the putting green and flag were handcut.

Had lots of fun learning how to put together this new card style, though it did take me quite a long time trying to decide where to place each design element on the card. Didn't realize until I was adhering all the pieces onto the card... Snoopy, the golf cart, the trees and the putting green... that the exact placement of each piece makes a huge difference on the total effect of this card. Found this to be a little frustrating, but intriguing enough to make me want to continue playing and experimenting with this new card style.