Showing posts with label Open Down Pop Up Card. Show all posts

Sunday, March 14, 2021

Floating Sakura Girls

I think I'll finally be caught up with posting my cards from 2020 with this birthday card I made for my Mom back in December. I was excited to ink up two Dandelion Designs stamp sets: "Sakura" and "Sakura Girls" which I added to my collection last year.


I used Copics to color the stamped images, adding a little sparkle to the centers with Stickles. Greeting on the front was computer generated, trimmed to a rectangle and backed with gold foil cardstock. I cut off most of the front of the card using Lawn Fawn's Puffy Cloud Border and attached a piece of clear acetate to replace the portion I had cut off.

I used the mechanism from Karen Burniston's Parcel Pop Up die to add some fun animation. As the card is opened...

...two Sakura Girls emerge from behind the blossoms.
Difficult to tell from still photos but the little girl in the center slowly rises from behind the sakura blossoms as the card is opened. 

Kimonos for the Sakura Girls were stamped onto washi papers and cut and paper pieced. Sentiment was computer generated, printed onto cardstock and cut to size with the cloud border die to cover the front of the pop up mechanism.The last thing I did was to attach a piece of gold foil board cut about 1/8 of an inch larger to the back, giving the card a thin shiny border all around.
I really like the fun whimsical feel of the images in this Dandelion Designs stamp set and am looking forward to thinking up other fun ways to animate the Sakura Girls.


Saturday, July 2, 2016

Do You Tsum Tsum?

Do you adore the Disney Tsum Tsum characters as much as some of my friends? Do you play the game or collect the plushies...or both? My dear sister in law does both, and I nearly fell off my chair when she revealed her huge collection of Tsums to us not too long ago. So even though I made a Tsum Tsum card for her birthday last year, I sorta figured she probably wouldn't mind another for her birthday again this year.

I used  Mickey and Minnie Tsums for the front of the card, using the same cutting files I created last year, but enlarging them a bit and changing Minnie into a "Winking" Tsum. Scalloped border was created in Make the Cut. Cupid and Amorioso fonts were used to make cutting files for the "happy birthday" and "celebrate", also in Make the Cut.

Mounted both Mickey and Minnie onto the card with wobblers to add some fun and silliness!

Front of the card opens down to reveal a simple pop up style card inside. 

I wanted to use different Tsums for her card this year so I added Daisy, Sully, Stitch, Piglet, and Alien (Toy Story). Everything went a lot quicker this time around thanks to the fantastic free cutting files so generously shared by Krafty Nook.  If you love Disney as much as I do, you'll definitely want to check out her blog. She creates and shares the most awesome fan art svg cutting files ever! Thanks to Krafty Nookthe only Tsum cutting file I had to create on my own this time was for Stitch. Everything was cut using plain white cardstock, then colored with Copic pens.

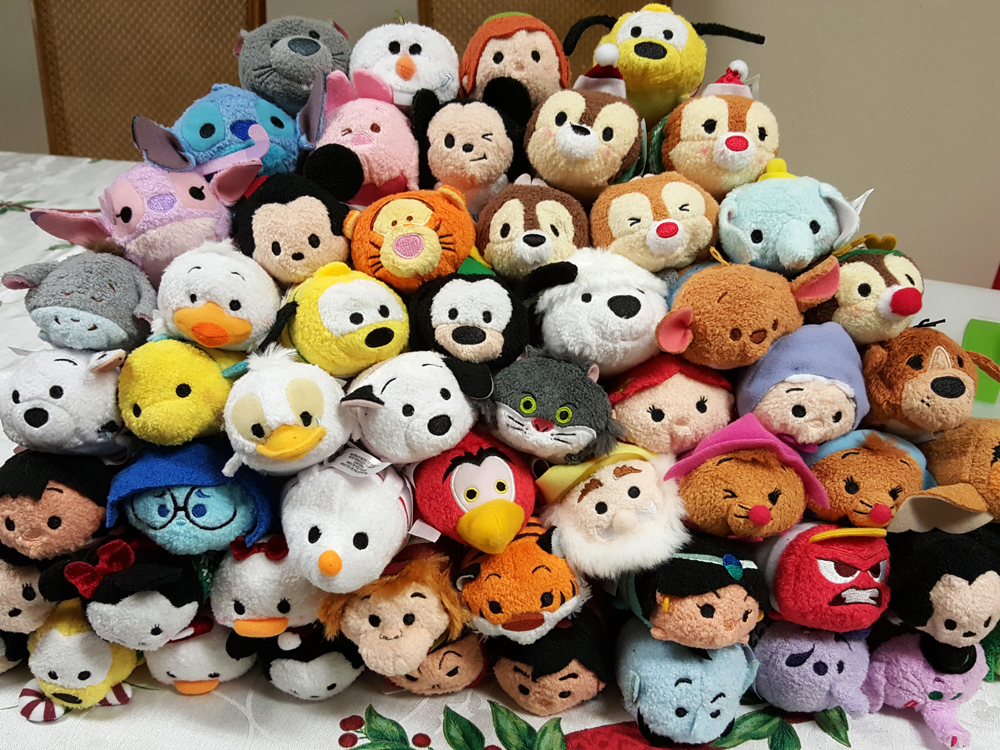
Before I close, I wanted to share a photo of just a part of my dear sister in law's amazing Tsum Tsum collection.This is probably only about a third of her collection, but this is as many as I could get to stack up and fit in my photo. Aren't they ADORABLE?!!!


Saturday, September 5, 2015

Domo Happy Birthday!

My dearest and long time friend Pat is a big fan of the mascot to Japan's NHK broadcasting company, Domo-kun, so I wanted to surprise her with some fun Domo-kun themed goodies for her birthday.

I started out by making this tiered chocolate birthday cake card. The cake, frosting and candles were created by welding basic shapes together in Make the Cut (MTC) and cut using my Silhouette Cameo. The little rosettes were cut from the Springtime Tea die from Cottage Cutz and lacey corners were cut using Spellbinders D-Lites Corner Flourish Two die. Used Stickles and a Marvy Glitter pen to add some fun shimmer and sparkle.

Made this into what I call an "open down" card...the top layer of frosting on the card keeps the card closed. Gently lifting up on this layer of frosting drops the front of the card down to open the card...

...and LOL, it's Domo-kun with frosting and candles on his head with a birthday wish!

The pop up Happy Birthday sentiment was created Make the Cut and Arial font.

And I had MTC trace an image found online to make a cutting file for Domo kun.

Next, I made this gift card holder to include as part of Pat's Domo kun themed birthday gift.


This is a trifold pop up type gift card holder inspired by Angie Leach on her blog, Too Cool Stamping. Comic Sans font was used to create the word "Celebrate" on the front of the card, and I found a cute Domo kun border online to add to the inside.

Then finally, as I was getting ready to wrap Pat's gift, I got a wild and crazy idea to decorate the box as well! I enlarged the Domo kun cutting file I had created for her giftcard to make a huge paper pieced Domo kun to add to the front of the gift box...LOL...so fun! Hoping Pat enjoyed her crazy Domo kun birthday surprise as much as I had fun putting this together!

Monday, January 21, 2013

Peeking Puppy "Open Down" Birthday Card

 I'm a bit behind on posting my projects due to the holidays. Alot of my family celebrate their birthdays at the end of the year but with all the excitement of the holidays, I haven't had a chance to share their cards till now. Today's card is the one that got sent to my daughter back in October, right before Halloween...
 
It's been awhile since I've done one of these type of cards...don't know what they're called, but I've decided to call it an "Open Down" card, simply because unlike most pop up cards that open "up" this one's a little different in that it opens "down".
The front page of this card is the layer with the two wrapped gifts. The puppy and balloons peeking from behind are on the inside layer of the card...
  
And when the card is opened "down", you see the popped up layers inside...a birthday cake and more presents! The concept is simple enough but it always takes me so long to figure out the layers and the sizing of each layer that I usually don't have the time or patience to make this type of card.  The cake is a cut from Cricut Sretch Your Imagination cartridge, balloons are from the Celebration cartridge, and the the label inside from the Elegant Edges cartridge. Bows for the gifts are a Google image search find, rendered into cut files by MTC. And of course the familiar little puppy is a MTC cutfile created from my own rendering of our Maltese.
 
Here are a couple shots from the side and top of the card showing the three layers inside and the tabs behind the layers that hold them in position, similar to a basic pop up card. I used MTC to create the shadowed layers for the card and placed each layer 3/4" in front  of the other. 
The original concept of this card is not my own, but from a Hallmark card purchased a long while ago. As mentioned before, the basic card is really simple, and in retrospect it may have been quicker and easier to simply hand cut the shadow layers on this rather than spending time creating a cutfile...will have to try that next time!

Sunday, February 15, 2009

Created with Love


This year, my Valentines Day cards for dh and dd were inspired by a birthday card I ran across while browsing the Hallmark card aisle at the drug store.


In fact, I was so amazed with this card, I had to buy it just so I could take it home to figure out how it was put together and make one too. The concept of the design on this card is actually the same as a simple pop-up card, with the pop-up element cut at different lengths resulting in a tiered card. Very ingenious, Hallmark!


For my cards, I used the Mickey Font cart and welded the letters in Design Studio to the tops of the layers for the Happy Valentines Day greeting. The photo below of the side view of the card shows how the pop-up element separates the tiers when the card is open.

On the card for dd and her bf, I used cuts from Aladdin on the Dreams Come True cartridge. In order to get the "head shots" large enough, I had to do a 12 inch cut of Aladdin and Jasmine and cut away their legs. Choosing to do a larger cut also made piecing together the face details much easier to do. The filigree heart is from the Wedding cart.

The cloud on the front of the card is from the Paper Pups cart. The sentiment was printed on vellum, attached to the cloud outline and attached with foam mounting tape. The floral embossing on the front was done with a Cuttlebug strip embossing folder and the lacy corners were punched with a corner punch from All Night Media.

My card for dh uses the same base card as for the first card; I just changed the colors and theme. The knight, princess, castle and dragon cuts are all from the Paper Dolls cartridge. The filigree heart on this card is a Sizzix Bigz die.


Making little Valentine treats is always so much fun. The cutfile for these cute gable boxes was created and shared on the Cricut Messageboard by member Robin Savage.


Thank you, Robin! You can contact her via the Cricut Messageboard to request a copy of her cutfile. I added heart cut outs to the fronts of the boxes so the yummy Dove chocolates could peek out. Finally had the chance to use my new Hello Kitty and Sesame Street cartridges! Glittered, printed cardstock for these boxes are from DCWV.


Also had the chance to make these designer or boxy bags that I've been wanting to make forever. Cambria Turnbow has a very good tutorial for them on her blog, "Stamp A Little Love, Baby". Found these bags to be really quick and simple. But didn't realize till I actually made one, how small these are. The bottom of this is 2-1/2 inches square. I needed it to be bigger to hold bags of puffed rice candy I had bought, and changing the sizes on these was very easy. I increased the size of the box on the bottom to be 3 x 4-1/2 inches. The only problem with the larger sized bags is that it takes more than 12 inches of paper to go around the bag. I ended up having to add an additional 4 inches of paper . Next time I think I'll consider using a heavy weight wrapping paper if I need a larger sized bag.


Decorated the small bags with Hello Kitty cuts and the larger bags with the Sizzix filigree heart cuts. Scalloped border on the bottom and the tab punch (since I don't own this SU punch...) for the bag closure were created with the George cart in Design Studio.


Here's a photo of the re-sized, larger designer bag and more decorated cable boxes. The height of these larger bags is 8-1/2 inches.

These are few of the tags I made....


Nestabilities for the scalloped rectangle and circle, Sizzlits die cuts for the red tag and Hello Kitty cartridge for the round tag.
This one's from the doggie...


Nestablilites for the scalloped square and Quickutz for the doggy. (Love how this die cut looks so much like our own little Latte!) Sentiment is from a dollar set of clear stamps by g studio.
One more gift card for dd, with another Cricut Hello Kitty cut. Stamped sentiment in the heart is from Dandelion Designs and embossed scalloped edge was done with a Cuttlebug embossing strip. Stamped circle sentiment on the envelope is from Autumn Leaves.


And I even had time (barely!) to bake up some lemon custard filled cupcakes, topped with lemon buttercream (thanks, Heather!)


Lastly, I sent out cards created on Hallmark.com from our fur baby with this photo. Poor thing...she doesn't look too happy, does she?


Not sure which she hated more...the ribbons on her ears or being stuffed into that little bucket...probably the latter!