Showing posts with label Thank you. Show all posts

Sunday, March 16, 2025

Thanks Sew Much!

Ever had a card you spent hours creating for someone special get lost in the mail, never to be received or seen by the person you sent it to? Such is the sad tale of this card that I sent to my very crafty aunt (who loves to sew)  to thank her for some craft supplies she had shared with me. 
  
I used Whimsy Stamps "Thanks Word and Shadow" die set to cut the shadowed sentiment for the front of the card  and embellished with die cut buttons, thimble, scissors, needle and thread from Karen Burniston's "Sewing Charms" die set.

On the inside, I used the mechanism from Karen Burniston's "Twist Flower Pop Up" die to animate the teddy bear and sewing machine in the center of the card.  As the card is opened, the panel with the teddy bear and sewing machine twists to pop forward into position.

I used Marjorie Ann Designs "Franklin's Fall Quilt" svg cutting file for the paper pieced Franklin teddy bears and larger spool of thread that he's sitting on.

Shadowed sentiment was created in Make the Cut Design program and the smaller spool of thread, scissors, and sewing machine were die cut from the "Sewing Charms" die set. Large blank space on the left side of the card is where I wrote my thank you note. I had fun putting this card together, thinking my aunt would really enjoy it. Luckily I had taken photos of the card so I could show her. We're both disappointed she never received it.

Sunday, March 10, 2024

Thank Ewe!

As much as I'd like to make my thank you cards, I always seem to need them "right now" so I end up buying them instead. For this particular instance however, I knew ahead of time I would be needing  a thank you card so I had a bit of time to put this together.

I tried to keep things simple by making use of my dies instead of the Silhouette to cut most of the elements for this card. The dies used to cut the paper pieced lambs, flowers, leaves and tufts of grass were all included in Marianne Designs Eline's Lamb die set.

Inside, I used the mechanism from Karen Burniston's Twist Flower Pop Up die to animate the lamb so she would pop forward and appear to leap as the card is opened. Couldn't resist attaching a punny sentiment "Thank Ewe" to the lamb with acetate strips so it too twists and pops forward. I used Di font and Make the Cut design program to create the cut file for the the sentiment and shadow. Kept the background very easy and simple, using Lawn Fawn Stitched Hillside Borders for the grass and tree die from Karen Burniston Tiny Trees Pop Up. I added a matted blank panel on the right side where I could write a personal message. Very happy that this card didn't take too long at all to put together... what I really need to do is make several of these to put away for the next time I need a thank you card "now".

Sunday, June 11, 2023

Panda Thank You

My card today is a panda themed thank you card made to send to a friend. The adorable panda svg cutfile I used for my card comes from designer Cat and Me Digital.
 
As you can see, I'm still having fun playing with the sliceform base template from the Lori Whitlock Shop. I love that this sliceform base can be customized and decorated however you wish, and always results in a super fun pop up card.

 
I used the paper pieced panda in the center of the sliceform base and surrounded her with many different flowers and leaves all diecut from Spellbinders Big Blooms die.


This view from the top shows the five "layers" of the sliceform base onto which decorative elements may be added. Still got a few more ideas spinning in my head that I'm anxious to try with this sliceform base...stay tuned!

Monday, January 2, 2023

"HOP"py New Year of the Rabbit

2023 is the Lunar Year of the Rabbit which promises to be a year of harmony and diplomacy with a focus on creativity and appreciation of the arts. Sounds like great year to be a crafter! 
This is the card I made to enclose my refrigerator magnet calendars and send to family and friends in celebration of the New Year. I used Make the Cut design program to cut a shaped window so the rabbit on the calendar inside could be seen on the front of the card. I also added an illustration of Japanese mizuhiki and a New Years greeting below it, using the Print and Cut function.

Each calendar was put into  a clear plastic sleeve and adhered to the inside of the card with double stick tape. I added our New Years sentiment underneath the window on the left.

I got the rabbit, pine and bamboo images to decorate my calendar from the Japanese digital image website, Pixta. Images were converted into layered svg files and cut using the Silhouette Cameo. Decorative plum blossoms and pine image on rabbit's body was done using the Print and Cut function.  

For the plum blossom backdrop behind the rabbit, I used a simple 5 petal shaped flower and ran it through Mpress Mystic Clouds embossing folder to add texture. Arial font was used to create the cut file for the "2023".Papers used include washi paper as a mat for the calendar togher with pearlescent and gold foil cardstocks for the paper pieced embellishments.


At the last minute I decided to add a recent family photo to the backside of the card, mostly since I was feeling a little guilty about not sendimg any cards out this past Christmas.These New Years cards doubled as our Christmas cards and thank you cards as well.

Before I close I'd also like to share another New Year/thank you card and a couple adorable New Year treats from friends.

This super cool NewYear card which doubled as a thank you card was designed by my dear friend, Bev. I love the pretty washi paper she chose for the front of the card and loved the fun pop up surprise inside even more! Bev used Karen Burniston's Parcel Pop Up mechanism to animate her card such that the traditional kagami mochi and tangerine rises up to the top of the "sanpo" pedestal as the card is opened... this is SO COOL! 

These two super kawaii Year of the Rabbit Daruma treat boxes were created by my sweet crafty friend, Lorna. The cute daruma with a carrot on her head held a container of white rice and the red daruma was filled with yummy Japanese candies. Of the twelve lunar zodiac animals, the Year of the Rabbit just might be the cutest of all, with so many adorable crafty possibilities!

Sunday, August 28, 2022

Gabby's Dollhouse Fabulous Flip Card

  
I made this Thank You card to send to our daughter and her family after we stayed at their home earlier this month. Our granddaughter had a week free prior to starting kindergarten, so gramma and grampa got to spend lots of time with her. While there, we learned that her new favorite animated series is Netflix "Gabby's Dollhouse" about a young girl named Gabby, who magically shrinks in size to go on adventures with her cat friends.


Just for fun I wanted to try to recreate Gabby's Dollhouse using a card style similar to Sam Calcott's four shutter "Fabulous Flip" Card as the base.

I used Make the Cut Design Program and a coloring page image of the dollhouse to create a layered cutting file for the kitty roof. After watching Sam Calcott's video tutorial for her 6x6 Fabulous Flip Card assembly, I made a template with a similar mechanism for my card. I imagined each of the shutters to be windows of the dollhouse and added clipart from Etsy of the different characters onto the shutters.


As the frame on the front of the card is pulled to the left, the shutters swing open to reveal images of four more of Gabby's kitty friends and a sentiment underneath on the right.  Still having so much fun making these Fabulous Flip cards!

I also want to share these box cards and paper pieced princesses my granddaughter and I had fun working on together during our stay.


The castle box card is from the Box Card SVG Kit from SVG Cuts, the Box Card Ice Cream Truck is from the Lori Whitlock Store, and the princesses were paper pieced from Karen Burniston Princess and Mermaid die set. I had precut all the pieces and made kits with pictures of the completed projects. It felt so satisfying just sitting there, crafting with my granddaughter! Looking forward to the next time we can work on more fun projects together.

Sunday, January 31, 2021

New Years Greetings and Holiday Thanks

Today I'm sharing some of the amazing paper crafts I recently received from creative and crafty friends.
 
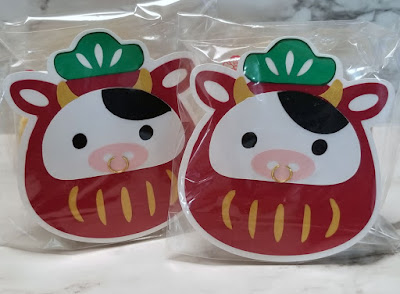
My dear friend Lorna has been making these super kawaii paper pieced Chinese zodiac daruma dolls to celebrate New Years for the past few years now. And this year's Year of the Ox daruma might just be the cutest one ever!

I thought it was so clever that she used a jewelry jump ring as the lead nose ring for her ox. Lorna slid her paper pieced Ox into a clear cello bag together with a yummy Japanese senbei (rice cracker) treat.

This clean and simple New Years card was sent to me by Patti of Creations By Patti blog. Don't you love how she makes clean and simple look so elegant and classy with the addition of rhinestones and glitter?
These adorable thank you cards were created by talented paper crafters Karen of Have A Scrap Happy Day and Patti of Creations By Patti blogs.

Karen used a stamped image from Little Miss Muffet Stamps colored with Copic pens to create her thank you card. Isn't this little bonnet girl just the cutest ever? 

This die cut and paper pieced shaker card from Patti is beyond cute! She used Lawn Fawn's Stitched Mug Frame die to create her shaker cup and spoon, and added a paper pieced peeking Hello Kitty, kicking the cuteness level up by several notches for sure!
I apologize that I still haven't had a chance to post Christmas crafts from December, but hope to eventually do some backposting for December as time allows. Will let you know when that happens. Thanks for your patience!


Sunday, January 19, 2020

2020 New Years Cards


In celebration of the Year of the Rat, I put together a dozen of these New Years cards which also doubled as my holiday thank you cards.

Inspiration for my card comes from a Japanese website, Illust Box which offers its users lots of  freebie templates and ideas for printing "nengajo" or Japanese New Years postcards. I designed a cut file using Pharmacy true type font (for the numbers) together with a silhouette image of a Japanese ceramic mouse shaped bell from Illust Box to create a stencil-like cut out front for my card.

The text, "Year of the Rat"was printed onto plain white cardstock and I used the print and cut function in Make the Cut design program to cut out the 2020/Rat design. Below the stencil cut year, I added a strip of washi paper backed with gold foil cardstock as an accent.

I used red pearlized cardstock for the inner card and added my greeting together with another freebie printed image, also from the Illust Box website. Gosh, I barely got these in the mail last week and already Chinese New Years is less than 7 days away! See you next week...

Sunday, December 15, 2019

'Paw'sitively the best!

Here's a quickie card I recently put together for our furbaby's sitter to thank them for all the wonderful care and love they give to our Latte whenever we are away on vacation. The stencil paw print border was cut onto the top panel using the Silhouette, then adhered to a red card base. An Elizabeth Craft Design die was used to cut the "Thank You".

On the inside... another pop up dog card! I got the original template cutting file  for this card from the Lori Whitlock store, and have had so much fun using it to make a pig, a  Halloween cat, a Shiba inu, and this time our Maltese furbaby.

For the Maltese head, I used the "Dog Collection 2" cutting file from Treasure Box Designs. I believe that file has been discontinued, but there are several other very cute doggie cutting files there. I used the paw print embossing folder from Sizzix' Build A Bear set and lightly inked it a brown VersaMagic ink pad  to add some color to the paw impressions on the inside panels of the card.
I continue to love the versatility of this fun pop up card, you could easily transform it into any four pawed creature... lions, bears, and tigers, oh my!

Monday, September 23, 2019

Pet Sitter Thank You

 Here's a super quick and easy window card I recently put together to thank our dog sitter for caring for our furbaby while hubby and I were away on vacation.

All layers for this oval window card were cut on the Silhouette Cameo. I used Lala Land's Filigree Corner die for the fancy corners, and cutting file for the little paper pieced puppy, crown and pillow were created in Make the Cut Design Program. Sentiments were added to panels using Scrap Casual font and print and cut function.

On the inside I added a castle in the background... so fitting for a spoiled doggie, wouldn't you say? And so true that, because her sitters always give her so much lovin' and care that we sometimes worry that she might not want to come home!

Sunday, July 14, 2019

Thanks for Being PAW-some

Here's a quickie thank you card I put together for our furbaby's sitter just before we went on our vacation last month.

Paper piecing cut file for my puppy is from Treasure Box Designs' Dog Collection 2, which unfortunately, has long been retired, but continues to be a favorite of mine. There's still a large collection of newer puppy cut files to be found on the site, so be sure to check it out.

Once I had the puppy assembled, I mounted her onto a piece of cardstock that had been run through a Sizzix Pawprint embossing folder from their "Build A Bear" set to add texture. Sentiment inside the card is computer generated using LD Charming Light and CK Journaling fonts and pawprint clipart.

Sunday, November 11, 2018

Hidden Message Thank You Card

The day before we left on our trip I was all packed and had some extra time so I decided I would try and make a thank you card for our dog sitter who would be caring for our furbaby while we were away. It's been awhile since I made a Hidden Message style card so I decided to try one again, keeping the embellishing to a bare minimum.

Paper pieced puppy holding the heart is from the "Puppy Love" cutting file from Little Scraps of Heaven Designs. I find myself using this cutting file quite often because it reminds me a lot of our own dog, Latte.

Pulling down on the pull tab at the bottom of the card reveals a "hidden message"  which appears above the doggie's head as well as one on the bottom slider piece. This fun surprise slider card is really a simple one to put together once you see how it's constructed. I used the tutorial by Beate Johns on Splitcoast Stampers found here.