Showing posts with label Easter. Show all posts

Thursday, April 9, 2026

More Easter Treats!

A few days past Easter already but definitely want to share these amazing Easter goodies I received from crafty friends this year.
 

Kris put together this super cute puppy with bunny ears shaped box and filled it with my favorite chocolate Easter candies. Shaped boxes like this one with so many curves and angles take lots of  time and precise gluing to assemble! She even added a window to the carrot so you can get a peek of all the goodies inside!

This Winnie the Pooh with bunny ears basket created by Lorna is absolutely adorable! Cuteness overload from the honeybees on the bow at the top and down to the "Hunny bunny" sign Pooh is holding. The design of this basket is very unique; Lorna created a box base with just a bottom and two side panels, then wrapped and glued the double sided Pooh bear cut out around it.

Lorna also made this irresistible little Peeps S'Mores basket. Tucked inside the basket are everything you need to make a yummy S'mores snack: an individually wrapped Marshmallow Peep, a mini chocolate bar and graham crackers! Instructions on how are on the backside. So cute and clever!
I'm truly fortunate to have such creative, crafty friends who always spoil me with all the fun things they make!

Sunday, April 5, 2026

Just in Time for Easter


 Happy Easter! I made a card to send to our granddaughter and cookie boxes to share with family to celebrate Easter this year.

Finally had a chance to play with my set of Lawn Fawn "Build A Bunny" and "Build A Bunny Accessories" dies to make the bunnies for this Easter card. Die cut Happy Easter greeting comes from Karen Burniston "Easter Charms" set and I used Karen Burniston "Curved Edges" dies for the grassy hillside.
Inside the card, I added a sliding gift card mechanism which I learned from watching video tutorials by Sam Calcott of Mixed Up Craft on You Tube here and Sarah Davies of Crafter's Companion here.

Here's a short video showing this sliding mechanism in action.

 As the card is opened, a panel holding the gift card slides out from the bottom.


The sliding mechanism for this card is really simple to put together and no special dies are required. The only thing that bothered me a little is that the sliding mechanism (shown here) is part of the back of the card and very visible; there is really no way to hide or disguise it.


At the last minute I decided to put together these Easter cookie boxes to share with friends and family.

The original cutting file for the top of this box was a freebie I picked up from Dreaming Tree at Creative Fabrica. This was meant to be a box style card, but I made a few adjustments to the cut file so I could use it for the top of my cookie boxes.

I wanted to use a hinged lid for my cookie boxes so I first enlarged the outer "box" of the card to fit around the lid of the cookie box. I then cut the height of the two struts that hold the bunny and tulips by 0.5 inch so it would sit nicely on top of the lid.
I also added a round scalloped label with "Happy Easter" printed on it just above the tab closure for the box.

Not enough time to even bake cookies so I filled my boxes with our favorite decadent Palm Leaf cookies from a local bakery. 
Hope everyone is spending Easter doing whatever you enjoy most! 

Friday, April 25, 2025

Bunnies Galore

Although Easter has come and gone, I have one last project: a card shared with friends at a crafting get together, and some Easter treats from my crafty friends to share today. 
As you can tell from the bulging card in the photo, this card turned out to be quite bulky so I decided to use a belly band which doubled as the decoration for the front of the card to keep it closed.

The pop up inside is made up of several layers of stepped and angled panels... lots of places to add lots of different embellishments! For my card I used lots of bunnies and chicks created using dies from Eline's Collectibles Baby Bunny and Chicken Family die sets. Also used dies from Karen Burniston Easter Charms and Spring Animals sets. Spellbinders Club Blooms die set was used to cut the flowers.


Views from the top and side show the three steps and six angles that make this pop up. The idea for this card comes from Sam Calcott of Mixed Up Crafters. She calls this a Pop Up Picture Panel Card and provides all the instructions and measurements needed to recreate this type of card on her You Tube Channel, here

As much as I liked the overall look of the pop up in this card, I didn't care too much for the resulting bulkiness. I'm sure that including so many embellishments, each being made up of several layers of cardstock added to the thickness. I did another test version of this card earlier using only flat  images and it turned out a lot flatter, so I may try a similar card again later. 
This was the only Easter card I made this year so it was mailed to our granddaughter. Hope she liked it!   
The Easter Bunny didn't stop at our home this year but happily I have crafty friends who shared their special creations for the holiday.

Sweet friend Kris made this adorable bunny treat holder filled with chocolates and wrapped it up in a very cool cellophane treat bag that's printed to look like a basket. So cute!

Dear Lorna cleverly origami folded a kawaii bunny basket and also this fancy Easter Egg holder with ears. She added cute bunny faces and wrapped each in cello bags with the cutest Easter toppers.
Thank you for stopping by for a visit today. Hope everyone was able to relax and enjoy Easter.

Sunday, April 20, 2025

Bunny Treat Boxes

In addition to the cookie boxes I shared in my last post, I also had enough time to put together two kinds of bunny treat boxes to share with friends and family for Easter.

Inspired by all the very cute and creative Easter treat boxes posted online made by others, I put together this very simple bunny treat holder using the cut file for a bunny from a shaped Easter Bunny Card designed by Lori Whitlock.
By welding a mirror image of the bunny to the original with a rectangular gusset, and by adding two holes to the necks, I was able to place a small cello bag of treats in between and secure it in place with  ribbon tied into  a bow. And of course I couldn't forget to add a pompom for a cute bunny tail.

My second bunny treat box is not really a box, but a "Bunny Candy Wrap" from My Scrap Chick, which was originally designed to hold a 1.5 oz Hershey Chocolate Candy Bar.

I saw a post on their Facebook page where crafters had decreased the size of this template to hold smaller sized candy bars and decided to try changing the size too. Instead of a bar of chocolate, I wanted make mines to hold Yoku Moku Cigare cookies so I enlarged the template to be taller and deeper.

Bunny's bow tie serves as the belly band that keeps the wrap closed.

By enlarging the wrap, I was able to fit three cookies to into each holder. I especially liked that these came together very quickly because no gluing was required to create the wrap.                                         I had fun putting together 15 sets of the two Easter treat holders; the later Easter date gave me extra time to spend crafting. Did you know the day Easter's falls on each year depends on the moon cycle? It won't be for another 5 years for Easter to be late in April again. Next year Easter falls during the first week of April so I may not be as productive! Hopefully I'll remember to start planning early.

Sunday, April 13, 2025

Easter Bakery Boxes

Made cookie boxes to share with a group of ladies with whom I've been friends with since high school. We try to get together once or twice a year to share a meal, touch bases and have fun reminiscing. There's a lot of conversations about travel, grandkids and especially, "Oh! Do you remember when...?"

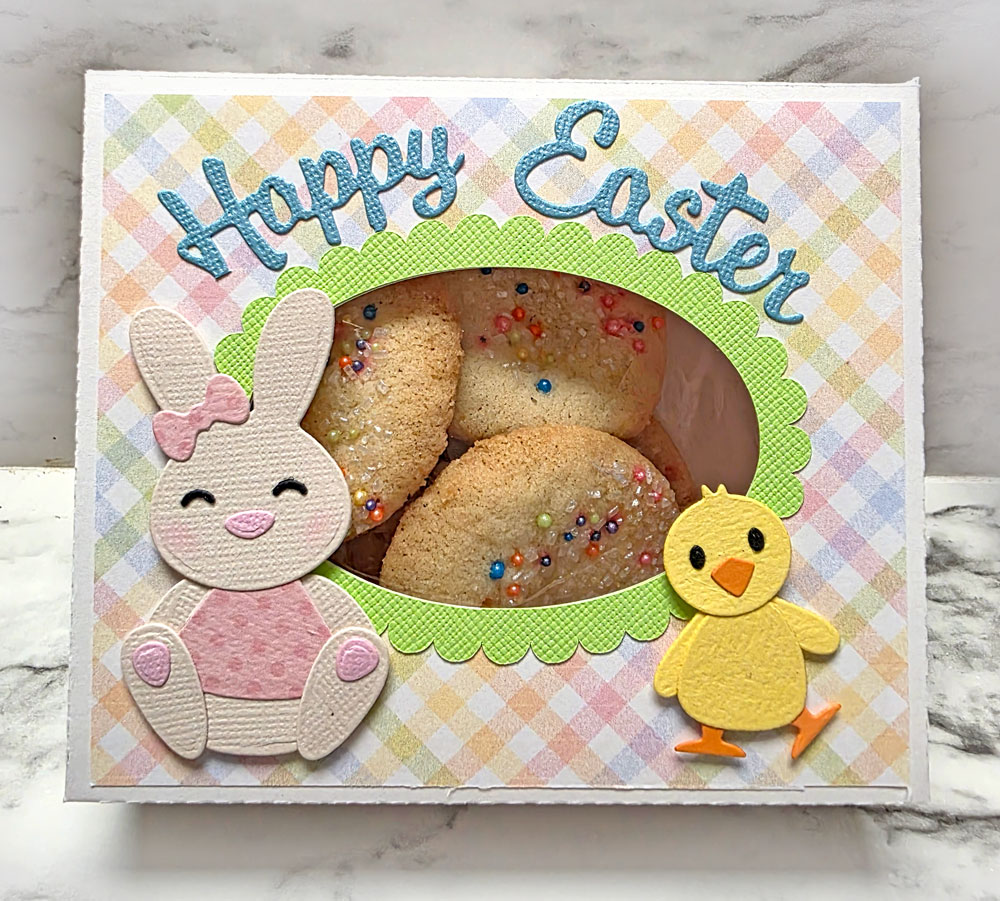
With Easter just around the corner, I thought it would be fun to make Easter themed cookie boxes. I found a great tutorial for designing easy templates for hinged lid boxes of any size by Dr. Sonia SV on her blog "Cards and Crafts"  I created my template in Make the Cut to make boxes, 5" x 4.25" with a depth of 1.5" and a capacity to hold half a dozen medium sized cookies. I added an oval window on the lid to make them look like those bakery boxes that show the cookies inside.

I started decorating the box lid with a pastel plaid digital paper from the Happy Easter Digital Paper Pack by Printable-Cuttable-Creatables. Marianne Designs Eline's Chicken Family and Baby Bunnies Collectable dies were used to piece together the bunny and chick; and Happy Easter was die cut from Karen Burniston Easter Charms Set. The oval scalloped window frame was created in Make the Cut by welding circles around an oval shape.
Put together eight of these boxes, filled them with butter cookies and wrapped them in cello bags cinched with a tulle bow. These were fun to make! With Easter falling late in April this year, I had fun crafting to my heart's delight... more to come!


Sunday, March 31, 2024

Cracked Egg Treat Box


While searching online for ideas for Easter treat boxes, I came acorss this cracked egg box design which I thought would be fun to decorate.

But since I wasn't able to find a template for it, I decided to wing it and try and create my own by welding some basic shapes (ovals, squares, triangles) in Make the Cut Design studio. 

Welded rectangle shapes to the design to create gussets and enlarged the template to maximum size that would fit onto a 12 x 12 sheet of cardstock. It's always nice when I can get the entrire template to fit onto one piece of cardstock so the box assembly goes quickly. Happily, the finished box size was large enough to hold half a dozen butter spritz cookies.

Had fun die cutting and paper piecing bunnies, chicks, baskets and eggs to create a fun little Easter scene for the front of the egg box. I used dies from Maryanne Designs "Eline's Bunnies" and "Eline's Chickens", Karen Burniston's "Spring Animals", Sizzix "Eggs and Decorations #2", and MFT Stamps "Grassy Edges". I always love it when I make use of a lot of different dies to create a project so I can confidently assure hubby that I'm not "just collecting" !

Lots of room on the back of the box for a print and cut inset panel using cute digital paper from Nancy Kubo's Hunny Bunny Paper Pack.

Got a dozen of these boxes filled with cookies and chocolate eggs, wrapped and ready to deliver just in time for Easter. Hope everyone had a relaxing and enjoyable Easter Sunday!

Bunnies and Chicks Galore

I recently watched a tutorial on YouTube on the assembly of Lawn Fawn Platform Pop Up cards using coordinating add on dies and was inspired to try a similar idea to create an Easter card for our granddaughter using the svg cutfile I've been using to make hexagonal pop up cards.

The hexagonal pop up cards I've made in the past have had six equal sides, but this time I altered my cutfile to create a hexagon shaped card that was nearly twice as long in the front and back than the sides. I also replaced the large round panel I usually attach to the center strut with a larger hinged panel adhered to the back.

I really liked the new look of  the hexagonal pop up card with the larger back panel which gave me a lot more space on the front of the card to create a fun Easter scene. 

 I used my Silhouette Cameo to cut the pieces needed to construct the card base, and dies from Karen Burniston, Sizzix, and Maryanne Designs to cut the pieces needed to piece together the bunnies, chicks and scene elements.

Lots of room on the back of the panel to add our sentiment.

    
I think the neatest thing about the hexagon pop up card is how it folds completely flat for mailing. I intentionally increased the size of my card so I could fit several bunnies and chicks on it so the card measures 7.75 x 8.25 inches flat...huge!

I also made a fun matching gift card holder to tuck into the box of Easter surprises we mailed to our granddaughter.

As the drawer to this box is pulled open to reveal the gift card inside,  the panel on the top of the box with the bunny and balloons slides up. Svg template for this pop up drawer comes from the Lori Whitlock Shop. This little box is so much fun and surprisingly easy to assemble. I'm certain I will be making more of these in the near future!

Sunday, April 16, 2023

More Easter Goodies!

 Easter has already passed but I want to share some of the very fun and creative Easter treat boxes my crafty friends created.

These kawaii Easter Bunny Daruma were put together by my sweet friend Lorna. Lorna made these in pretty pastel colors to share with her Bon Dance Club friends. She attached individually wrapped Boba Mochi treats to the backs of each paper pieced Bunny Daruma. Now that's a creative Easter treat idea with an Asian twist!

This pretty Spring Lantern Basket was also designed by Lorna. She used a svg cut file template for a pumpkin shaped box from the Lori Whitlock Store which she very cleverly altered. By adding a top and base, she transformed a pumpkin box into this lovely paper lantern! The cherry blossoms embossed on the side panels together with the addition of the delicate cherry blossom embellishment and rabbit gift tag really makes this a wonderful "Chochin" (Lantern) basket perfect for celebrating Hanami or Cherry Blossom Viewing Festival in Japan.

This mini pizza box style Easter treat holder was put together by my dear friend, Lori. Love how she decorated the lid with an almost 3D image of this irresistable little bunny. Inside the box is divided into two compartments; filled with candy on one side and a purse sized bottle of hand sanitizer on the other.

My crafty friend Kris shared this pretty egg shaped window treat box. This classic treat box from SVGCuts is a holiday favorite with it's pretty lid and fun peek a boo window giving a sneak peek of all the goodies inside.


These two Carrot House treat boxes were also created by Lorna. I love the idea of Easter Bunny living in a carrot shaped house, and love even more that Lorna was able to create the idea into treat boxes! SVG template for the carrot shaped lidded box on the right comes from Studio Illustrado at the Silhouette Design Store, and I believe the inspiration for smaller carrot house on the left came from an illustration.I hope you enjoyed seeing some of the fun and creative treat boxes shared and created by others and hope they may have inspired you to get crafty too.