Showing posts with label Christmas. Show all posts

Sunday, December 24, 2023

Christmas Tree Lanterns

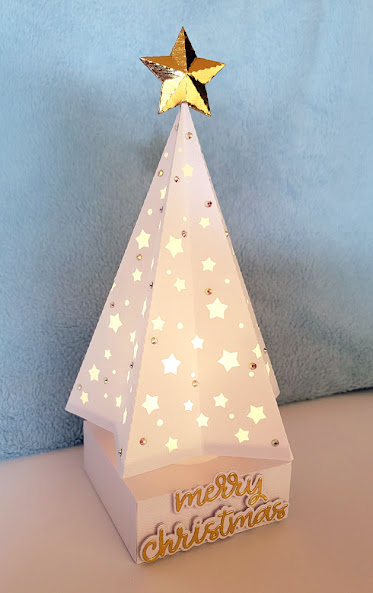
I put together these Christmas tree lanterns or luminaries to be used as gift card holders to give to friends and family this holiday season. 

The original svg template for the tree and star for this project was designed by Makamo Creations. I sized the template to as large as I could cut from a 12 x 12 sheet of Diamond Bazzill Bling cardstock and glued vellum panels inside.  I should mention that I also added a few extra star cuts on each panel of the tree to maximize the lantern glow. Once cut, the tree itself was very easy to fold and assemble; the gold star on top: not so much. Since I knew I would be needing a place to include a giftcard, I added a tree trunk and a square box as a base for the tree to stand.

The 3D star tree topper was probably the most challenging part of this entire project for me. The gold metallic foil board I chose to use was not very pliable and although I watched in amazement how the designer assembled the star using a hot glue gun in the tutorial, I knew there was no way my fingers would be able to stand the heat. Instead I opted to use Beacon 3 in 1 adhesive because I knew I'd be able to wipe off most of the excess glue mess with Un-du adhesive remover. I also glued several  flatback crystal gemstones in two sizes to each tree to give the tree some sparkle.

I made a cylinder from cardstock and attached it over a circle I had cut in the bottom of the tree for a tree trunk. This trunk was then glued  directly over a circle I had cut on the top of a square box for the base of my lantern. Gold foil board and glitter cardstock cut with Photoplay's "Merry Christmas" die was used for a glittery shadowed greeting and adhered to the front panel of the base.

Here's a view inside the box base with the flap lid open. Adding the cylindrical trunk and box created a place to easily access the on/off switch to the flameless candle for the lantern as well as a place where I could enclose a gift card.


These are the enclosure cards I made to hold the gift cards I placed in the base box of the Christmas tree lanterns. The front of the card is a piece of white cardstock hot foiled with Papertrey Ink's "Cascading Dots" plate which was layered on top red and green metallic foil board. Spellbinder's "Sealed Twine" die was used to cut the faux twine border from gold foil board and I added red and green  Merry Christmas wax seals. I used a Marvy Uchida DecoColor gold paint pen to color the impression on the seals.

This is what the Christmas tree lantern looks like with the flameless candle turned on. 


After wrapping thirteen Christmas tree lanterns in cellophane and gold ribbon, these tags were tied on.  I used the foiled cardstock left over from making the gift card enclosures, matted on gold foil board. Simon Hurley's "Joyful Christmas Sentiments" plates and dies were used to foil and die cut the sentiments. Inside, the tags included instructions to each recipient on where they would find the on/off switch to the lantern as well as their gift card.

Saturday, December 23, 2023

Holiday Packaging for Chex Mix

I used the same paper pieced reindeer head and body svg file that I used to decorate my treat boxes (see previous post) to decorate these trays to hold bags of Chex Mix we made to share with family and friends.
 
Since these packages of Chex Mix were considerably larger than the packages of puffed rice, I opted to simply make a tray with front and back panels for the  Chex Mix to sit in.

I used the same tag idea I used for the smaller reindeer boxes, with small changes in the wording.

We filled smaller window mylar bags with Chex Mix for hubby's golf buddies.

 It's nice that these red mylar bags looked festive enough so all that was needed was to attach a fun gift tag. Found a cute clipart image of golfing Santa on Etsy to use for these.

Sunday, December 3, 2023

For My "Deer" Friends

My first Christmas project of the season was a dozen of these reindeer treat boxes, made to share with friends at a holiday dinner get together.
 
Inspired by the many cute reindeer face images I saw online, I tried to create something similar in Make the Cut Design studio. I knew I would be putting puff rice treats in my boxes so I created the template for a flap style treat holder that would be just the right size for one package of puff rice treats.

The treat boxes were designed with a tuck in front flap closure. I glued the paper pieced reindeer heads onto this flap so the treat boxes could easily be opened simply by lifting up reindeer's head.

For a fun final touch, I created a "punny" print and cut gift tag and matted it with glitter cardstock to add to the front of the box. Tiny hearts were cut using a Carla Craft mini heart punch and the dies for the candy cane are from Karen Burniston's Stocking Pop Up die set.

Saturday, December 24, 2022

Gingerbread Explosion Box

Those who know me well know that I would pick crafting over Christmas shopping any day. That's why practically everyone on our gift list (except my mom and our granddaughter who give us their wishlist) gets giftcards from us at Christmas. That may sound like a boring gift, but at Christmas I make every effort to make giving and receiving giftcards fun for me as well as the recipient.

The giftcard holder everyone received from us this Christmas was this gingerbread house explosion box. The basic pattern for the gingerbread house was adapted from a Birdhouse Explosion Box cutting file I picked up from My Scrap Chick. The decorative elements on the inside and outside of the house were created from a collection of new and old svg cutting files from Doodlebug, My Scrapchick and Lori Whitlock as well as a few old dies from Taylored Expressions and Quickutz. Not showing up too well in the photos but everything "snow" was edged with Stickles glue to add some sparkle.

Lifting the roof (lid) off the house"opens" the explosion box. I left one corner of the box attached so I could create a corner of the room to add a fireplace and window. I added pockets for the giftcards to the other two sides of the box that opened flat. 

It was so much fun decorating the inside of the box with fun little details like rhinestone ornaments on the tree, stockings on the chimney and the silhouette of santa and his reindeer in the window.

I used a Doodlebug print and cut clipart from the Lori Whitlock store to create giftcard holder inserts to slide into the pockets.

Doodlebug gingerbread girl clipart from the Lori Whitlock store was used to create these hang tags for the gingerbread houses.

Final step: wrapping in cellophane and red gingham ribbon. I amazed even myself that I was able to complete a dozen of these in time for Christmas! Happy Holidays!

Friday, December 23, 2022

Holiday Treats

After baking up two batches of Chex Mix and putting them into resealable mylar bags, I tried to give the bags a festive look by dressing them up to be little penquins.
 
The paper pieced cutting file for the penquins is called "Penguin Sweet Treat Belly" from My Scrap Chick, and is originally intended to be an adorable little treat holder for small candies like individually wrapped Ferrero Rocher chocolates. 

I used the same file but enlarged it to size large enough for my bags of Chex Mix to fit and used double stick tape to securely adhere the front and backs of the penquin to the bags. 

Greeting in red on penguin's tummy was done as a Print and Cut, and I added a glittery punched heart to add a little fun bling. I put together a colony of two dozen penguins and I was glad that they all came together pretty easily. 

I also made a couple batches of Prune Apricot Mui to share with family and friends. 

This sweet, sour and salty fruit snack of dried plums and apricots marinated in lemon juice and scotch whisky is a favorite here in the islands. After packaging into sealed plastic containers, I labelled them with this fun "homemade with love" panda label using Print and Cut on sticker paper.

I think sharing homemade goodies from the kitchen is always even more fun when I can think of  cute ways to package them!

Sunday, July 25, 2021

Christmas In July Gift Tags

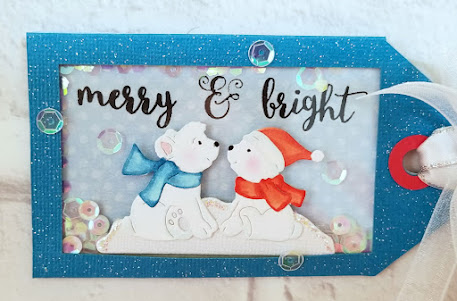
After feeling so much satisfaction from making Christmas tags in July for the first time last year, I convinced myself to give it a try again this July. I used the same tag svg cutting file I had created for my Christmas shaker tags last year but changed the colors and the image.

I chose to use nontraditional Christmas colors that are actually a better match for my blue foil holiday wrapping paper this year. Couldn't find any cute Christmassy stamps in my stash to use on my tags, so I decided to use this pair of die cut polar bears from Cottage Cutz' "Polar Bears with Birch Trees" instead. Inside the shaker I added iridescent clear and white sequins together with Recollections "Glitz" chunky glitter.

Polar bears and their hat and scarves were cut from plain white cardstock and quickly colored with Copic pens. Love that after coloring the scarves and hats, all that was needed was  a few quick strokes with the lightest shades of grey, pink and blue to add shadows and highlights to the bears. I die cut the bit of snow they're sitting on from textured pearlescent cardstock and added some Stickles for some contrast so the bears wouldn't disappear in the snow.

Instead of my usual computer generated sentiments, I stamped the words on my tags this year, using a mix of stamps from Kwellam's "Christmas Wishes", Waffle Flower's "Classic Sentiments" and Scrappers Den's "Christmas 1" sets. It took me a few days to put together a dozen of these, and the feeling of accomplishment afterwards was so satisfying! I even went as far as planning the layout for our family Christmas cards and ordering the photos that will be included in them already. Wow! Hopefully my unprecedented early start on Christmas projects will make the holidays a lot less stressful this year.


Saturday, December 26, 2020

Crafty Holiday Treasures

2020 was a year that we'll all likely remember for a long time. Things weren't always easy, and probably many, including myself found solace immersing ourselves in our hobbies. Maybe that could  explain the huge amount joy I felt in receiving so many wonderful handmade treasures this Christmas.


My long time friend Bev always wows us with her handmade Christmas cards, and this year was no different. I love the beautiful and intricate holly/star swirl design she used for the front of her card, not to mention her paper and color choices. 


But the best part of this "Peek A Boo" style card happens as you open it... the "Happy Holidays" sentiment in the window disappears and is replaced with a photo collage of Bev and her family engaging in a virtual meeting. With travel restrictions in place everywhere, many of us, including Bev and her daughters, could only spend time together "virtually". What a wonderful idea to use screenshots for her  holiday photo collage!

My always amazing crafty friend Lorna outdid herself again with this super creative tropical Sand "Snow"man under a coconut tree. 

The coconut tree is actually a tall box filled with candy canes and chocolates! And how adorable is this little "sand man" with his cool hat and shades and even a string of Christmas lights!

This adorable bonnet girl Christmas card and super kawaii Dandelion Designs kimono girls coaster magnet calendar were put together by my very special blogging pal, Karen of "Have A Scrap Happy Day" blog. Karen has made it a holiday tradition to send out her beautifully designed stamped cards and coaster magnet calendars every year. In fact it was she that inspired me to start making my annual Chinese lunar animal calendar magnets too.

How cute is this Hello Kitty snowflake ornament?!!! This meticulously paper pieced Hello Kitty angel was created by my dear friend Claire. I apologize that my photo does not fully capture all the intricate little details of this project, from Hello Kitty's garland of teensy. tiny flowers to her glittery little halo, dress and wings. Claire attached her Hello Kitty angel to a sparkly resin ornament topped with a shiny gold bell... cuteness overload!

This pair of handcrafted treasures was created by my sweet and crafty pal, Kris. 

This  super adorable fuzzy teddy bear with his watermelon is a "tear bear", which Kris created by layering and adhering many tiny pieces of felt together... truly amazing, right? After piecing her teddy bear together, she adhered him to the front of a notepad holder. Imagine this, a notepad with a mini plushie on it... love it!

Kris also put together this delightful matchbox Santa giftcard holder. I especially liked that she used glossy enamel dots to give his eyes that special twinkle! SVG cutting file for this adorable giftcard holder can be found at the Lori Whitlock store.

Here's a fun vintage style shaker card that was sent to me by my super creative blogging pal, Patti, of Creations by Patti blog. Did you recognize Siren, the two tailed mermaid in the center of the shaker of "snow" beads?

Yes, of course you did! That's because all the "patterned paper" that adorns this amazing gift card holder was cut from an actual Starbucks cup. Very clever, and so beautifully put together... definitely a keepsake piece!
Thanks for stopping by! Hope you enjoyed seeing the fun creations put together by some of my sweet crafty friends and that you may have been inspired by them as I always am. 

Friday, December 25, 2020

Holiday Gift Card Tree Boxes

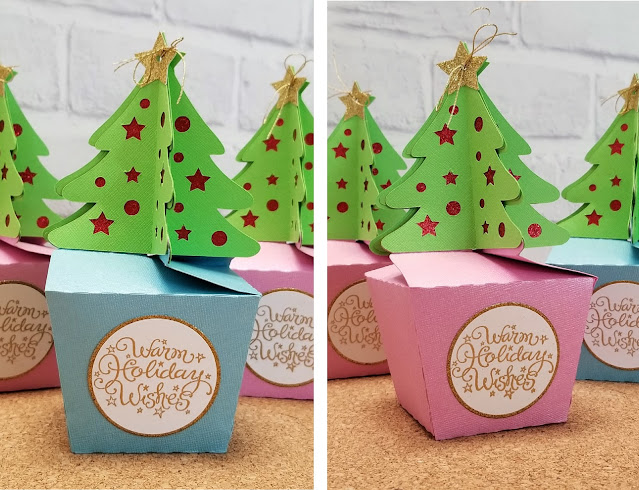
 I put together a little over a dozen of these little tree boxes to use as my gift card holders for nearly everyone on my gift list this Christmas. 

Designed by Pebbles In My Pocket, the svg cutting template for these boxes can be found at their Etsy Digital Store. To be certain I 'd be able to get my giftcards to fit, I enlarged the template for the box as large as possible to fit onto a 12 x 12 mat.

Before cutting the trees, I joined various sized star and circle svgs to tree template so it would cut out as little stencils on the tree. I then added red glitter paper to the backs of the trees so it would show through the front as glittery round and star shaped ornaments on the trees. Then I added another tree shaped layer of green text weight paper to sandwich the glitter paper and box tabs in to give everything a cleaner look.

It takes four tree cuts standing back to back and meeting at center folds to create the desired 3 dimensional tree and keep the box closed. However, since my tree cuts were 3 layers thick, I couldn't get the trees to stand snug enough in place to keep the box nicely closed.  After a bit of fiddling, I ended up punching a hole in the center of the star, threading and tying a length of gold thread into a tight bow to keep the tree sides snug and the box closed.
I stamped and heat embossed a Christmas sentiment from a very old Inkadinkado stamp set in gold metallic powder and backed it with gold glitter paper to create the labels for the front of the boxes.


These pop up gift card holders were put together from a tweaked cut file of a Christmas card created by my dear friend Kris a few years ago. 

After the gift cards were put in the boxes, each was wrapped in a cello bag tied with gold ribbon. The final touch were these very simple round tags with a cut out tree and gold star. I really liked the finished look of these tree boxes and hope everyone enjoyed getting them as well.