Sunday, July 30, 2023

Photo Collage Wedding Card

We received a beautiful non traditional photo wedding invitation recently, and I couldn't resist creating a wedding a card for the couple that matched their invite.

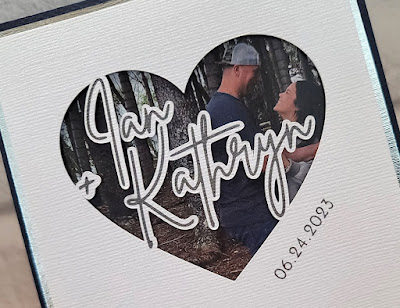
The original wedding invitation we received was an elegantly understated double sided postcard style with photos of the couple and their names scribbled in a large handwritten font.  I decided to use the main photo from the invitation on the front of my card, placing it behind a heart shaped window frame. I then scanned the "word art" of the couple's names from the invitation, created a print and cut file for it, and welded it into the window. I kept with the same color scheme of the invitation, using dark navy blue, silver and grey.

On the inside, I used Karen Burniston's Photo Collage Pop Up die to create a fun, non-traditional, interactive wedding card. Hard to tell from the photos, but I used white glitter cardstock matted with silver foil board for the inside panels to give a subtle shimmer. Tiny heart embellishments were cut from silver glitter cardstock.

I had so much fun putting this wedding photo collage card together.  The recent trend of  couples sharing photos on their wedding websites and invitations makes it fun to create personalized cards such as this.

Sunday, July 23, 2023

Hexagonal Pop Up Birthday Card

I have another Hexagonal Pop Up Card to share today. This one was created as a birthday card for a very sweet friend and decorated with partying teddy bears.
 
I used the Cottage Cutz Celebration Cake, Karen Burniston's Birthday Charms, Taylored Expressions' Celebration Confetti, and Craft Emporium's Stitched Balloons dies for the cake, balloons and confetti on the round panel in the center of this card. 

Paper pieced teddies were cut using Marjorie Ann Designs "Bently At The Beach" svg cutting file and the template for the Hexagonal Pop Up comes from the Lori Whitlock Shop. I tweaked the template to increase the size to be as large as I could fit onto a 12x12 Silhouette mat.

On the backside of the pop up I added another bear, more confetti, presents, and a banner. Tiny cupcake was cut using an old EK Success punch.

Although the original cutfile I had purchased for this Hexagonal Pop Up Card was Christmas themed, I really like that I was able to easily make it larger and change the embellishments to convert it into a birthday card.

Pushing down on the center round panel collapses the card so it can be slid into an envelope. Flattened, the card is nearly 1/4 inch in thickness so I made a petal style box envelope for it.  I added my sentiment to the trapezoid shaped panel which sits underneath the hexagonal base when the card is fully opened.

Then I used Cottage Cutz Tiered Cupcakes and Lawn Fawn Happy Birthday Border dies to make a matching gift card holder to enclose with the card.

Sunday, July 16, 2023

Birthday Cruiser

One of my dearest long time friends enjoys traveling the world via cruise ships. When I learned she would be away on a cruise to Norway during her birthday, I thought it might be fun to do a travel themed birthday card for her.

I was happy to find several cute travel themed images in Doodlebug Designs "I Heart Travel" Collection that would be perfect for my card. I picked up the svg cutting files for the suitcase, passport and cruise ship images from this collection from the Lori Whitlock store. The world map on the front of the card was created as a print and cut file using an emoji image found on Emojipedia.

 Inspired by a  cruise ship box card I saw on the Simply Crafty SVGs website I wanted to try a sliceform version using the cute Doodlebug cruise ship image. 

I started by paper piecing the Doodlebug cruise ship in three separate layers, then sliding them into the sliceform base. I added  water waves to the first layer of the sliceform and a round background with clouds as the fifth last layer.


Views from the top and the side more clearly show the  five layers of the sliceform base. The svg cut file for the sliceform base template was also purchased from the Lori Whitlock Shop. Lori's step by step video tutorial makes this easy to assemble and I love that it can be customized as you please.


I really had fun putting this card together. It's always nice when an idea for a card that you imagined turns out just as you had hoped! Looking forward to trying out even more different ways to use this versatile sliceform base to make fun pop up cards.

Sunday, July 9, 2023

Fit for a Princess

I used the Princess Pop Up Card svg cutfile from Dreaming Tree to make this fun, blinged out pop up card to send our granddaughter for her sixth birthday.

A huge, glittery crown fit for a princess pops up from the center of the card as it's opened. The Dreaming Tree project files for this card included cutting files for the word "Princess", the wand and crown for the front of the card, together with a flag banner, the pop up crown and mechanism for inside the card. I chose not to use the flag banner that comes with the project for my card. Instead, I created a paper pieced a  pillow crown holder using basic shapes in Make the Cut design program and placed it underneath the crown.

As you can see, I did not spare the use of glitter and pearlescent cardstocks or gemstones on this card!

Here's a view of inside the crown from the top.


In addition to the cuts that were included with this project, I added lots of glittery die cut butterflies cut from old dies from Memory Box and Cheery Lynn Designs. I also used a Spellbinders Corner Flourish Two die to create the large swirly corners glittered with Stickles.

I'm pretty happy with how this card turned out, especially since I was a bit late getting started on this birthday card for our granddaughter. I'm so glad to have come across this Dreaming Tree pop up card cutfile just in the nick of time! The step by step video tutorial for this project was great and made the assembly of this card very easy to do. Hoping the design team at Dreaming Tree continues adding fun interactive cards like this one to their site.


Sunday, July 2, 2023

Hexagonal Pop Up Graduation Card

This second graduation card was created for the daughter of a very dear friend who graduated this year with her Degree in Education. Our friend had mentioned a while ago that her daughter was a fan of Hello Kitty, so I couldn't resist using Graduate Hello Kitty on her card.

I wanted to make a card that was BIG and FUN so I chose to use the Hexagonal Pop Up style card.I used the Hexagon Pop Up Card cut file I got from the Lori Whitlock shop as my base template,  enlarged it, and added my own embellishments.

Paper pieced Graduate Hello Kitty cutting file comes from the old Cricut Hello Kitty Greetings cartridge. I dressed her in the green academic regalia typical of  University of Hawaii graduates and gave her a light blue tassel for her degree from the School of Education. Star border cut from glitter cardstock was created in Make the Cut; and the "Way to Go" sentiment was die cut from Karen Burniston's word die - Congrats set.


On the backside I used a photo from graduation day and added a plumeria border print and cut that I had picked up from Island Digital Imagers on Etsy. "Congrats" is also from the same Karen Burniston word die set was cut from glitter and silver foil cardstocks and glued together a teensy bit  offset for a shadowed effect.

I absolutely love how this big 3 dimensional card folds down flat to easily fit into an envelope. I added our personal message to a panel that is seen right away as the card is pulled out of it's envelope but ends up being on the bottom of the hexagonal base when the card is fully opened.

Here's the gift card holder I included together with the graduation card. Kept it simple with a paper pieced diploma and mortarboard cap; both cut using old Quickutz dies. I used an Elizabeth Craft Designs word die to cut "Congratulations" from glitter and silver foil cardstocks.