Monday, March 28, 2022

Butterfly Collage Pop-Up

I recently put together this butterfly themed card and gift card set for the birthday of a very special friend. After a bit of searching, I chose this elegant but simple butterfly svg by Samantha Walker from the Silhouette Design Store to use on the front of my card and gift card holder.

While looking for ideas and design inspiration for the front of my card, I came across a card on Pinterest with a butterfly which had been cut using a stencil edge die. I really liked the unique look of it and decided to try and create a cutting file to get a similar look using the butterfly svg I had.

I cut my butterfly edge from pearlescent lavender cardstock and added flatback adhesive pearls to the  body. The word "celebrate" was cut using "Sentimental Elements" die from Avery Elle.

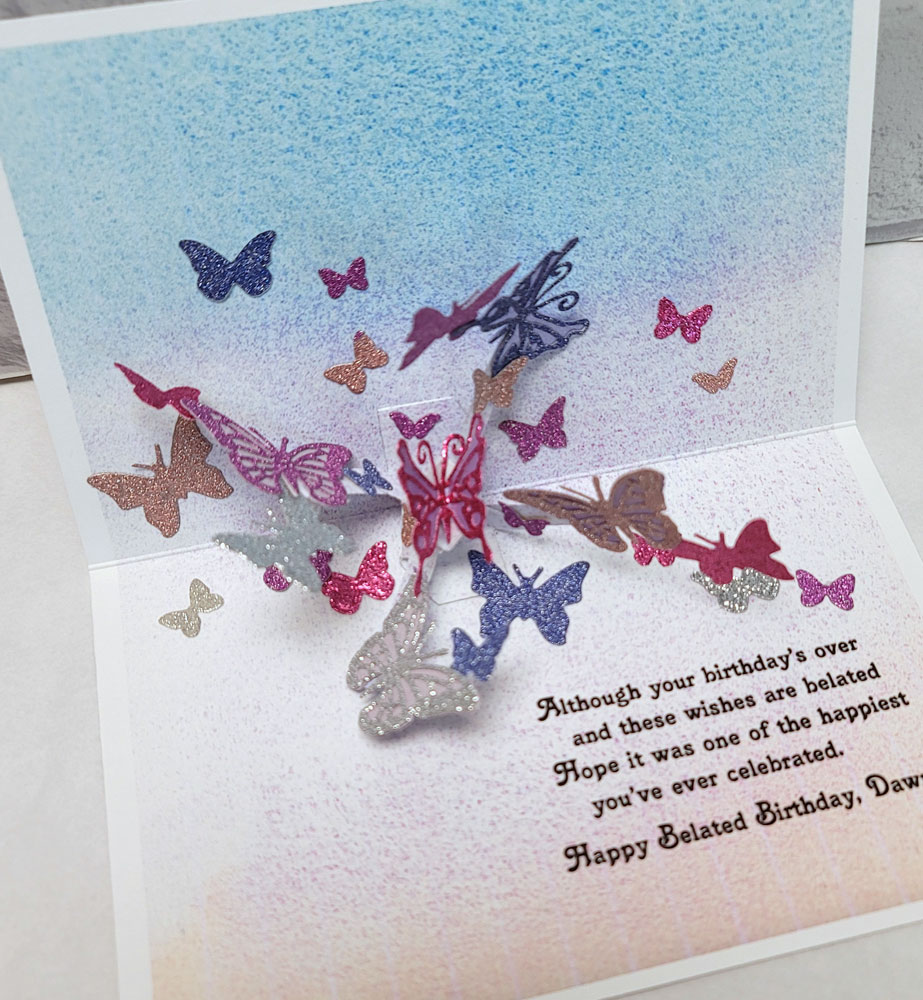
Inside the card, I was excited to use Karen Burniston's new Heart Collage Pop up Die for my first time to animate a kaleidoscope of glittery butterflies.

The mechanism for this new die is the same as its predecessor, the Photo Collage Pop up Die, but just in a smaller size to fit into narrower cards like slimline cards. 

What I like most about this smaller size is that I can attach smaller elements, and more of them, to the spinning arms for a fun "wow" effect. Instead of using the different sized heart shaped dies that come included with this die set, I used butterfly dies I had collected over many years. I used Cheery Lynn Small Exotic Butterflies, Memory Box Butterfly Delights, and Stampin' Up Beautiful Wings dies to cut butterflies of many styles and sizes from glitter cardstock to add to my card.

I used the same butterfly from the front of the card to embellish this matching gift card holder with a fun closure.
To open, butterfly wings are folded together and slipped through the opening on the box lid.

So happy to finally finish and present this very belated birthday gift and card to my sweet friend. I hadn't been feeling very creative lately, but I have to admit I had so much fun putting this little set together that I think I'm starting to enjoy crafting again. Yay and hurray!

Sunday, March 13, 2022

You Are A Warrior Princess

This is the card I made to send to a very special young lady in our lives when we learned that she was going through chemotherapy after she had a recurrence of breast cancer. It broke my heart to hear the news, especially since she is the sweetest person with such a bubbly and effervescent personality. She always exudes a contagious kind of joyfulness to those around her. I wanted to send this card to cheer her on to stay strong!

I came across several of the cutest chibi style Wonder Woman svg files over at Etsy and thought they would be perfect for the message I wanted to send. I used lots of glitter and pearlescent cardstock as well as added accents of glitter glue on my paper pieced Wonder Woman to make sure she would stand out and wow!

 
On the inside, I attached a flying image of Wonder Woman to Karen Burniston's Katherine Label Pop Up mechanism. 

As the card is opened, little chibi Wonder Woman pops forward and "flies" up above the top of the card. to "Rise above the storm"!

I enjoyed putting this card together, and I especially liked that the message inside is strong, caring and full of encouragement.

Sunday, March 6, 2022

Double Z Fold Birthday Card

Here's a fun Double Z Gate Fold birthday card I put together for our daughter's birthday last year but haven't had the chance to post until now.

For this card I cut and pieced together several of my favorite bears by Kristi W Designs named "Patches". I think he's adorable and love that he's simple to piece together. Paper piecing cut file for "Patches the Birthday Bear" can be found at Marjorie Ann Designs.

Decided to do a Double Z Gatefold style card so there would be room enough for all four of the paper pieced teddies.  In addition to the balloons and gift cuts included with the cutting file from Marjorie Ann Designs, I also used the  "Happy Birthday Cat" cutting file from Kadoodle Bug Designs for the cupcake and a stitched balloon die, "Balloon Galore" from Craft Emporium. Happy Birthday sentiment on the front was created as a print and cut using Ballerina font.

Pulling on the right and left sides of the card opens this gatefold card.


In this view you can see the "boxes" that are created in the card by adding border strips on the top and bottom edge of the card

Struts were added inside these "boxes" where I could adhere the bears, balloons and presents.


Birthday sentiment was added onto the backside of the card. Really had fun putting this Double Z Gate fold card together. Template and instructions for this style card may be purchased at Addinktive Designs. The base of this card spans 15 inches, providing lots of room for plenty of fun embellishments.