Wednesday, March 18, 2020

Showers of Love for Dana and Ben

Recently I helped with the planning of a wedding shower for a former coworker and agreed to make the favors for the brunch. It's been a while since I've crafted anything for a wedding so I felt awkwardly out of touch, but figured I'd be safe if I stayed with something that was personalized, floral, and in the bride's favorite color.

This is what I came up with. I used Make the Cut design program to create a cut file from a stencil rose image found on the internet and used it to create a rose border around the bottom edge of the favor box cover.

The cut file for the scallop edge heart stencil on the front of the box was also created in Make the Cut using heart and half circle shapes. Box covers were cut from pearlescent Bazzill Bling Glamour cardstock to give the favors a pretty shimmer.

Favors were then personalized with the names of the bride and groom by using Amazone font and the print and cut feature on the inner box. Boxes were filled with chocolate hearts and kisses and finished with a white tulle bow tied on top. Nothing fancy, just sweet and simple.

Sunday, March 8, 2020

Flying Tsuru Birthday Card

My mom's birthday was back in December but being that I notoriously fall behind with all my blog postings during the holidays, I always end up posting her birthday card several months late.

Usually I'm so focused on holiday crafts in December that I find myself struggling for ideas to make mom's birthday card. Thank goodness for Karen Burniston's Katherine Label Pop Up die. This pop up mechanism has pulled me through many creative slumps, helping to make even the simplest card idea into a special card.
This time I decided on using a paper pieced image of a Japanese Red Crowned Crane, or "tsuru" flying against the sun, a traditional Japanese symbol for good luck and long life. The tsuru and sun were positioned onto the pop up mechanism so it would partially show through the round front window while the card is closed.

As the card is opened the tsuru pops out and rises up, appearing to fly.

The pretty, glittered background cardstock is from the now retired Kimono collection from Best Creation, Inc. I chose it hoping it would add a soft feminine touch to the bold colors of the tsuru and sun. Stamped "Happy Birthday" greeting is from Darkroom Door Happy Birthday Sentiment Stamps set.

Friday, March 6, 2020

Special Girls Day Treats

Today I'm sharing two adorable treat boxes I received on Girls Day from my super talented and crafty friends, Lorna and Kris.


Kris put together this cute gable box and filled with yummy tricolor mochi. She decorated the sides of her treat box with panels of pretty origami paper and an adorable print and cut kokeshi doll image. Love this!

Lorna created another "knock your socks off" Girls Day treat box this year. Her kawaii paper pieced kokeshi is 3 dimensional, prettily sitting on a red stand with her fan and Japanese lantern. Wow, right?

Lorna made her stand from a piece of red cardstock which had been run through a cherry blossom embossing folder and wrapped around a foil pack of Glico Strawberry Pocky Sticks (yum!). Her little kokeshi doll is intricately dressed a lovely kimono created from layers of red foil and washi kimono.  Lorna even decorated the panels of the standing lantern with a mini cherry blossom stamps... so much attention to detail and so beautifully done! Lucky me, to have such talented friends who inspire me with their amazing creativity!

Wednesday, March 4, 2020

Treats for Hinamatsuri

Yesterday (March 3rd) was Hinamatsuri or Girls Day, a Japanese traditional holiday when we celebrate girls and wish them good health and happiness. Here is the card I put together to send to our granddaughter.

Finally had the chance to try out Karen Burniston's Triple Flip die which I got on sale last year. I decided to use three different kokeshi images from Kokolo Designs on Etsy for the three flaps on the front of my card, rendering them into cut files for paper piecing in Make the Cut design program. I used the fill in and print and cut features for their kimonos and  mini punches from Punch Bunch for the tiny cherry blossoms and leaves in their hair.

Here's the fun part of this card: when you pull on the tab on the right with the arrow, the three front flaps open simultaneously, to display what's on the other side of the flaps as well as under the first flap.

The entire interactive triple flip panel was adhered to a side opening card where I added our sentiment inside. I really liked that this was a pretty easy and fun card to put together. I did have a few issues with "catch points" on the flaps which caused two of the flaps not to open, but I was able to easily remedy this by trimming away a sliver from the right edge of the flaps.

For friends and family, I put a dozen of these boxes together to hold some chichi dango mochi treats.

I got the original template and cutting file for this box called "Slide Box with Snowflake", designed by Pebbles In My Pocket from the Lori Whitlock Store. For my box, I swapped out the snowflake on the original template for a cherry blossom, and enlarged it from a 3 inch square box to one that was about 4-1/2 inch square.


The slits in the center of the cherry blossoms creates the slide closure on the front of the box and a tab closure keeps the remaining two sides of the box in tact. A clean and simple design, and I really like the rounded curved edges.

Here's the mochi that was wrapped in decorative waxed papers and packed in mini bento containers before putting them into the slide boxes. Aren't the hinamatsuri stickers adorable? Stickers and pretty waxed papers were both purchased from "Celebrations" a local Japanese gift and packaging store in Honolulu. Hope everyone had a fun time celebrating Girls Day this year!

Saturday, February 29, 2020

More Year of the Rat Goodies

As promised, I have more paper crafting projects created by my super talented friends to share! These adorable Year of the Rat treat holders were put together by sweet Lorna.

How cute are this pair of  paper pieced daruma rats! 


But wait, this all gets even better... Lorna adhered her larger daruma rat to a can of tuna! She covered the label with gold cardstock, and lo and behold, her daruma rat rocks back and forth, just like a real daruma doll! Clever, right! Believe me when I say this lady is totally out of the box creative!

Lorna attached a pouch of rice crackers to the backside of the smaller daruma rat, which nicely doubles as a display stand for the cute little rat.

To celebrate Chinese New Year, Lorna made these knock-your-socks-off amazing Year of the Rat treat holders that she created from Chinese lai see envelopes.


I love that she even made "Year of the Rat" stands for them to sit on, and tied a ribbon onto their tails!
If you think you'd like to give this craft a try, you can find video tutorials here on You Tube.

This super kawaii Year of the Rat refrigerator magnet was created and shared by one of our sweet and talented craft club members, Aileen at our last meeting. She used Make the Cut program to design her calendar, and used washi paper and pearlized cardstocks to piece it all together. So shimmery and pretty! I am very fortunate to have so many creative and talented friends who always share and continue to inspire me!

Tuesday, February 25, 2020

Happy Heart Day RAKs!

Valentines Day has come and gone, but I just couldn't go without sharing some of the sweetest Galentines goodies I received from two very special crafty friends.


This very elegant and clever heart shaped box filled with chocolates was created by my dear friend, Kris. I apologize that it's difficult to tell from my photos, but this box has diamond shaped gussets which gives this heart box its puffy appearance. Kris dry embossed the front and back of this box with lots of hearts for texture and added a tulle bow on the slip notch closure on the back... so pretty!


This adorable hot air valentine balloon treat holder was crafted by my super creative friend, Lorna. I really love how she gave her heart shaped hot air balloon a  fun 3D look by gluing together three folded hearts, sort of like one of those cool honeycomb pop up cards!

Lorna also made this chic chocolate holder. Simple, but so stylish, right? I believe the idea for these originated from European crafters. Of course Lorna added her own special Asian spin to this by embellishing with washi paper!
Stay tuned... I have more awe inspiring RAKs from creative crafting friends to share in my upcoming post!

Friday, February 14, 2020

"Koala-fied" To Give Hugs

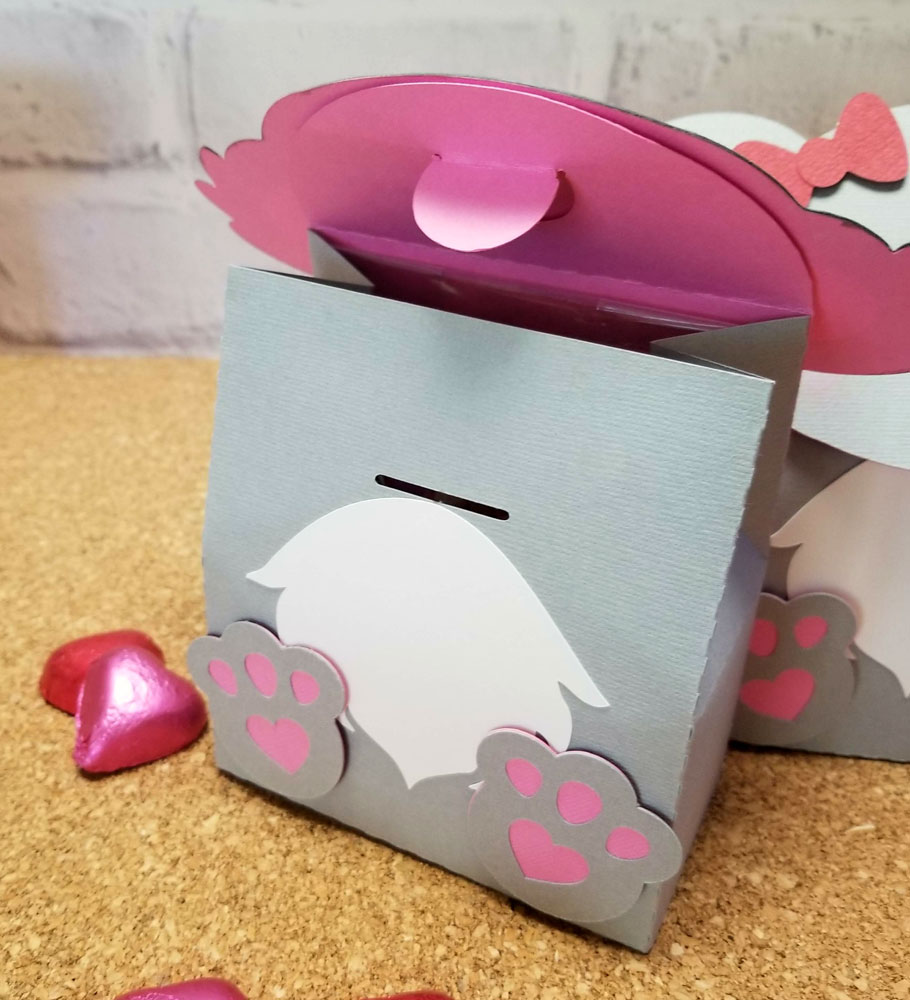
With all the tragic and devastating news about the Australian wild fires, I've had Koalas on my mind quite a lot recently, and decided my Valentine treat boxes needed to be Koalas this year.

For the base treat box, I used the Scalloped Flap Treat Box cutting  file from the Lori Whitlock Shop. The original cut file for this box is 2 x 3.5 x 3.5 inches, but since I knew I wanted to fill the boxes with homemade cookies, I enlarged the file to create a box that was 4.75 inches in height, 4.25 inches in width and 2.5 inches in depth.

I used Cricut Create A Critter 2 cartridge to cut the Koala's head, enlarging it so it would fit onto the flap of the box. I used a now retired Koala cutting file from Cuddly Cute Designs to cut koala's white fur and paws.

The thing I really liked about this particular treat box style was the simple, yet novel "easy open" tab closure on the flap.

I used the print and cut function on Make the Cut design program to create and cut heart shaped sentiments to add on to the back of the boxes.

I made only one Valentine's card this year, and of course it was for our granddaughter.

Since we got her a Hallmark's Lovestruck Minnie Mouse plush for Valentine's, I thought it would be fun to send along a matching Minnie Mouse Magic Color style card to go along with it.
I used a simple coloring book image of Minnie found online and printed it onto a sheet of acetate and a sheet of white cardstock for my card. I used Copics to color in the image of Minnie printed on the white cardstock and used a digital paper file from Bella Blvd's Sweet Baby Girl collection for the background. Happy Valentine's sentiment was cut from glitter cardstock using a Mama Elephant die, and hearts were cut using  mini Carl Craft Punches.


Pull up on the panel marked "PULL" and the image of Minnie appears to "magically" become colored in. Hoping our two year old granddaughter will have fun with this!

 Happy Valentine's Day! Thanks for stopping by!