Enjoyed making the Stadium Wave Card for our granddaughter so much that I decided I should do another. I thought a floral one would be fun to do so I chose to do one with die cut cherry blossoms as a Mothers Day card.
Happy to finally have had the chance to use my iCrafter Cherry Blossom Bursts die to cut and piece together all the flowers for this card. Sentiment on the card front was cut from gold foil board, using Brisk font and shadow on the Silhouette for "Mom" and a Gemini Swash Sentiment die for "love you".
Finally remembered to do a short video showing the Stadium Wave Card in action.
On the inside, I added more cherry blossoms and leaves onto each of the eight accordion panels of the stadium wave mechanism.
Side view of the card shows the strips of cardstock folded and adhered together that create the fun stadium wave effect for this pop up card.
Lots of room on the left side of the card to add our sentiment, matted with gold foil board.
Before closing, I want to also share this fabulous Mothers Day card I received in the mail from my very dear friend, Bev.
Bev added a beautiful bouquet of flowers tied with a bow onto a rubberband activated pop up ball for a fun pop up surprise card. Love, love, love everything about this card, and especially how she perfectly matched the colors of the flowers in the bouquet to the flowers in the patterned paper!
The fun pop up floral bouquet was collapsed and hidden in this lovely gatefold card with dry embossed panels and kept closed with a belly band embellished with flowers and a cute medallion. I'm truly blessed to have such creative and thoughtful friends! Thank you for stopping by today. Hope you're having an enjoyable, relaxing day.
Our granddaughter decided she wanted to have a "Spa Day" themed 7th birthday celebration with her friends so this is the card her gramma created for her. I heard the little girls had a great time spending the day playing grown up; getting pampered with mani-pedis, foot soaks, facials and having their hair styled while snacking from a charcuterie board.
The cute paper pieced bathrobed little girl on the front of the card comes from a file called "I Need A Spa Day" from Marjorie Ann Designs. After putting her together and adhering her to the card, I added a few fun flat back acrylic cabochons that looked like sparkly bubbles. The punny birthday sentiment was created as a print and cut and I added a shadow layer.
On the inside, I added a Stadium Wave Pop Up, adding different paper pieced cosmetics to each of the pop up panels.
I really like that the Stadium Wave Pop Up has such a big "wow factor", requires no special dies, and is so easy to put together. This pop up mechanism is basically just strips of cardstock folded and glued together like an accordion. To create my card, I used the measurements and instructions given by Sam Calcott's You Tube tutorial here.
I had fun using dies from MFT's Iconic Beauty DieNamics and Karen Burniston's Dolled Up Charms Set together with lots of glitter and metallic cardstock to create the lipstick, perfume bottles, eye shadow compact and nail polish to add to the pop up panels.
Here's a side view which shows all the strips of cardstock adhered together to create the cascading effect of the stadium wave card. Hope our granddaughter enjoyed her card as much as I had fun putting it together!
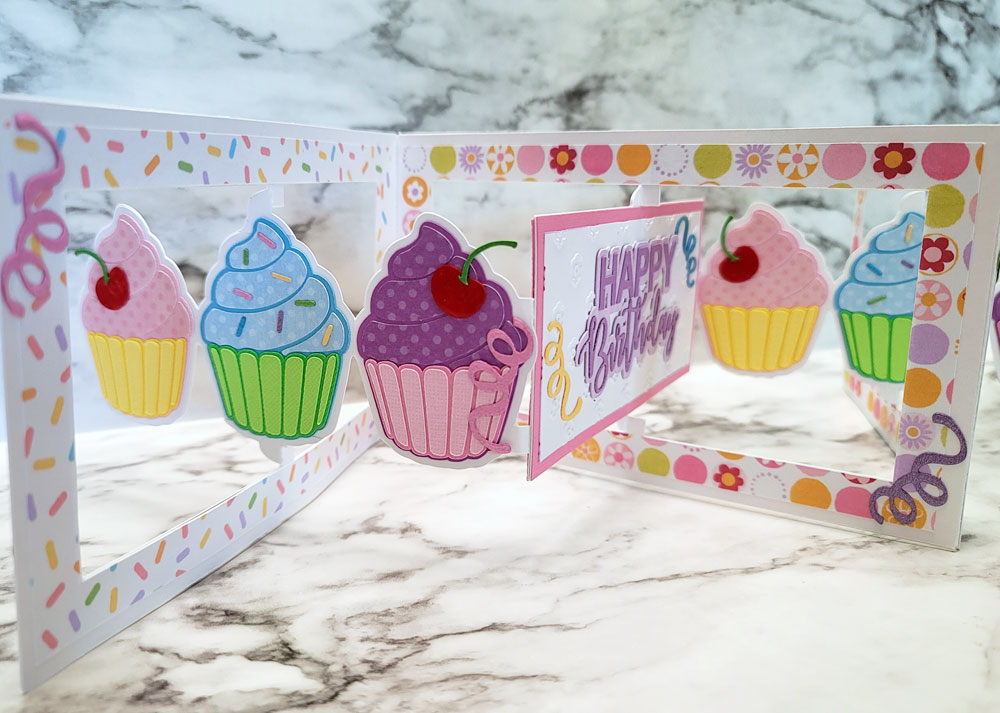
This rectangular format accordion cupcake card and matching gift card holder was created for a dear friend's birthday.
Inspired by the fun landscape cupcake cards created by others using Karen Burniston's dies, I did some experimenting in Make the Cut with the swing through card cutfile I used to create my Thanksgiving card last year. I used a simple svg cutting file of a cupcake from Design Street, then created and welded their shadow layers to add the trio of paper pieced of cupcakes to the card.
I used a Whimsy Stamps die for the word "Birthday" on the center panel. "Happy" and the shadow cuts were created in Make the Cut. Streamer confetti embellishments were die cut with Karen Burniston Big Birthday Charms set.
Each of the panels on this card measures 7.25" x 4.25" so the finished card size is quite large. I like that the larger size makes it easier to embellish and decorate, but I found that I had to reinforce each panel with an extra layer of cardstock to keep my card sturdy enough and prevent it from buckling as it's pulled open. Next time around I may have to consider increasing the width of the frame borders to make it stronger.
Here's a view from the top of the sccordion card opened.
While searchng online for ideas for giftcard holders, I came across a cupcake shaped giftcard holder shared by Gina Creates that I thought would go perfectly with the cupcake accordion card. Gina shares a free svg file to create her cupcake giftcard holder on her website. I did use Gina's idea of creating a pocket on the top of the cupcake for the giftcard as well as in the cupcake liner for the cupcake, but I used the same cupcake image I used on my card instead. Finished it off with a bit of stickles glitter on the frosting and candle flame for some bling.
Today I'm sharing a birthday card and matching gift card holder set created for a special friend.
Recently, I've been challenging myself to start making use of more of the dies I've been collecting over the years. I met the challenge with this card by using dies to cut nearly all the decorative elements except three... the round lacy circle on the front, and the sentiment and oval on the inside were cut on my Silhouette Cameo. I used dies from Marianne Designs Collectable Deer set, MFT Stamps Grassy Edges, Memory Box Butterfly Delights, Cheery Lynn Babies Breath, and Gemini Birthday Celebrations for all the rest of the embellishments.
On the inside of the card I installed two sets of the mechanism from Karen Burniston's Spinner Square Pop Up die side by side to get a double pop up effect.
As the recipient opens the card, the two center panels with the deer pop forward and arms with the words, "Deer Friend" swing down into view.
This was my first time making a double spinner square pop up card with the two spinners side by side. I really like how the pop up and moving arms really make for a fun card. The video tutorial I used for this can be found here. Love that Karen Burniston always comes up with multiple ways to use her fun pop up dies!
I used the same dies that I used for the card to decorate and embellish a simple pocket style matching gift card holder. This time I used a svg cut file I created a while ago in Make the Cut to cut the base card.
While searching online for ideas for Easter treat boxes, I came acorss this cracked egg box design which I thought would be fun to decorate.
But since I wasn't able to find a template for it, I decided to wing it and try and create my own by welding some basic shapes (ovals, squares, triangles) in Make the Cut Design studio.
Welded rectangle shapes to the design to create gussets and enlarged the template to maximum size that would fit onto a 12 x 12 sheet of cardstock. It's always nice when I can get the entrire template to fit onto one piece of cardstock so the box assembly goes quickly. Happily, the finished box size was large enough to hold half a dozen butter spritz cookies.
Had fun die cutting and paper piecing bunnies, chicks, baskets and eggs to create a fun little Easter scene for the front of the egg box. I used dies from Maryanne Designs "Eline's Bunnies" and "Eline's Chickens", Karen Burniston's "Spring Animals", Sizzix "Eggs and Decorations #2", and MFT Stamps "Grassy Edges". I always love it when I make use of a lot of different dies to create a project so I can confidently assure hubby that I'm not "just collecting" !
Lots of room on the back of the box for a print and cut inset panel using cute digital paper from Nancy Kubo's Hunny Bunny Paper Pack.
Got a dozen of these boxes filled with cookies and chocolate eggs, wrapped and ready to deliver just in time for Easter. Hope everyone had a relaxing and enjoyable Easter Sunday!
I recently watched a tutorial on YouTube on the assembly of Lawn Fawn Platform Pop Up cards using coordinating add on dies and was inspired to try a similar idea to create an Easter card for our granddaughter using the svg cutfile I've been using to make hexagonal pop up cards.
The hexagonal pop up cards I've made in the past have had six equal sides, but this time I altered my cutfile to create a hexagon shaped card that was nearly twice as long in the front and back than the sides. I also replaced the large round panel I usually attach to the center strut with a larger hinged panel adhered to the back.
I really liked the new look of the hexagonal pop up card with the larger back panel which gave me a lot more space on the front of the card to create a fun Easter scene.
I used my Silhouette Cameo to cut the pieces needed to construct the card base, and dies from Karen Burniston, Sizzix, and Maryanne Designs to cut the pieces needed to piece together the bunnies, chicks and scene elements.
Lots of room on the back of the panel to add our sentiment.
I think the neatest thing about the hexagon pop up card is how it folds completely flat for mailing. I intentionally increased the size of my card so I could fit several bunnies and chicks on it so the card measures 7.75 x 8.25 inches flat...huge!
I also made a fun matching gift card holder to tuck into the box of Easter surprises we mailed to our granddaughter.
As the drawer to this box is pulled open to reveal the gift card inside, the panel on the top of the box with the bunny and balloons slides up. Svg template for this pop up drawer comes from the Lori Whitlock Shop. This little box is so much fun and surprisingly easy to assemble. I'm certain I will be making more of these in the near future!
I waited too long and didn't have enough time to put together a handmade card for my brother in law in time for his birthday, but came across a few ideas for a neat looking tool box shaped gift cardholder online that looked like I would be able to create in a day.
I started by purchasing a png clipart file of a tool box with several tools from Scrapbook Gems on Etsy, and converted the files to svg cutfiles. I then welded the images of the tools onto a panel to hold a giftcard and created a pocket in the tool box for the gift card to slide into.
Lastly, I printed some of the png tool images together with our birthday wishes and adhered it onto the backside of the toolbox. So happy that this came together so quick and easy when I was in a pinch for time!