I have one last post for Halloween this year; this time to share some of the fun treat boxes I received from crafty friends. This adorable Hello Kitty potion bottle filled with treats was created by my dear friend Kris.
The template for this bottle was designed and shared by Debbie of Paper Pulse blog here. I really like how you can see the treats inside through the acetate window. And best of all, I love how Kris decorated her potion bottle to be extra special by adding a dry embossed spider web texture and an adorable paper pieced Hello Kitty dressed in her pumpkin costume to the window.
Never to disappoint, my amazingly creative friend Lorna really knocked it out of the park again this Halloween with her dancing Wednesday Addams treat box. Lorna used a super cute print and cut clip art image of Wednesday Addams dressed up with black tulle and stood her onto a condiment cup filled with treats.
The condiment cup, which serves as the base is covered with patterned paper and embellished with dancing skeletons. On the front is a label with lyrics to Lady Gaga's "Bloody Mary" which Tik Tokkers had added to Wednesday's iconic dance scene video, causing it to go viral. So much attention to detail!
Lorna also put together these very kawaii paper pieced pumpkin and kimono clad chibi vampires to decorate packages of treats.
Even the gift bag all the goodies came in was decorated with a waving Hello Kitty in her black cat costume!
Our sweet friend Heather delighted us once again this Halloween with her super cute decorated cookies. Halloween is always so much fun, especially with special friends that are so creative and talented!
When I learned our granddaughter would be dressing up as "Barbie in her Gingham Dress" for Halloween, I started putting together a few fun PINK goodies so we could send her a Barbie themed Halloween package.
First, the card: I used Make the Cut Design program to convert a coloring page image of Barbie, a spider web and a wtich's hat clip art into cutfiles for the front of my card. I picked up a Dolly font bundle which included cute Barbie clipart and icons from Exordia Designs to use for the sentiments, and cut out embellishments.
On the inside of the card, I installed Karen Burniston's Twist Flower Pop Up mechanism. The movement of this pop up is a little difficult to capture with still photos alone so I have a short video to demonstrate the movement of this fun pop up.
Since this was a slimline format card, I could fit three of the Twist Flower Pop Up mechanisms in the card. The top and bottom panels with the orange flower shapes pop up and twist to the left while the larger center panel twists to the right as the card is opened. I also attached two die cut bats to the center round panel with strips of acetate so they twist and appear to be flying when the card opens. Barbie silhouette and crown svgs came as part of the Dolly font bundle, bats were die cut from Karen Burniston's Haunted Tiny House Add Ons, and black cat and jack-o-lantern were clipart images rendered into cut files.
Since I had not seen the Barbie movie yet, I watched the movie trailer hoping to get ideas and creative inspiration for fun things I could put together that our granddaughter might enjoy. I thought this shoe from the movie and references to "Barbie feet" vs flat feet were hilarious. It got me thinking, "Hey, I think I can make that!"
I used the free svg cut file for paper witch shoes shared by Cindy Louh on her website here. This is the same template I used to make the witch shoes which I posted last week. But since this one was for Barbie, I used pearlescent pink cardstock instead of black, and attempted to duplicate the heart shaped rhinestone shoe clip.
The next fun little thing I made was this Barbie Eyeshadow Compact...
The inspiration for this came from a similar one posted on Instagram and created by Ideas Caprichosas.
The eye shadow compact was made with circles of glitter and pearlescent cardstock to look like the eye shadows with a foil board mirror. I found clipart of a shadow brush and used Make the Cut Design program to convert it into an svg cut file. The completed paper pieced compact was then glued onto a box with side flaps and filled with candy.
The third little surprise was this personalized pop up slider box with a gift card to her favorite store. I used the Dolly font to make a layered cut out of her name for the front of the box. A little hard to see in the photo but lighter pink panels were dry embossed with Sizzix Stars and Swirls embossing folder and trimmed with glitter cardstock and tiny rhinestones for glitz.
I think I had the most fun this Halloween putting together this box of surprises for our granddaughter. Hope you enjoyed your Halloween too!
I cut and assembled these fun and "not so spooky" lanterns to share with friends on Halloween this year.
I found the template/svg cut file for these gable box shaped lanterns designed by Quietfire at the Lori Whitlock Shop. The cut out image of the black cat and spider web that I used for the lantern panels comes from Lori Whitlock's three panel Halloween Scene Cat.
The original size of the gable box lanterns turned out to be 2.75 inches wide and 6.5 inches tall. I added another 1.5 inches to the bottom of my lanterns so there would be room to hold Halloween candies.
I also added a shelf inside the lantern so a tea light could be attached, and I changed the bottom closure to a flip top so the tea light would be easily accessible to turn on.
After wrapping the lanterns in cellophane bags, I added a tag so the recipient would know where to find the candies and switch to turn the lantern on.
I'm finding making lanterns and luminaries are fun and thinking I might want to make a Christmas themed one too...
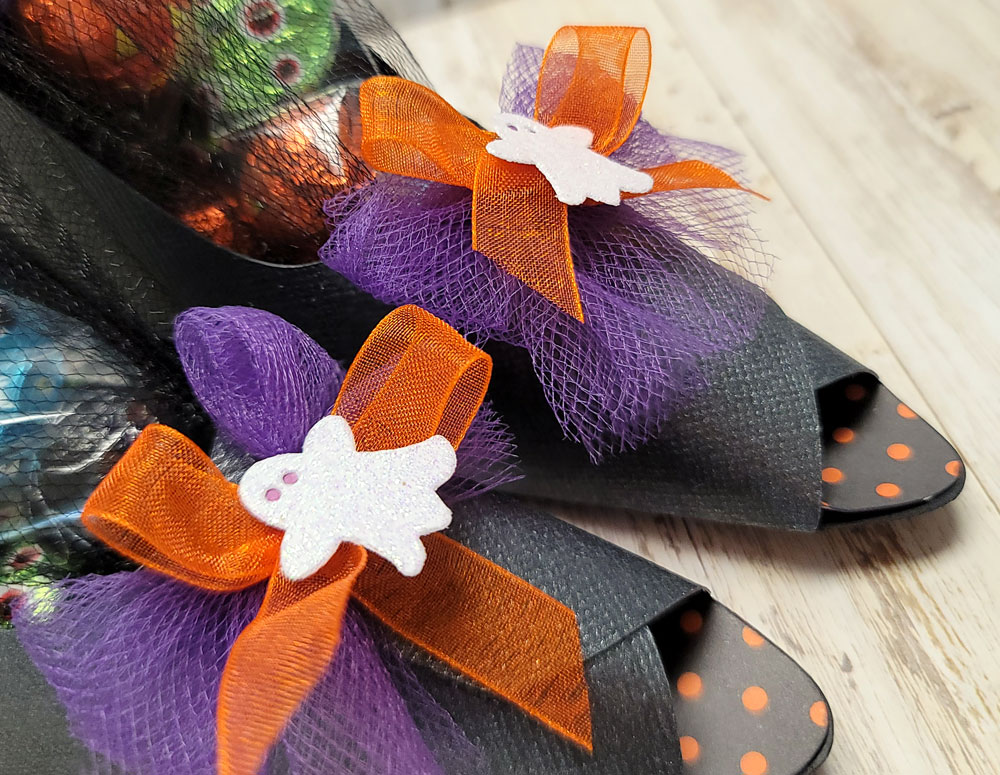
I put together several of these fun paper witch shoes to share with a group of old "ghoul friends" at a dinner get together we had earlier this month. The template for these was designed and shared by Cindy Louh on her website, Skip To My Lou.
I used this very same template 12 years ago to make similar witch-y shoes for another group of friends. (See blog post here) They were a big hit back then and well, you know what they say about fashion trends repeating themselves, so I figured I'd try making them again.
The best part about these treat holders was that they were super quick and easy to put together.
Purple tulle and orange organza bows together with glittery die cut ghosts and skulls adorned the toe of each shoe.
I put the chocolates into cellophane tubes and wrapped them in black tulle and purple satin bows to put into the shoes for a festive look.
The card I'm sharing today was made for a good friend I go walking with to get a little bit of exercise. It's fun and therapeutic to walk and talk with a friend!
I knew I wanted to put together walking teddy bears for the front of my card but since I couldn't find a cutfile for one, I ended up using a combo of cutting files to create an image of teddy bears walking together. I used Marjorie Ann Designs' "Take Time To Smell The Flowers" and "Franklin Brain Freeze" for the teddy bears, hats and sunglasses; and Cuddly Cute Designs' Girl On Scooter for the sneakers.
On the inside of the card, I installed two sets of Karen Burniston's Spinner Square Pop Up mechanisms for a fun interactive card. As the card is opened, a panel on the left side with the word "Happy" swings up, while a panel with the word "Birthday" simultaneously swings down on the right side.
The pivoting mechanisms which create all the movement are hidden behind the decorated square panels. The mechanism on the right of the card was installed in the usual manner and the the mechanism on the left was installed upside down to get the spinner to rotate in the opposite direction. Karen Burniston's You Tube video tutorial here explains all the details. I've owned and used this Spinner Square Pop Up die to make cards for a couple years now, but only recently have felt confident enough to try two in one card. Don't know why I waited so long... it was easy and so fun!
Many years ago when we first met our son in law (as our daughter's boyfriend), he used to wow and delight our family by demonstrating his speedy Rubik's Cube solving skills. I recall thinking back then that it would be cool to make some sort of Rubik's Cube themed birthday card for him, but it took me ten-plus years to finally come up with one for his birthday this year.
The paper pieced Rubik's cube I put together for the front of the card started off as an image I found through a Google search which was rendered into a svg cutting file using Make the Cut Design Studio.
Totally inspired by Karen Burniston's Surprise Pop Up Cube Tutorial, here's a short video showing the fun pop up that I constructed inside my son in law's card.
The three stacked cubes are rubber band activated pop up cubes created using Karen Burniston's Surprise Pop Up Cubes die. I used a template for a Rubik's Cube gift box designed by Creative Print Lab together with the Print and Cut function to do the individual sides for each cube. The cut file for the floating Happy Birthday sentiment was created using Hello Valentica font. A strip of acetate was adhered to it and it was attached to the back of the top cube.
During my Rubik's Cube searches for this project, I came across an interesting diagram of what appears to be drawings submitted by inventor Erno Rubik for application of an U.S. Patent. I reprinted the diagram onto cardstock and used it as a fun backdrop for the card.
Rubberband activated pop ups are fun to put together and give, but come with a moderate probability of failure. I usually don't have a problem as long as the card is hand delivered since I will wait till the last moment before putting the card into it's closed, flattened position and into it's envelope. On the otherhand when the rubberband activated pop ups are kept in it's fattened format for too long, the rubberbands may get over stretched and not spring back to pop up. I especially worry about this when I have to mail these types of cards. Happily, the rubber bands in this card survived the three day journey overseas via USPS and popped up perfectly, according to my son in law.
Hubby celebrated his birthday this weekend and I managed to come up with another golf themed card for him. Yay!
Kept the front of the card very simple. I used an old cut file I created a while back for the golf putter, and the shoes were a freebie svg file I picked up at SVG Cuts. Golfer's jeans were hand sketched to fit with the shoes, then traced in Make the Cut to create a cutfile. Happy Birthday sentiment was hot foiled and cut using Spellbinders "Be Bold Glimmer Sentiments" hot plate and die set.
I decided to create a Double Slider interactive card. As the tab on the right of the card is pulled out, the golf ball slides in the opposite direction to the left of the putter and appears to drop into the hole. I used a video tutorial on You Tube by Karolyn Loncon of MFT Stamps as a guide for the construction of the mechanism for this Double Slider Loop card, found here.
Slider cards have always been my nemesis because so many things can (and usually do) go wrong that prevent the slider mechanism from working smoothly. This time around, I did a bad job of cutting the channel for the ball to slide along, which caused the ball to get caught along the jagged edge. In an effort to avoid having to redo the entire front panel, I rubbed a candle along the rough edges of the cut line. The wax from the candle really worked to smooth it out and got my slider working smoothly... so happy!
I attached the slider front to a top fold slimline sized card and added my sentiment together with some golf clip art on the inside of the card.
Hubby was very pleased with his interactive birthday golf card and even suggested an idea for his next... "next time, how about making the golf club swing?"!!!