Sunday, March 13, 2022

You Are A Warrior Princess

This is the card I made to send to a very special young lady in our lives when we learned that she was going through chemotherapy after she had a recurrence of breast cancer. It broke my heart to hear the news, especially since she is the sweetest person with such a bubbly and effervescent personality. She always exudes a contagious kind of joyfulness to those around her. I wanted to send this card to cheer her on to stay strong!

I came across several of the cutest chibi style Wonder Woman svg files over at Etsy and thought they would be perfect for the message I wanted to send. I used lots of glitter and pearlescent cardstock as well as added accents of glitter glue on my paper pieced Wonder Woman to make sure she would stand out and wow!

 
On the inside, I attached a flying image of Wonder Woman to Karen Burniston's Katherine Label Pop Up mechanism. 

As the card is opened, little chibi Wonder Woman pops forward and "flies" up above the top of the card. to "Rise above the storm"!

I enjoyed putting this card together, and I especially liked that the message inside is strong, caring and full of encouragement.

Sunday, March 6, 2022

Double Z Fold Birthday Card

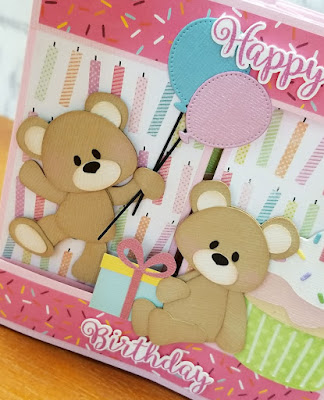
Here's a fun Double Z Gate Fold birthday card I put together for our daughter's birthday last year but haven't had the chance to post until now.

For this card I cut and pieced together several of my favorite bears by Kristi W Designs named "Patches". I think he's adorable and love that he's simple to piece together. Paper piecing cut file for "Patches the Birthday Bear" can be found at Marjorie Ann Designs.

Decided to do a Double Z Gatefold style card so there would be room enough for all four of the paper pieced teddies.  In addition to the balloons and gift cuts included with the cutting file from Marjorie Ann Designs, I also used the  "Happy Birthday Cat" cutting file from Kadoodle Bug Designs for the cupcake and a stitched balloon die, "Balloon Galore" from Craft Emporium. Happy Birthday sentiment on the front was created as a print and cut using Ballerina font.

Pulling on the right and left sides of the card opens this gatefold card.


In this view you can see the "boxes" that are created in the card by adding border strips on the top and bottom edge of the card

Struts were added inside these "boxes" where I could adhere the bears, balloons and presents.


Birthday sentiment was added onto the backside of the card. Really had fun putting this Double Z Gate fold card together. Template and instructions for this style card may be purchased at Addinktive Designs. The base of this card spans 15 inches, providing lots of room for plenty of fun embellishments. 

Monday, February 28, 2022

Belated Valentines

Life threw a few curveballs our way recently so crafting and blogging had to be put on pause for a little bit. Even though it was late, I went ahead and finished the Valentines projects I had started for our granddaughter and will be mailing them to her later this week. 
 

Early in January I was happy to find mini metal mailboxes while shopping at Walmart. After having seen so many posts of how others had embellished and decorated these mailboxes in the past, I was excited to give it a try as well. 

After measuring the mailbox I created a template in Make the Cut design program for the areas I wanted to cover with patterned paper. Fun heart themed papers (American Crafts and the Paper Studio) are from our shopping spree at JoAnn's when we last visited our granddaughter in  August.

I used a simple coloring book image of an Unicorn to create a cut file in Make the Cut and cut the pieces from  pearlescent, foil and glitter cardstocks. Unicorn eyes and nostril seemed a little too small to cut so I did the Unicorn's head as a print and cut. Mane pieces were cut from pearlescent white cardstock and colored in with Copic pens.

"Love You" and personalization was created using Cupid font and shadows. Originally I had planned on adding a second paper pieced unicorn to the side of the mailbox but being that I was so late, I opted to do it as a print and cut instead..

Happy Valentines Day sentiment was stamped and heat embossed in gold onto a scallop edged heart for the inside lid of the mailbox. Mailbox was filled with blind box toys from our granddaughter's latest favorite My Little Ponies. Although I bought six mini mailboxes hoping to dress them up for my "Galentines" this year, I only had time to do one. Thinking I may either decide to embellish them later as Christmas mailboxes to hold giftcards and holiday treats, or maybe just wait till next Valentines Day. 

In keeping with the unicorn theme, I also made a few of these fun swirl lollipop holders to send along with the mailbox. The cutting file "Unicorn Valentine" comes from My Scrap Chick and was very quick and easy to assemble.

The hardest part was finding a place that had these swirl lollipops in stock! Finally found them at Walmart and picked up their very last container of twenty pink ones. Not quite sure now what I'm going to do with the remaining 17 lollipops!

Before I close, I want to share two more fun Valentine treat holders which were created by my sweet crafty friend, Lorna.

Lorna very cleverly used a Silhouette design file for a 3 dimensional box card, "Kitchen Mixer Box Card" and converted it into a fun treat holder filled with candies.

Lorna made a Valentine mailbox treat holder too! Cutting file is "Mini Mailbox Treat Holder" from the Lori Whitlock store. I love the fun heart sealed mini envelopes in the mailbox and did you notice the adorable Maneki Neko on the front holding a Valentine too? So kawaii!!!
Thank you for dropping by. Hope everyone had a fun Valentines Day!


Sunday, February 6, 2022

Year of the Tiger Craftiness

 I received many wonderful handmade cards and gifts from crafty friends and relatives to celebrate the Year of the Tiger and wanted to share the fun.

These Chinese New Year cards from two very special friends came in the mail with happy wishes to brighten my day.

My dear friend Bev designed a cutting file to create this fun reveal wheel card to celebrate the New Year of the Tiger.

Turning the wheel on the right side of the card changes the sentiment that appears in the fan shaped window on the front of the card. Love that sweet little tiger cub holding up the Chinese character for tiger!

This super kawaii daruma tiger shaped card was designed by my crafty friend Patti. She tweaked and altered a daruma cut file she picked up from the Silhouette Design Store by switching out the face with an adorable tiger face. Great idea! 

Sweet Lorna dropped by this weekend with this beautifully decorated gift bag filled to the brim with Chinese New Year goodies. The intricate glitter and gold die cut lanterns at the top were cut from dies from Lene Lok's Spellbinder Destination China collection.
Here's a close up look at the very detailed paper pieced tiger dressed in a mandarin jacket with lantern and sparkler in hand. So many tiny pieces of different colored papers so carefully pieced together to create this! 

Inside the bag, there were lots of handmade surprises, like these golden tiger treat holders that Lorna created by cutting lai si envelopes with a curvy keepsake die. She created a cutting file to cut tiger's stripes, ears, and face and adhered the pieces to the sides of her curvy keepsake box. So cute and  creative!

For this second treat holder, Lorna added texture by running her paper through an embossing folder that added an Asian medallion design. She then created a cut file for this impressive Chinese paper cut tiger to add the the front.

This third treat holder was decorated with a Japanese inspired paper pieced daruma tiger...so kawaii! I am totally loving that pawprint on the fan!

My aunt who enjoys sewing decorates dish towels to share with family every New Year, using fabric in the theme of the lunar zodiac animal of the year. Similarly, we all look forward to my mom's special Chinese zodiac animal of the year plastic canvas magnet creations to adorn our refrigerators.
I am truly blessed to have so many talented and creative people in my life who bring happiness by sharing their amazing creations. Sending best wishes to all for a great 2022!

Wednesday, February 2, 2022

The Year of the Tiger Roars In

Gung Hay Fat Choy! To celebrate the start of a new lunar year, I put together tiger themed cookie boxes and red envelopes for sharing with friends and family.

I decided to change things up a bit this year by making whimsical, cutesy boxes instead of the usual traditional red and gold boxes I've made in the past to hold the almond cookies I bake for Chinese New Year. The inspiration for the design of these boxes comes from a freebie project  for a tiger "toy" offered by Canon Creative Park

I used Make the Cut design program to render the free printable template into a cutting file for the tiger head, paws and stripes. The original Canon Creative Park project used a closed trapezoidal box, but I needed one with a lid. Happily it didn't take me too long to find a trapezoid shaped cupcake box with a hinged lid in the "B is For Birthday" project set at SVG Cuts. I enlarged the cupcake sized box in the set to one that would be large enough to hold about a dozen cookies.

After my tiger boxes were assembled, I used the print and cut function to add a gold medallion to the lid of each box.

I baked 4 batches of almond cookies to fill 16 boxes and still had enough left over cookies to keep hubby happy!

I also made these Year of the Tiger "lai si" red envelopes. There are so many adorable tiger images on the internet that I had a hard time deciding which to use for my red envelopes. I finally chose to use this one because I liked how he looks like he's roaring and smiling at the same time! Cutting files for tigers were designed in Make the Cut. 

Cutting file for the red envelope was traced in Make the Cut from a free template available on Bride and Breakfast website. Paper pieced tiger head was glued onto the flap of the envelope and the body below it. Lucky red knot charms the tigers are holding were cut from "Knot and Coin" die from Lala Land Crafts. I covered the coin charm die with a red square so I could add the Chinese character "fu" for good fortune onto it.

Then, at the last minute I came across this adorable image of a string of fireworks and felt compelled to make a card for our granddaughter. I should have resisted the urge because often things I do last minute, and in a rush have poor outcomes. 

Creating the cut file and paper piecing the string of fireworks for the front of my card went pretty smoothly. I made sure to use a lot of red and gold foil, pearlized and glitter cardstock to give the card enough bling to delight any child.

On the inside, I added an interactive mechanism for the "Hideout Card" which I learned from a video tutorial on You Tube by Srushti Patil. As the card is opened, two images simultaneously pop out from behind a center panel. I added a small paper pieced tiger to pop out above the center panel and the year 2022 to pop out below the panel. 

I was successful in getting the mechanism to work quite well when the card is initially opened but ran into issues with "catch points" when trying to close the card. This wouldn't have been a problem had I used stamped or printed images, but with paper pieced images the tiger and "2022" would catch on each other while returning back behind the center panel as the card was being closed. I redid this card five times, but in the end had to write a note to Mom and Dad to "please gently close card by manually pushing tiger back behind his panel..."  I really like the movement of this card so I definitely will be doing more experimenting and practicing to learn how to make this work for me!

Stay tuned for more fun Chinese New Year projects I'll be posting soon...

Sunday, January 30, 2022

Happy New Year 2022

Happy New Year! I'm finally back from my usual holiday hiatus from blogging. The first project I'm sharing this year are my Year of the Tiger calendar magnets.

While searching the internet for inspiration, I came across many adorable maneki neko (lucky cat) tiger images on Pinterest and knew right away I wanted to create a paper pieced version for my calendars this year.

I normally try to start working on these calendar magnets during late summer to alleviate holiday stress but last year I got behind schedule and didn't get a chance to start cutting and assembling until after Christmas. In order to save time, I decided to print the stripes onto orange cardstock for the tiger body pieces prior to cutting them on the Silhouette. It saved a lot of time doing it that way instead of having to cut the stripes out as a stencil or as individual pieces, and it prevented much stress! Arial Black font was used to create the cutting file for the year. The cutting file for the paper pieced tiger was created in Make the Cut design program, inspired by a combination of several maneki tiger images found on Pixta Japan

 I wanted to send the calendars in my holiday thank you cards again this year so I created a window on the front of a card for the tiger to show through. "Year of the Tiger" was done as a print and cut and backed with a gold foil board shadow cut.

I trimmed an acetate sleeve to fit the bottom half of the calendar and adhered it to the inside of the card. Mama Elephant stamps from "Lunar Sayings" and "Lunar Extras" sets were used to add the sentiments to the left side.
I enjoyed putting these calendars together and sending them to friends and relatives again this year. Hope the Year of the Tiger proves to be a lucky one for everyone!