Thursday, February 16, 2023

"Panda-stic" Valentine


Hello! I'm finally back from hibernation with my first post for 2023. Today I'm sharing these fun Panda candy holders I put together for Valentines Day. 
Although I had seen these type of domed candy holders around for quite awhile, I was never too interested in making them for two main reasons. First, I worried about running into issues trying to find the right sized domes to fit and second, I never cared much for the design solutions offered for accessing the candy once the holder was made.

But about a week before Valentines Day, videos from Vinily Papel Design showing how easy it was to create these cute domed candy holders  started appearing on my Instagram feed and I was hooked! I wasn't able to purchase templates from Vinily Papel Designs due to technical issues they are having but I did end up picking up a similar layered svg template for this cute panda from Alison Detallitos Design on Etsy instead.
For my candy holders, I used heart shaped plastic fillable ornaments. These were made of a plastic similar to the kind used in merchandise packaging so I was able to easily cut each into two halves (to make two candy holders) and snip off the round loop hanger on the top. Turns out these were not the exact same size or shape of the domes the template was made for so I did have to resize and tweak the original file quite a bit to get everything to fit correctly.

The template from Alison Detallitos Designs included a very fancy rotating opener to access the candy  similar to an iris or shutter card mechanism with brads and several moving parts on the back. Nice, but way too complicated! I decided to stick to the easy and simple idea that was presented on the original assembly video I watched by Vinily Papel Designs instead.

I designed a very simple envelope with a slotted heart closure to enclose a little card for the recipient with a Valentine message.

As the card is removed from the envelope, the open access to the candies is revealed!
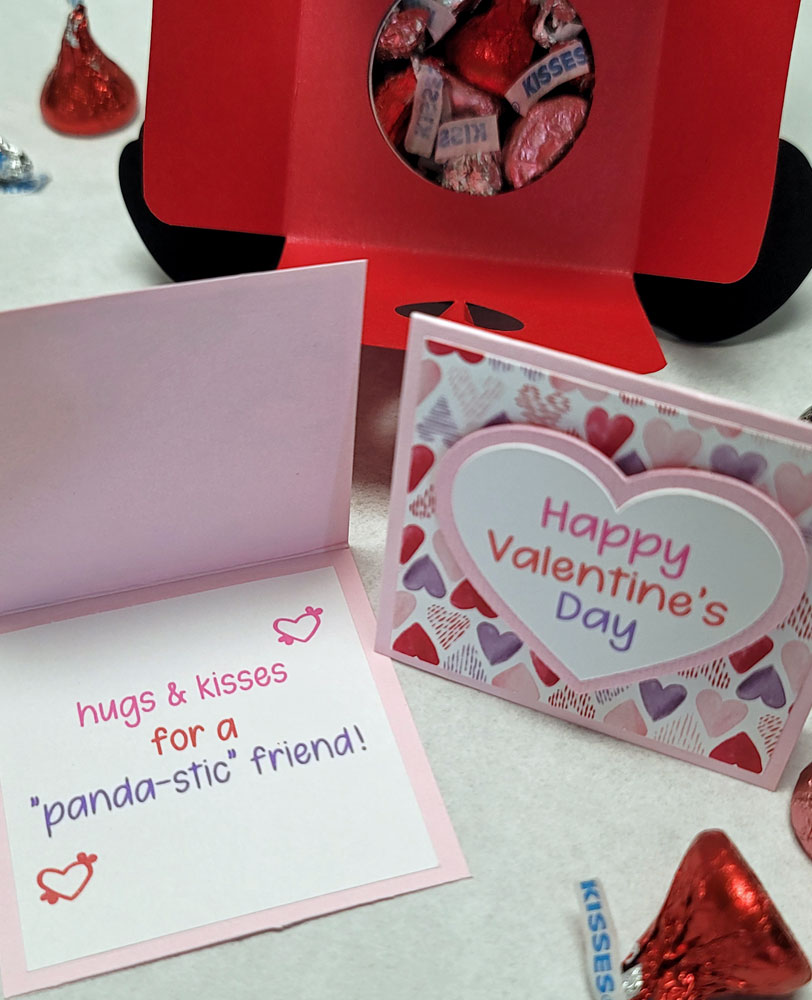
For me, this is the easiest and best idea I had seen by far for easy access to the candies on this type of domed candy holder. I also really like that it allows me to add a little card for an additional personal touch. These were fun to put together and a nice change from the usual treat boxes I usually make. Thinking I may decide to do something similar for Easter this year as well.

Sunday, January 22, 2023

Hopping In with the New Year of the Rabbit

The Year of the Rabbit officially began on the the 22nd of January 2023. I had hoped to make some cute bunny themed red envelopes (lai si) and a Chinese New Year card but just like the rabbit in Aesop's Tortoise and Hare fable, I relaxed a bit too much during the holidays and it was too late when I finally started hopping to it. Fortunately,  I have wonderful, talented friends that always come up with the best fun and creative projects to share!

My very punctual and reliable crafty friend Bev sent us this super cute My Melody themed card a week prior to Chinese New Year. It was a good thing that she did because it was her card that finally inspired me to start working on my Chinese New Year cooky boxes.

With only a week left to come up with a box to share my almond cookies this year, I knew it had to be something that would be quick and easy. Sanrio's adorable My Melody bunny was the perfect answer! To make her card, Bev told me she used a Chinese New Year image of Hello Kitty to create her cut file, then swapped Hello Kitty's head with My Melody's head. I thought that was ingenius! So I did the same for the My Melody paper piecing too.

No time to design a new box style so I decided to use the same flip top box template that I had already created a file for a few years ago for Valentines Day.

My Melody's paper pieced body was attached to the box base and her head to the flip top lid. Each box had the capacity to hold 8 to 10 medium sized almond cookies.

As a final touch, I used the Print and Cut feature to add a print and stencil cut label to the back of the boxes.

This fun Chinese New Years Firecracker treat holder designed by Lorna once again shows her amazing creative prowess of thinking ouside the box. For this treat holder, Lorna cut Chinese red envelopes (lai si), rolled them into tubes and hung them from a wooden dowel to look like a string of firecrackers. She then very cleverly glued pony beads to the bottom of a condiment cup filled with treats as a stand to hold the wooden dowel in place. Love that cute little bunny dressed in a Mandarin jacket and the pretty gold blossoms at the base of the dowel.   

Thank you for stopping by today. Sending wishes for a New Year full of good health and prosperity to all!

Monday, January 2, 2023

"HOP"py New Year of the Rabbit

2023 is the Lunar Year of the Rabbit which promises to be a year of harmony and diplomacy with a focus on creativity and appreciation of the arts. Sounds like great year to be a crafter! 
This is the card I made to enclose my refrigerator magnet calendars and send to family and friends in celebration of the New Year. I used Make the Cut design program to cut a shaped window so the rabbit on the calendar inside could be seen on the front of the card. I also added an illustration of Japanese mizuhiki and a New Years greeting below it, using the Print and Cut function.

Each calendar was put into  a clear plastic sleeve and adhered to the inside of the card with double stick tape. I added our New Years sentiment underneath the window on the left.

I got the rabbit, pine and bamboo images to decorate my calendar from the Japanese digital image website, Pixta. Images were converted into layered svg files and cut using the Silhouette Cameo. Decorative plum blossoms and pine image on rabbit's body was done using the Print and Cut function.  

For the plum blossom backdrop behind the rabbit, I used a simple 5 petal shaped flower and ran it through Mpress Mystic Clouds embossing folder to add texture. Arial font was used to create the cut file for the "2023".Papers used include washi paper as a mat for the calendar togher with pearlescent and gold foil cardstocks for the paper pieced embellishments.


At the last minute I decided to add a recent family photo to the backside of the card, mostly since I was feeling a little guilty about not sendimg any cards out this past Christmas.These New Years cards doubled as our Christmas cards and thank you cards as well.

Before I close I'd also like to share another New Year/thank you card and a couple adorable New Year treats from friends.

This super cool NewYear card which doubled as a thank you card was designed by my dear friend, Bev. I love the pretty washi paper she chose for the front of the card and loved the fun pop up surprise inside even more! Bev used Karen Burniston's Parcel Pop Up mechanism to animate her card such that the traditional kagami mochi and tangerine rises up to the top of the "sanpo" pedestal as the card is opened... this is SO COOL! 

These two super kawaii Year of the Rabbit Daruma treat boxes were created by my sweet crafty friend, Lorna. The cute daruma with a carrot on her head held a container of white rice and the red daruma was filled with yummy Japanese candies. Of the twelve lunar zodiac animals, the Year of the Rabbit just might be the cutest of all, with so many adorable crafty possibilities!

Saturday, December 24, 2022

Gingerbread Explosion Box

Those who know me well know that I would pick crafting over Christmas shopping any day. That's why practically everyone on our gift list (except my mom and our granddaughter who give us their wishlist) gets giftcards from us at Christmas. That may sound like a boring gift, but at Christmas I make every effort to make giving and receiving giftcards fun for me as well as the recipient.

The giftcard holder everyone received from us this Christmas was this gingerbread house explosion box. The basic pattern for the gingerbread house was adapted from a Birdhouse Explosion Box cutting file I picked up from My Scrap Chick. The decorative elements on the inside and outside of the house were created from a collection of new and old svg cutting files from Doodlebug, My Scrapchick and Lori Whitlock as well as a few old dies from Taylored Expressions and Quickutz. Not showing up too well in the photos but everything "snow" was edged with Stickles glue to add some sparkle.

Lifting the roof (lid) off the house"opens" the explosion box. I left one corner of the box attached so I could create a corner of the room to add a fireplace and window. I added pockets for the giftcards to the other two sides of the box that opened flat. 

It was so much fun decorating the inside of the box with fun little details like rhinestone ornaments on the tree, stockings on the chimney and the silhouette of santa and his reindeer in the window.

I used a Doodlebug print and cut clipart from the Lori Whitlock store to create giftcard holder inserts to slide into the pockets.

Doodlebug gingerbread girl clipart from the Lori Whitlock store was used to create these hang tags for the gingerbread houses.

Final step: wrapping in cellophane and red gingham ribbon. I amazed even myself that I was able to complete a dozen of these in time for Christmas! Happy Holidays!

Friday, December 23, 2022

Holiday Treats

After baking up two batches of Chex Mix and putting them into resealable mylar bags, I tried to give the bags a festive look by dressing them up to be little penquins.
 
The paper pieced cutting file for the penquins is called "Penguin Sweet Treat Belly" from My Scrap Chick, and is originally intended to be an adorable little treat holder for small candies like individually wrapped Ferrero Rocher chocolates. 

I used the same file but enlarged it to size large enough for my bags of Chex Mix to fit and used double stick tape to securely adhere the front and backs of the penquin to the bags. 

Greeting in red on penguin's tummy was done as a Print and Cut, and I added a glittery punched heart to add a little fun bling. I put together a colony of two dozen penguins and I was glad that they all came together pretty easily. 

I also made a couple batches of Prune Apricot Mui to share with family and friends. 

This sweet, sour and salty fruit snack of dried plums and apricots marinated in lemon juice and scotch whisky is a favorite here in the islands. After packaging into sealed plastic containers, I labelled them with this fun "homemade with love" panda label using Print and Cut on sticker paper.

I think sharing homemade goodies from the kitchen is always even more fun when I can think of  cute ways to package them!

Thursday, November 24, 2022

A 3-D Turkey for Thanksgiving

While searching for ideas and inspiration for a fun card we could send to our granddaughter for Thanksgiving, I came across the cutting file for this 3-D paper turkey designed by Chirpy Llama Art Studio on Etsy.

What I liked the most about this turkey was that it looked like a simple version of a sliceform papercraft with layers of  feathers and the turkey body slotted together. Sliceform papercrafts always ingtrigue me, but I haven't had the courage to try one yet. This one looked easy enough for a beginner like me!

Happily, I was able to cut and assemble the pieces to put this little guy together pretty quickly. There was lots of room behind the last row of feathers to add our personal Thanksgiving wishes.

Neatest thing about these sliceform projects are how they flatten so easily to slide into an envelope for mailing.

I had so much fun putting this 3-D  turkey together that I wanted to share the fun with our granddaughter. So I cut the pieces to the turkey again, this time about 30% larger (for tiny hands) and made a step by step photo instruction sheet for easy assembly. We put everything into a large envelope and mailed it as part of  our Thanksgiving "care package" from Grampa and Gramma.

May have been "too easy" for her but hope she had fun making a turkey for Thanksgiving!

Before I go, I wanted to quickly share this beautiful intricately cut Thanksgiving display card that came in the mail for us from a very dear friend.

I especially love the combination of vibrant fall colors for the pumpkin and leaves together with the pearlized gold frame and easel...so pretty!
I hope everyone is enjoying the Thanksgiving holiday today with friends and family. Tomorrow: Black Friday and full steam ahead to Christmas!

Tuesday, November 8, 2022

May Your Birthday BB-"(gr)8" !

Here's the Star Wars themed birthday card featuring the droid BB-8 that I created for two of my favorite Star Wars "fan-atics", my hubby and son in law. 

I came across an image of  a very cool card created by illustrator Josh Lewis showing Star Wars Droid BB-8 lighting a candle on a birthday cake and knew right away I wanted to create something similar using paper piecing. 
To create the cutfile, I started with a simple coloring book image of BB-8 and drew in the arm extension and flame. Make the Cut design program was then used to render this doctored image into a  cutting file. At first I thought this would be a simple cutfile to create but later realized making multiple layers for the 5 colors of BB-8 was a little mind boggling. But I stuck with it and got it done! I used a cut file from Marjorie Ann Designs' "Betsy Loves Baking" set for the birthday cake.

I thought it would be fun to showcase BB-8 using a Hexagon Pop Up style card. Here are a couple views from the top and side. As you can see, the paper pieced BB-8 droid and birthday cake were attached to struts on the front half of the hexagonal "stage".
I used a round panel which I ran through Sizzix Stars and Swirls embossing folder for texture as the center backdrop."Happy Birthday" was cut from glitter and metallic cardstocks using dies from Hello Bluebird and Whimsy Stamps.
The template for the stand alone Hexagon Pop Up card is one I created a few years ago inspired by Hallmark Cards'  amazing Paper Wonder collection.

I was hoping to find ideas for a really good "punny" sentiment to add to the back of this card, but sadly, this one was the best I could find... "May Your Birthday BB (gr)8". I simply added it to a backdrop image I found online of droids BB-8 and R2D2 together and printed it out. Shadowed and glittered stars were cut on the Silhouette and added to the struts on the back side  of the hexagon platform.

Without a doubt, the best part about these Hexagonal Pop Up cards are how they fold flat to fit very nicely into an envelope. I like how there's even room on the very bottom of the card to add a personal message when the card is in its folded position.
After spending way "too much time" creating the cutfiles and assembling the first card for hubby, I decided to make it into "time well spent" by making another identical card for my son in law who celebrated his birthday 3 days later. It's always good whenever I can get multiple uses from cutfiles that took way too long to create!