Friday, March 12, 2021

Kawaii Kokeshi

Today I'm sharing some of sweet Girls Day treat boxes and Kokeshi doll paper crafts I recently received from my super creative and thoughtful friends.
 

I simply love this pretty Girls Day treat holder created by my dear friend Lorna. I think the blue she chose to use for her box is striking, and really makes her sweet kokeshi, the Asian diecut border and Mt. Fuji stand out so beautifully. Side view of her treat holder shows how Lorna constructed it to be a sleeve for a roll of yummy HiChew candies.

This adorable kokeshi doll card was also created by Lorna. She used the "Chibi Geisha Girl with Lantern" cutting file from SVG Cutting Files to cut and paper piece her kokeshi and added it to a shoji background with a branch of cherry blossoms. 


This ah-mazing origami octagon box was created by my crafty friend Kris' talented and creative aunt. This box is 5-1/2 inches in diameter, beautifully folded to showcase the colors and pattern of the double sided origami papers.

Here's a peek of the inside of the box and bottom of the box. I understand it takes 16 perfectly folded sheets of origami to create this box and lid. I love this, and really would love to give it a try one day... however my origami folding skills are really bad so it may take me a bit of practicing to create something as lovely as this is!


This is a wallet size ID /credit card holder/case that was decorated by my sweet and special friend, Claire. Claire also used the Chibi Geisha cutting file from SVG Cutting files for her Japanese girl. I really like how she added the die cut mini torii in the background, and the tiny double layered cherry blossoms with glittery centers really make this scene so pretty!
I am truly blessed to have so many thoughtful and crafty friends. I enjoy sharing their projects and hope that you may be inspired, as I always am by their creativity.

Monday, March 8, 2021

Girls Day Shaker Card

March 3rd was Girls Day and this is the card I made to send to our granddaughter this year. I received some very pretty cherry blossom clay polymer sprinkles for Christmas from a sweet friend and knew they would be perfect for a Girls Day shaker card.
 
I stamped and heat embossed images from Mama Elephant's "Lunar Extras" (cherry blossoms) and Sister Stamps "Harumi". Images were colored with Copics and Harumi's kimono was stamped and cut from washi paper. Scalloped window was cut on the Silhouette using a cutting file created in Make the Cut design program. Stamped sentiment inside the window is from Dandelion Designs "Love & Hugs". 

On the inside, I used the bottom layer of Karen Burniston's Pop Up Cake die to create a fun pop up "stage" for my kimono cuties. 

Stamped image is one of my all time favorites, "BFFs" from Sister Stamps. Kimonos were stamped and cut from washi papers. Cherry blossoms, leaves and shadows were cut on the Silhouette. I used Wiki C.A.P.S. Cherry Blossoms Outline die to cut the flower centers; and the large cherry blossom on the front was cut using the print and cut function with DJ Doodlers font.
     
The hexagonal shaped "stage" pop up in this card uses the same design mechanism as most of the stand alone hexagonal pop up cards being seen a lot on the internet recently. I really like Karen Burniston's version using her Pop Up Cake die because the pop up is installed inside the card, giving that "wow factor" as the card is opened. You can watch Karen's video tutorial here.

Here's a side view of the pop up stage where you can see I added three acetate struts; front, center, and back, where the cherry blossoms and stamped images were adhered. I'm enjoying playing with this pop up cake die, although I have to admit I haven't used it to make a pop up cake yet! I love that Karen Burniston always comes up with fun alternate ways to use her dies to create different styles of cards.

Sunday, February 28, 2021

Flower Pot Peeking Teddy

 Trying to play catch up now to share some of the cards I made last year but didn't have a chance to post. This one was made for my daughter's birthday which was in October. 

 I used two cutting files, "Bear Bouquet" and "Bear with Dogwood", both from Little Scraps of Heaven to piece together the teddy bear for the front of my card. The bouquet of flowers and most of the teddy bear are from "Bear Bouquet" but I had to borrow the hands and feet from "Bear with Dogwood" file so I could get my bear into a sitting position.

On the inside of the card I used Karen Burniston's Pop Up Flower Pot die to add a teddy bear peeking out of the pop up flower pot. I used the same teddy bear and flowers from Little Scraps of Heaven's "Bear Bouquet" file, using lavender flatback rhinestones as the flower centers for some fun bling.  

Doily underneath the flowerpot was cut using a cutfile from Carta Bella Paper Co., purchased at the Silhouette Design Store. Matted labels for the front and inside of the card are from Cricut's Lacy Labels cartridge.

Here's a view from the top of the flower pot which shows the struts inside where the flowers and foliage are attached. 

I tried to be very careful when putting this pop up flower pot  together this time. The first time I used this die  was for Mothers Day cards and I had trouble with the placement of the flower pots inside the cards because I think my flowers were too large. I think I finally got it pretty much figured out now, and am ready to play with this die again soon.
By the way if you're interested,  I'll be backposting my Christmas holiday projects tomorrow. I'm not positive, but I think you'll have to either click on "older posts" at the bottom of this page or click on December 2020 archives (in the sidebar) to access these posts.

Sunday, February 21, 2021

RAKs and Thanks from Crafty Friends

 
I've been the lucky recipient of lots of wonderful crafty projects recently and thought it was about time I shared some of them. 

This amazing Chinese New Year lantern treat holder is the brainchild of my dear friend Lorna. 
Totally thinking outside the box, Lorna created a "window box" with two sides open and hung a Chinese lantern inside.

If you take a closer look, you'll see that the lantern was made from a "lai see" or Chinese lucky red envelope. Hanging from the lantern, Lorna attached a medallion with the silhouette of an ox bearing the Chinese character for ox. 

This Chinese New Year card from my long time friend and class buddy Bev, really brightened my day and made me feel so special!

Bev used a cute and whimsical image of hanging lanterns for the front of her card... and on the inside, a cuteness explosion with this adorable pop up Ox! Similar to a Year of the Boar card I put together a few years ago for my granddaughter, Bev also used the Pop Up Dog/Cat Card from the Lori Whitlock shop as the springboard for her Chinese New Year card.


I  also received  this beautiful Shadow Box thank you card with intricately cut layers from Bev in the mail recently. I love the patterned paper and background color she chose to make the cut layers on this shadow box really stand out. The cutting file for this can also be found at the Lori Whitlock Shop... my most favorite place to shop for interactive card and box cutting files.

My sweet blogging friend Lynn of Lynn's Craft Blog also sent a beautiful and intricately cut thank you card. This one was cut from the Sizzix Framelits Thank You Drop-ins 4 piece die set, and Lynn also added a cute vintage stamped and colored image from Whimsy Stamps' Gossip Holiday Girls set to the front.

I really like how this card is designed in such a way that the larger inside panel of the card creates a border around the fancy cut front... very clever effect!

Together with her thank you card, Lynn also enclosed this adorable calendar which is currently hanging from the printer stand in my craftroom. Sized the same as a slimline card, Lynn used a Lawn Fawn Valentines die to cut and piece together the hearts, stitched window and scallop edge for this super cute "twofer" card. I keep it displayed with the Gorjuss Girls stamped and colored image facing forward to brighten up my space, knowing I can flip it over whenever I need to see a calendar. 
Thanks for dropping by for a visit today. Hope you enjoyed, and maybe were inspired by some of the amazing and fun paper crafts put together by my dear friends.

Sunday, February 14, 2021

Teddy Bear Hugs for Our Valentines

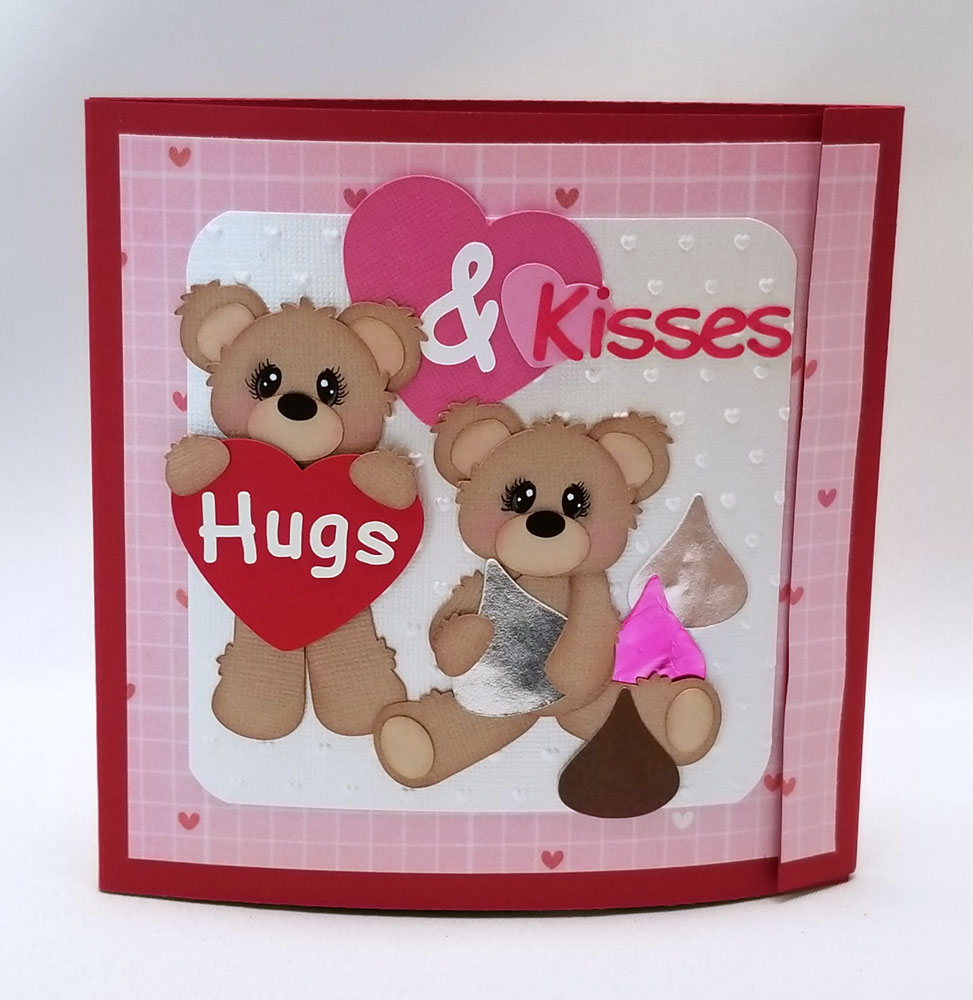
Happy Valentines Day! This is the cuddly teddy bear and card that we packed into a box and mailed to our favorite Valentine this year. Like many kids her age, I'm sure our granddaughter has more plushies than she needs, but this Hallmark teddy was just too hard to resist... when you press on his foot paw, he sings "Skinnamarinki Dinky Dink" as he rocks his head side to side to the music... so ADORABLE! We decided he was the perfect bear to go with this Valentine card I made...

The inspiration for the card front layout as well as the cutting files for the paper pieced teddies come from Cuddly Cute Designs.

I used silver foil board for the wrapped candy kisses and colored one of them pink using Copic markers. Comic Sans font was used to create the title and the rounded square white panel behind the bears was run through a Cuttlebug Heart Dots embossing folder.

Hubby helped me with this short video to show the fun pop up surprise inside the card.

Voila! A pop up ball teddy bear! He's my second attempt at creating a creature using Karen Burniston's Surprise Ball Pop Up die... it's so much fun! This time I used two balls glued, one on top of the other to "build" my bear. I was totally inspired by Frances Byrne's super adorable panda pop up seen here on her blog, Stamp Owl's Studio; as well as all the incredibly talented KB fans who share their wonderful creations on Karen Burniston Pop Up Peeps Facebook page. 

I actually had to spend quite a bit of time carefully studying how everyone had put their creatures together... where on the ball should I glue the nose and eyes and ears? the arms and legs? I used enlarged paper piecings from Cuddly Cute Designs' teddy bear svg cut files for the arms, legs ears and eyes. Teddy's muzzle was a little tricky; I initially did a rough hand cut of the shapes, then scanned the pieces into my computer where I could edit them into symmetrical shapes and cut them using the Silhouette.

Teddy's string of hearts was made by doing a print and cut for the pink hearts with the words, and layering them onto the larger red hearts, then stringing onto bakers twine. Scripty "happy valentines day" greeting was die cut from a Mama Elephant die. 

Lastly, I added our Valentine message to the opposite side of the card using the print and cut function on a scalloped heart shape. This double pop up ball card was a lot of trial and error but a fun learning experience. Hmmm... so now the burning question is... will there be a pop up ball leprechuan or Easter bunny coming soon?

I gave teddy bear hugs to my "Galentines" in the form of these treat boxes for Valentines Day this year.

The svg cutting file for the teddy bears on these treat boxes comes from Cuddly Cute Designs. I created a box with a fun closure which was inspired by a Sizzix  Thinlits Folding Heart Closure Card Die Set.  The folded heart teddy is holding is what keeps this treat box closed.

As with the Sizzix card, to open the box, the right and left sides of the heart fold together to slide through a slit on teddy bear's tummy to allow the top flap of the box to open.

The heart closure is simply a heart shape folded in half and attached on the fold to the inner box flap with strong adhesive. Happy Valentines Day sentiment was done as a print and cut with LD Charming Bold font.

On the inside: pretty foil wrapped Dove chocolate hearts; the perfect little hug for any Valentine.


Saturday, February 13, 2021

Chinese New Year of the Ox

Gung Hee Fat Choy! I put together 15 of these boxes to fill with homemade almond cookies and share with family and friends for Chinese New Year.


According to the Chinese lunar calendar, 2021 hails in as the Year of the Ox, bringing lots of positive vibes; hardwork, honesty, and determination to help us move forward. 


I found  this template for a simple but elegant box with a unique bow tie closure on Pinterest and tried to recreate it in Make The Cut by welding square and rounded square shapes together. I wanted my box to be large enough to hold a dozen cookies so I broke the template apart into 3 separate pieces cut on 2 sheets of 8.5x11" cardstock. After gluing the pieces together, the completed box measured 5.75 inches square with a depth of 2 inches.

I chose a simple illustration of an ox found on Pinterest and the Chinese character for "Ox" and  rendered them into a stencil cuts using Make the Cut Design program. Metallic foil board and text weight Stardream Jupiter papers were used for the stencil cuts and layered to create the medallions for my cookie box. The Chinese ornamental corners were cut from glittered cardstock using Wiki Caps' Asian Design Die.

I used glitter cardstock and an Elizabeth Craft Designs to add the Happy New Year sentiment onto the inside flap.

And here's a peek at the Almond cookies inside!

Here are the Year of the Ox Lai See (lucky red envelopes) I put together for friends and family. 

I used an image of a cute ox vinyl decal to create a cutting file for the paper pieced ox head, adding washi paper for his outfit. The medallion with the Chinese character "Fu" for good luck was cut from gold metallic foil and red glitter cardstocks using Wiki Caps Good Luck Asian die. Stamps used on the back are from Happy New Year set from Dandelion Designs and Classic Sentiments from Waffle Flower.

Happy New Year everyone! Good luck and best wishes! Things have already begun looking up as we patiently wait our turn to get vaccinated and watch our infection rate numbers go down. Take care and continue to keep safe!