Sunday, February 14, 2021

Teddy Bear Hugs for Our Valentines

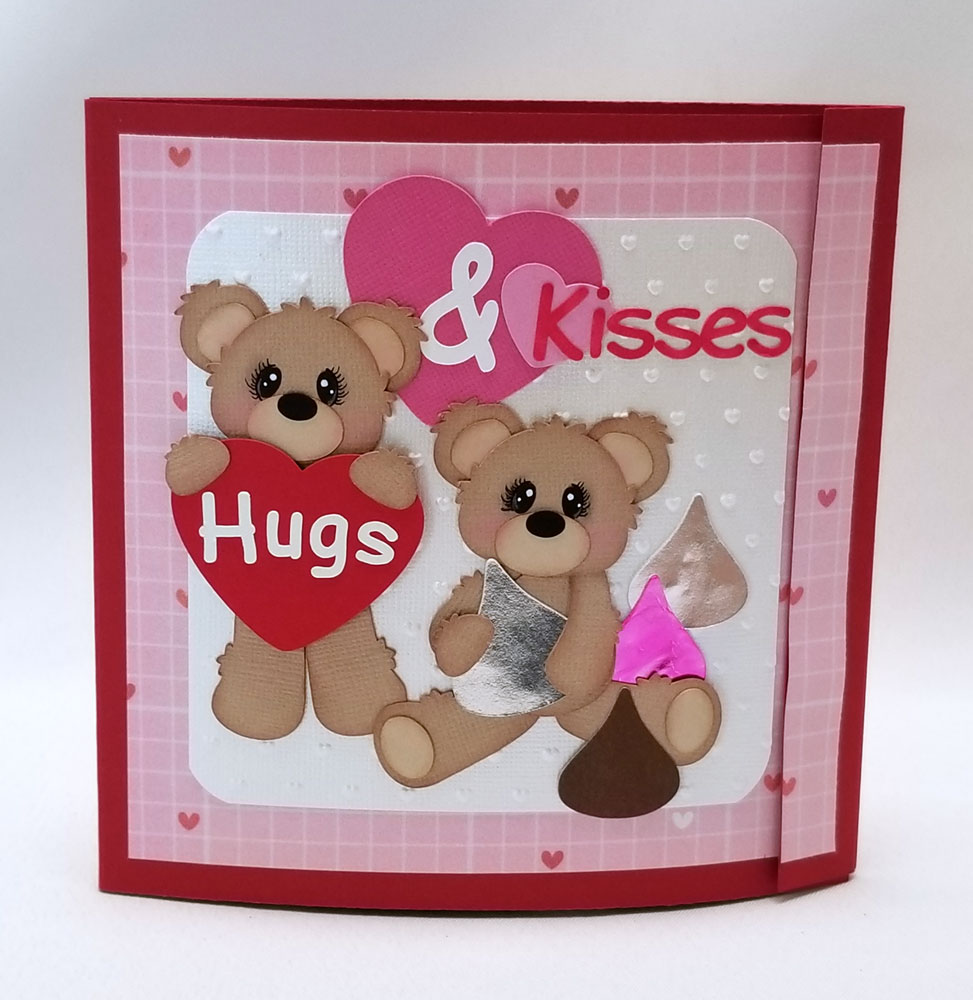
Happy Valentines Day! This is the cuddly teddy bear and card that we packed into a box and mailed to our favorite Valentine this year. Like many kids her age, I'm sure our granddaughter has more plushies than she needs, but this Hallmark teddy was just too hard to resist... when you press on his foot paw, he sings "Skinnamarinki Dinky Dink" as he rocks his head side to side to the music... so ADORABLE! We decided he was the perfect bear to go with this Valentine card I made...

The inspiration for the card front layout as well as the cutting files for the paper pieced teddies come from Cuddly Cute Designs.

I used silver foil board for the wrapped candy kisses and colored one of them pink using Copic markers. Comic Sans font was used to create the title and the rounded square white panel behind the bears was run through a Cuttlebug Heart Dots embossing folder.

Hubby helped me with this short video to show the fun pop up surprise inside the card.

Voila! A pop up ball teddy bear! He's my second attempt at creating a creature using Karen Burniston's Surprise Ball Pop Up die... it's so much fun! This time I used two balls glued, one on top of the other to "build" my bear. I was totally inspired by Frances Byrne's super adorable panda pop up seen here on her blog, Stamp Owl's Studio; as well as all the incredibly talented KB fans who share their wonderful creations on Karen Burniston Pop Up Peeps Facebook page. 

I actually had to spend quite a bit of time carefully studying how everyone had put their creatures together... where on the ball should I glue the nose and eyes and ears? the arms and legs? I used enlarged paper piecings from Cuddly Cute Designs' teddy bear svg cut files for the arms, legs ears and eyes. Teddy's muzzle was a little tricky; I initially did a rough hand cut of the shapes, then scanned the pieces into my computer where I could edit them into symmetrical shapes and cut them using the Silhouette.

Teddy's string of hearts was made by doing a print and cut for the pink hearts with the words, and layering them onto the larger red hearts, then stringing onto bakers twine. Scripty "happy valentines day" greeting was die cut from a Mama Elephant die. 

Lastly, I added our Valentine message to the opposite side of the card using the print and cut function on a scalloped heart shape. This double pop up ball card was a lot of trial and error but a fun learning experience. Hmmm... so now the burning question is... will there be a pop up ball leprechuan or Easter bunny coming soon?

I gave teddy bear hugs to my "Galentines" in the form of these treat boxes for Valentines Day this year.

The svg cutting file for the teddy bears on these treat boxes comes from Cuddly Cute Designs. I created a box with a fun closure which was inspired by a Sizzix  Thinlits Folding Heart Closure Card Die Set.  The folded heart teddy is holding is what keeps this treat box closed.

As with the Sizzix card, to open the box, the right and left sides of the heart fold together to slide through a slit on teddy bear's tummy to allow the top flap of the box to open.

The heart closure is simply a heart shape folded in half and attached on the fold to the inner box flap with strong adhesive. Happy Valentines Day sentiment was done as a print and cut with LD Charming Bold font.

On the inside: pretty foil wrapped Dove chocolate hearts; the perfect little hug for any Valentine.


Saturday, February 13, 2021

Chinese New Year of the Ox

Gung Hee Fat Choy! I put together 15 of these boxes to fill with homemade almond cookies and share with family and friends for Chinese New Year.


According to the Chinese lunar calendar, 2021 hails in as the Year of the Ox, bringing lots of positive vibes; hardwork, honesty, and determination to help us move forward. 


I found  this template for a simple but elegant box with a unique bow tie closure on Pinterest and tried to recreate it in Make The Cut by welding square and rounded square shapes together. I wanted my box to be large enough to hold a dozen cookies so I broke the template apart into 3 separate pieces cut on 2 sheets of 8.5x11" cardstock. After gluing the pieces together, the completed box measured 5.75 inches square with a depth of 2 inches.

I chose a simple illustration of an ox found on Pinterest and the Chinese character for "Ox" and  rendered them into a stencil cuts using Make the Cut Design program. Metallic foil board and text weight Stardream Jupiter papers were used for the stencil cuts and layered to create the medallions for my cookie box. The Chinese ornamental corners were cut from glittered cardstock using Wiki Caps' Asian Design Die.

I used glitter cardstock and an Elizabeth Craft Designs to add the Happy New Year sentiment onto the inside flap.

And here's a peek at the Almond cookies inside!

Here are the Year of the Ox Lai See (lucky red envelopes) I put together for friends and family. 

I used an image of a cute ox vinyl decal to create a cutting file for the paper pieced ox head, adding washi paper for his outfit. The medallion with the Chinese character "Fu" for good luck was cut from gold metallic foil and red glitter cardstocks using Wiki Caps Good Luck Asian die. Stamps used on the back are from Happy New Year set from Dandelion Designs and Classic Sentiments from Waffle Flower.

Happy New Year everyone! Good luck and best wishes! Things have already begun looking up as we patiently wait our turn to get vaccinated and watch our infection rate numbers go down. Take care and continue to keep safe!

Sunday, January 31, 2021

New Years Greetings and Holiday Thanks

Today I'm sharing some of the amazing paper crafts I recently received from creative and crafty friends.
 
My dear friend Lorna has been making these super kawaii paper pieced Chinese zodiac daruma dolls to celebrate New Years for the past few years now. And this year's Year of the Ox daruma might just be the cutest one ever!

I thought it was so clever that she used a jewelry jump ring as the lead nose ring for her ox. Lorna slid her paper pieced Ox into a clear cello bag together with a yummy Japanese senbei (rice cracker) treat.

This clean and simple New Years card was sent to me by Patti of Creations By Patti blog. Don't you love how she makes clean and simple look so elegant and classy with the addition of rhinestones and glitter?
These adorable thank you cards were created by talented paper crafters Karen of Have A Scrap Happy Day and Patti of Creations By Patti blogs.

Karen used a stamped image from Little Miss Muffet Stamps colored with Copic pens to create her thank you card. Isn't this little bonnet girl just the cutest ever? 

This die cut and paper pieced shaker card from Patti is beyond cute! She used Lawn Fawn's Stitched Mug Frame die to create her shaker cup and spoon, and added a paper pieced peeking Hello Kitty, kicking the cuteness level up by several notches for sure!
I apologize that I still haven't had a chance to post Christmas crafts from December, but hope to eventually do some backposting for December as time allows. Will let you know when that happens. Thanks for your patience!


Sunday, January 24, 2021

Persevering with the Year of the Ox


Happy New Year! I'm finally getting back to posting again after a long winter's nap! 

For my first post of 2021, I'm sharing these Year of the Ox mini calendar magnets I put together. They say the Year of the Ox symbolizes hardwork, honesty, diligence and perseverance; positive attributes which will hopefully help pull us through to recovery from all that 2020 threw at us.

I typically make several dozen of these Chinese zodiac calendar magnets every year to donate to my mom's senior citizen group for their annual craft fair. Unfortunately the craft fair was canceled due to Covid 19 safety precautions, so I decided to send the calendars in a New Years card to family and friends instead.

I tried to keep the card simple by having the Silhouette cut a fan shaped window on the front of the card so the top of the calendar would be visible. "Happy New Year" greeting was added using the print and cut function and the sentiment on the inside was stamped using a stamp from Mama Elephant Lunar Extras set. I added text weight Stardream gold paper on the inside. Then a small Heiko cellophane sleeve was trimmed to fit the bottom of the calendar and adhered to the card as a pocket. This way the calendar would be the embellishment on the front of my New Years card and can later be slid out by the recipient to use as a calendar.    

The inspiration for my calendar this year comes from a clip art image by illustrator Sayo which I purchased from Pixta. I used Sayo's leaping ox image to create a paper piecing cut file and added pine, bamboo and plum blossom icons as well as a fan background embossed with the Rainbow Wave embossing folder from Couture Creations. Gold metallic and pearlized papers were used as shadows for the cut images and washi paper as a mat for the mini calendar from Impress Cards.
2020 was a long hard journey for many but I'm hoping the New Year of the Ox brings the strength, tenacity and perseverance we all need to thrive. Please continue to stay safe and healthy!


Saturday, December 26, 2020

Crafty Holiday Treasures

2020 was a year that we'll all likely remember for a long time. Things weren't always easy, and probably many, including myself found solace immersing ourselves in our hobbies. Maybe that could  explain the huge amount joy I felt in receiving so many wonderful handmade treasures this Christmas.


My long time friend Bev always wows us with her handmade Christmas cards, and this year was no different. I love the beautiful and intricate holly/star swirl design she used for the front of her card, not to mention her paper and color choices. 


But the best part of this "Peek A Boo" style card happens as you open it... the "Happy Holidays" sentiment in the window disappears and is replaced with a photo collage of Bev and her family engaging in a virtual meeting. With travel restrictions in place everywhere, many of us, including Bev and her daughters, could only spend time together "virtually". What a wonderful idea to use screenshots for her  holiday photo collage!

My always amazing crafty friend Lorna outdid herself again with this super creative tropical Sand "Snow"man under a coconut tree. 

The coconut tree is actually a tall box filled with candy canes and chocolates! And how adorable is this little "sand man" with his cool hat and shades and even a string of Christmas lights!

This adorable bonnet girl Christmas card and super kawaii Dandelion Designs kimono girls coaster magnet calendar were put together by my very special blogging pal, Karen of "Have A Scrap Happy Day" blog. Karen has made it a holiday tradition to send out her beautifully designed stamped cards and coaster magnet calendars every year. In fact it was she that inspired me to start making my annual Chinese lunar animal calendar magnets too.

How cute is this Hello Kitty snowflake ornament?!!! This meticulously paper pieced Hello Kitty angel was created by my dear friend Claire. I apologize that my photo does not fully capture all the intricate little details of this project, from Hello Kitty's garland of teensy. tiny flowers to her glittery little halo, dress and wings. Claire attached her Hello Kitty angel to a sparkly resin ornament topped with a shiny gold bell... cuteness overload!

This pair of handcrafted treasures was created by my sweet and crafty pal, Kris. 

This  super adorable fuzzy teddy bear with his watermelon is a "tear bear", which Kris created by layering and adhering many tiny pieces of felt together... truly amazing, right? After piecing her teddy bear together, she adhered him to the front of a notepad holder. Imagine this, a notepad with a mini plushie on it... love it!

Kris also put together this delightful matchbox Santa giftcard holder. I especially liked that she used glossy enamel dots to give his eyes that special twinkle! SVG cutting file for this adorable giftcard holder can be found at the Lori Whitlock store.

Here's a fun vintage style shaker card that was sent to me by my super creative blogging pal, Patti, of Creations by Patti blog. Did you recognize Siren, the two tailed mermaid in the center of the shaker of "snow" beads?

Yes, of course you did! That's because all the "patterned paper" that adorns this amazing gift card holder was cut from an actual Starbucks cup. Very clever, and so beautifully put together... definitely a keepsake piece!
Thanks for stopping by! Hope you enjoyed seeing the fun creations put together by some of my sweet crafty friends and that you may have been inspired by them as I always am. 

Friday, December 25, 2020

Holiday Gift Card Tree Boxes

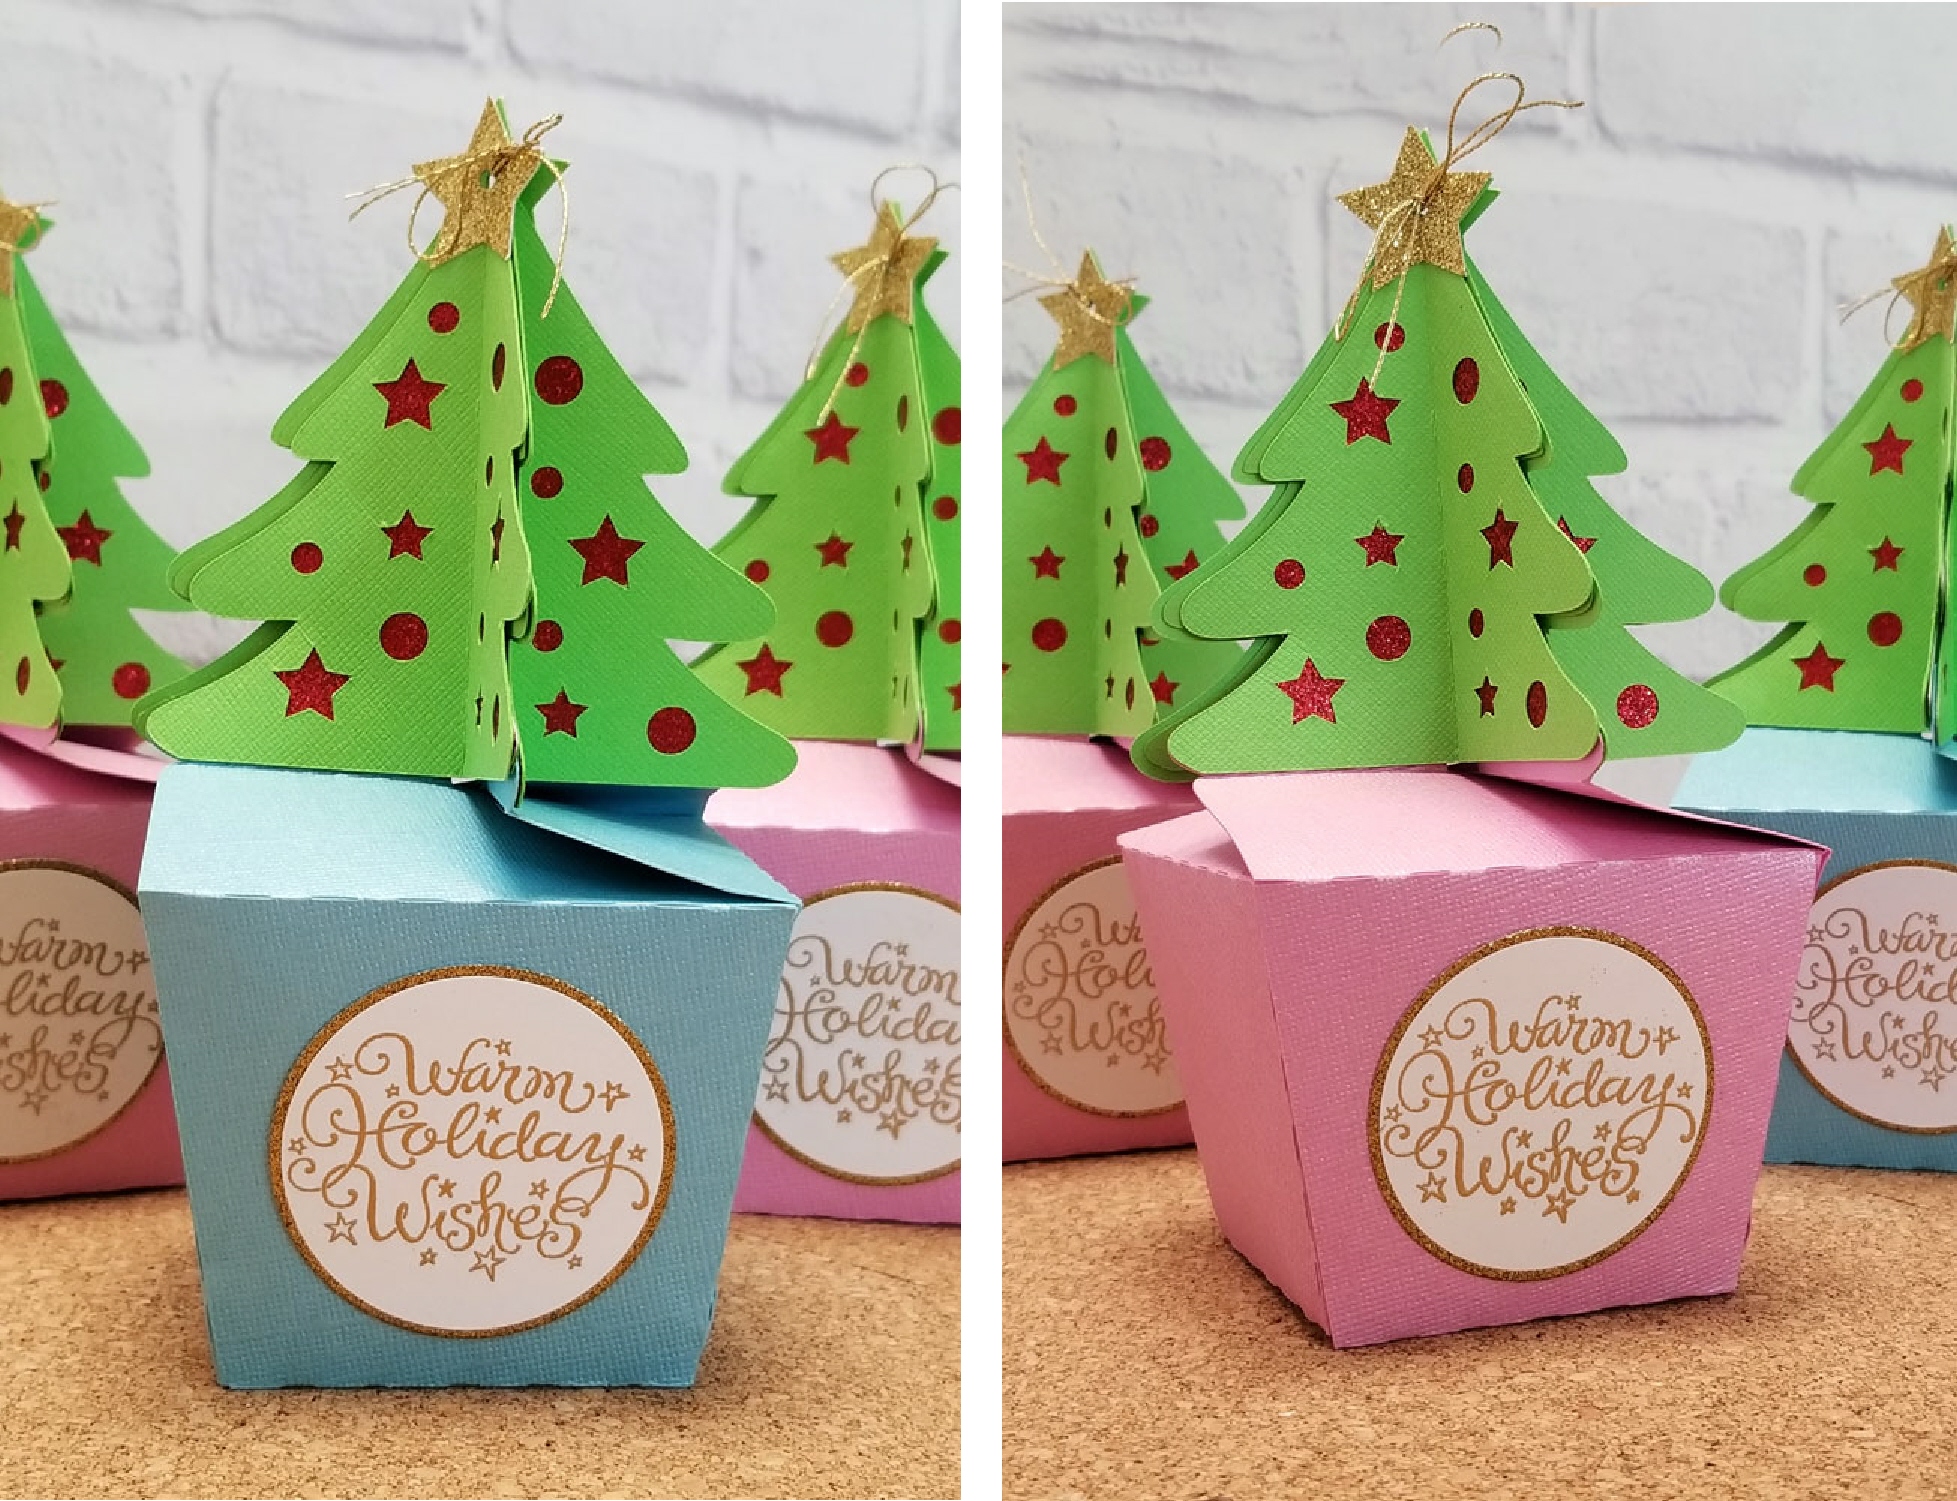
 I put together a little over a dozen of these little tree boxes to use as my gift card holders for nearly everyone on my gift list this Christmas. 

Designed by Pebbles In My Pocket, the svg cutting template for these boxes can be found at their Etsy Digital Store. To be certain I 'd be able to get my giftcards to fit, I enlarged the template for the box as large as possible to fit onto a 12 x 12 mat.

Before cutting the trees, I joined various sized star and circle svgs to tree template so it would cut out as little stencils on the tree. I then added red glitter paper to the backs of the trees so it would show through the front as glittery round and star shaped ornaments on the trees. Then I added another tree shaped layer of green text weight paper to sandwich the glitter paper and box tabs in to give everything a cleaner look.

It takes four tree cuts standing back to back and meeting at center folds to create the desired 3 dimensional tree and keep the box closed. However, since my tree cuts were 3 layers thick, I couldn't get the trees to stand snug enough in place to keep the box nicely closed.  After a bit of fiddling, I ended up punching a hole in the center of the star, threading and tying a length of gold thread into a tight bow to keep the tree sides snug and the box closed.
I stamped and heat embossed a Christmas sentiment from a very old Inkadinkado stamp set in gold metallic powder and backed it with gold glitter paper to create the labels for the front of the boxes.


These pop up gift card holders were put together from a tweaked cut file of a Christmas card created by my dear friend Kris a few years ago. 

After the gift cards were put in the boxes, each was wrapped in a cello bag tied with gold ribbon. The final touch were these very simple round tags with a cut out tree and gold star. I really liked the finished look of these tree boxes and hope everyone enjoyed getting them as well.

Thursday, December 24, 2020

Holiday Treats From Our Kitchen

I decided to change the packaging for my holiday Chex Mix this year from the kraft takeout boxes I've using for the past few Christmases to these clear mylar bags. I like that they can be heat sealed and also have a zipper closure so they can be resealed after opening. Best of all, unlike boxes or bottles, they fold flat and take up hardly any storage space in my closet.

I came across an idea for labels on Pinterest that used this clever play on words: "Merry CHEX mas" for Chex Mix, and decided I wanted to use the same for our oval print and cut tags too. Used Cottage Cutz "Santa Bear In A Pot" die for the cute paper pieced peeking polar bear.

In addition to our usual Chex Mix, this year we decided to make a couple batches of  one of hubby's favorite local style snacks, Prune Apricot Mui to share with friends and family as well.

We packed the mui in plastic portion containers and created fun labels using print and cut for the wording and stamped Dandelion Designs' "You Make Me Smile" panda.