Just a quick post to share a few goodies I recently recieved from the creative ladies in our Cricut Club during our monthly get togethers. From left to right: sweet mini totebag by Ev, a double pocket treat holder by Aileen, and up front an adorable star shaped Eeyore tag by Sharon. Both the mini totebag and treat holders are made from single sheets of square paper, simply scored and folded...just like origami...how neat is that! It's so much fun that everyone always has the neatest and most creative ideas to share and inspire us all. Thank you, ladies!
Oh, and take a peek at this collection of super cute holiday themed treat holders! All of these were meticulously put together by a new friend, Lorna who works upstairs in the same building where I work. Without fail, this amazingly creative and sweet lady has a new surprise to share with us for every holiday. All the time and love she spends stamping, coloring, cutting and creating each of these special treats really shows and makes them so special...thank you from the heart, Laura!
Tuesday, July 10, 2012
Saturday, July 7, 2012
Celebrating Patti!
Today is my best blogging buddy's birthday...and what better way to celebrate than to showcase a few of the treasures I've recently received from her. Many of you probably already frequent her blog, Creations By Patti...and know what an awesome and multi-talented crafter she is! Patti is full of life, effervescent, and one of the sweetest, most fun-to-be-with persons I have ever met. In my eyes, she's of celebrity-status, and I feel humbled and fortunate beyond words to have her as a friend.
First, take a closer look at this very special notepad holder that I received during Patti's recent trip to the islands...this is truly a work of art and nothing short of amazing!
The large red adornment and coin on the front...almost looks like carved gemstone. Love how it sits on the red border strip, constrasting so beautifully with the black and gold background. Notice how everything is edged in gold for a wonderful finished look. And on the inside, a repeat of the red border with more coins...
Details, details, details...it's all about the attention to little details, like these neat metal charms hanging from the spine of the note holder, that always make Patti's creations so unique and special!
Next, the cards...I fell in love with this particular card when I first saw it posted on Patti's blog. So you can imagine how excited I was to be the recipient of this! Stamped image is Lady in Aviary from Stamp Out Cute. Patti's coloring skills on this is fabulous and I love all the gold accents!
This second card in my favorite color features a cutie little Japanese girl stamped image from MFT. Patti gave her a folded crane, paper pieced kimono and even a new hairdo...so clever!
First, take a closer look at this very special notepad holder that I received during Patti's recent trip to the islands...this is truly a work of art and nothing short of amazing!
The large red adornment and coin on the front...almost looks like carved gemstone. Love how it sits on the red border strip, constrasting so beautifully with the black and gold background. Notice how everything is edged in gold for a wonderful finished look. And on the inside, a repeat of the red border with more coins...
Details, details, details...it's all about the attention to little details, like these neat metal charms hanging from the spine of the note holder, that always make Patti's creations so unique and special!
Next, the cards...I fell in love with this particular card when I first saw it posted on Patti's blog. So you can imagine how excited I was to be the recipient of this! Stamped image is Lady in Aviary from Stamp Out Cute. Patti's coloring skills on this is fabulous and I love all the gold accents!
This second card in my favorite color features a cutie little Japanese girl stamped image from MFT. Patti gave her a folded crane, paper pieced kimono and even a new hairdo...so clever!
Awww...isn't this little panda just adorable?
Open her up and see that she is actually a post it note holder...CUTE! Love it!!!
Thank you so much, Patti, for always generously sharing your fabulous and fun creations. I hope all the happiness you always bring to others comes back to you today! HAPPY BIRTHDAY, GURL!!!
Sunday, July 1, 2012
Butterfly Kisses
I am so lovin' that there are so many companies coming out with thin metal dies! With such a large selection of beautiful and intricate dies to choose from, my collection has been steadily growing. LOL, now I just gotta start using them!
So for my sil's birthday card, I decided to finally try out my Cheery Lynn's small Exotic Butterflies set. This comes as a set of three different butterflies, as small as ones on a punch, but yet so delicate and detailed. Wanted to have their wings "pop" from the card without having to worry about them getting squished in an envelope so I put them in another recessed window card.
The flowering branch cut is from Cricut Home Decor cartridge. I used plain white cardstock to cut the flowers and branch, and colored them with Copics to give them a softer color. Butterflies were cut from Bazzill Bling Pearl cardstock, and inked with Tsukineko Brilliance inkpads to maintain their pearlescent sheen. For the background I used Bazzill Bling Diamond cardstock inked with Tim Holtz Distress Ink. Flatback pearls were used for the flower centers and butterflies. Martha Stewart Doily Lace edge punch was used for the bottom border, and font for the greeting is Tangerine.
On the inside, I played with the Solly Pop font again, this time to create a pop up birthday greeting.
Repeated the doily lace borders, added another flowering branch cut and used a label from Cricut Lacey Label cartridge for my sentiment.
Still have quite a few more thin dies that I've purchased but haven't had the time to play with...guess I'd better get crackin' so I won't feel too guilty about buying all the new ones I keep adding to my wishlist!
So for my sil's birthday card, I decided to finally try out my Cheery Lynn's small Exotic Butterflies set. This comes as a set of three different butterflies, as small as ones on a punch, but yet so delicate and detailed. Wanted to have their wings "pop" from the card without having to worry about them getting squished in an envelope so I put them in another recessed window card.
The flowering branch cut is from Cricut Home Decor cartridge. I used plain white cardstock to cut the flowers and branch, and colored them with Copics to give them a softer color. Butterflies were cut from Bazzill Bling Pearl cardstock, and inked with Tsukineko Brilliance inkpads to maintain their pearlescent sheen. For the background I used Bazzill Bling Diamond cardstock inked with Tim Holtz Distress Ink. Flatback pearls were used for the flower centers and butterflies. Martha Stewart Doily Lace edge punch was used for the bottom border, and font for the greeting is Tangerine.
On the inside, I played with the Solly Pop font again, this time to create a pop up birthday greeting.
Repeated the doily lace borders, added another flowering branch cut and used a label from Cricut Lacey Label cartridge for my sentiment.
Still have quite a few more thin dies that I've purchased but haven't had the time to play with...guess I'd better get crackin' so I won't feel too guilty about buying all the new ones I keep adding to my wishlist!
Sunday, June 24, 2012
Resurgence of the Swing Card
Have you seen the new line of Flip-It dies from Sizzix? Gee...wish these were around when I was struggling with my Christmas cards couple years ago! When I first learned to make this type of card, they were called "Swing" or "Swivel Cards"... now Sizzix is marketing them as "Flip It" cards and making them so easy to create! I especially love that they're available in so many fun shapes!
Anywho, seeing all the excitement generated by these new dies got me wanting to make one again too. Searched my Design Studio files to find the cutfile I created two Christmases ago using the George cartridge so that I could use it again to make this Swing style birthday card for my dear friend, Kris.
Used Cricut Hello Kitty Font cartridge for the Hello Kitty fairy cuts. Created a mirror image of the fairy in blue using Design Studio so I could place her back to back onto the swing element. This way she could appear on both the front and on the inside of the card. The puffy cloud-like label is from Cricut Elegant Edges cartridge. Inked the edges of the label with Tumbled Glass Tim Holtz Distress ink and used it for my sentiment on the front of the card and again as the base for the giftcard holder inside.
Digital patterned paper is from the Chic Jessica Paper Pack by Woofy World at My Grafico, corners are from the Cuttlebug Vintage die set, and font is Lettering Delights LD Charming Light. Added Stickles glitter to the fairy wings, flatback adhesive pearls and a white organza bow to finish it off.
On a side note....with the growing popularity of the Sizzix Flip It dies, I've noticed that several very innovative crafters have even come up with ways to re-create this type of card using other types of shapes dies. Dawn Griffith from Dawns Stampin' Studio uses her Stampin Up Framelits dies and shows how she does it here.
As for myself, I guess I'll need to try and figure out a way to do this card in different shapes using either Design Studio or Make the Cut...lol, I just love a challenge to create a new cutfile!
Sunday, June 17, 2012
So Lucky To Have You As Our Dad!
Why is it always such a struggle to come up with creative ideas for Fathers Day cards? For my dad's card this year, I chose to go with a "Maneki Neko" or "Lucky Cat" theme. Last time I looked, he had Maneki Neko images on his computer as a screensaver, so I'm guessing he likes them. I got the image for my card by doing a Google image search and used MTC to render it into a cutfile. Had my Silhouette Cameo do the cutting and was very pleased that I could capture alot of the thin outlines and details.
Decided to add my paper pieced kitty to a sliding pop up card...pulling on the little tab on the front of the card pulls the front panel up and allows kitty to pop foward. Thought dad would get a kick out of that! You can find the link to Kim Score's tutorial here. I used one of the patterned embossing folders from Cuttlebug's Asian bundle to emboss the back panel. Gold vellum & cardstock, and washi paper were used for the accents. Fonts used for the sentiments were Pharmacy, Tangerine and Leelawadee.
Dh's card was a little easier to come up with. I knew what I wanted it to look like, and happily the final result turned out pretty close to what I had imagined. Don't you love when that happens? My card for dh is another shadowbox card, similar to the graduation cards I made earlier.
Here's a view from the top which makes it easier to see the silhouettes more clearly. The golfer & golfcart silhouette images as well as the photo of the sunset were found by doing another Google image search. Did a quick edit of the silhouettes in Photoshop and had MTC render them into cutfiles and weld them into a window. First, I printed the sunset photo onto glossy photo paper and trimmed it to fit into the recessed window as the backdrop. Next,the silhouette layer was cut in black cardstock, adhered to clear acetate and placed over the front of the recessed window. For the final tan colored layer, I used MTC to create another cutfile of a "negative" layer of the golfer and cart by "un-welding" them from the window so that the golfer's foot and tires of the cart would cut into the edge of the window and be visible when layered onto the black layer.
The library label holding the sentiment was created using Design Studio and a cut from the Cricut Lacy Labels cartridge, then adhered to the front of the card with brass mini brads.
And on the inside, my first try at this type of word pop up. This is something I've been wanting to try for a very long time but have never had the time to sit down and learn how to do till now. Found the tutorials for this at my usual favorite go to place for pop-ups, Extreme Cards And Papercrafting. LOL, after reading thru four of Carol's very detailed tutorial lessons, I decided to take her advice and take the "cheater's way out" by using the pre-made tabbed font, Solly Pop Tab Font created by Kay and shared on site at Clever Someday. Still haven't completely figured this out yet...definitely will need to practice more!
Since the inside of my card was 12 inches long, the pop-up word insert ended up being too short for my card. Had to add the torn edge borders to the top and bottom as a quick fix for my boo-boo. That's when I also added the torn edge border to the front of the card so it would match. Not bad, I kind of liked the effect...sometimes boo-boos are good, I guess. For my sentiment, I used a cut from the Cricut Elegant Edges cartridge for the label, and Tangerine & Gabriola fonts.
We celebrated Fathers Day a day early since dh had plans to spend today on the golf course with his buddies. I knew I'd still be sleeping when he left this morning, so I brought home these adorable animal friends from Watanabe Bakery for him and my dad to enjoy for their breakfast. Meet Choco Bear, Apple Bunny and Cream Elephant...aren't they the cutest breads you ever saw? Not only are they cute, they're filled with the yummiest fillings...and you can't help but to smile as you eat them! There's also Sweet Bread Panda and Sweet Bean Turtle in the menagerie... I'll definitely need to bring them home next time!
Saturday, June 9, 2012
Graduation Shadowbox Cards
Wow, didn't realize till my sil started rattling off names that we have a lot of kids graduating in our family this year! I wanted to make special cards and leis for them all, but with so many to do, I knew I had to try to keep it simple. Since I had enjoyed making the recessed window shadow box cards for our moms at Mothers Day, I decided I would go with that again.
These two were the first I came up with...very clean and simple, using only a sheet of cardstock of the school's color for the inside back panel and the graduate's name cut out on the bottom of the card. IRL the cards included the graduates' full names, but I edited the photos to block out the last names to avoid privacy issues.
Clean and simple is great, but I get easily bored....so for the rest of the cards, I experimented with different backdrops for the inside back panel. For my niece's card, I found a photo of her school campus to place behind the silhouette of the graduate.
I tried a metallic gold backdrop embossed with Cuttlebug's Congratulations folder for this one.
And for these two I printed up and added the school emblems mounted with some foam tape.
The tutorial for the recessed window card by Lynn Mercurio can be found over at Splitcoast Stampers. For the front panel of the cards, I used graduate silhouette images found by doing a Google image search. The female graduate is a free image file generously shared by Sue Cimini on her craft blog...thank you, Sue! "Class of 2012" is Amazone BT font and I used Arial font for the personalizations. Used MTC to make cutfiles for each and welded them into windows so the entire front panel would be one piece. Glued this to a piece of clear acetate, and added colored cardstock behind the name before adhering the panel to the front of the recessed window to create the shadowbox.
These didn't take too long to put together once I got started, and happily I had a chance to make each one a little different with some personalization.
These two were the first I came up with...very clean and simple, using only a sheet of cardstock of the school's color for the inside back panel and the graduate's name cut out on the bottom of the card. IRL the cards included the graduates' full names, but I edited the photos to block out the last names to avoid privacy issues.
Clean and simple is great, but I get easily bored....so for the rest of the cards, I experimented with different backdrops for the inside back panel. For my niece's card, I found a photo of her school campus to place behind the silhouette of the graduate.
I tried a metallic gold backdrop embossed with Cuttlebug's Congratulations folder for this one.
And for these two I printed up and added the school emblems mounted with some foam tape.
The tutorial for the recessed window card by Lynn Mercurio can be found over at Splitcoast Stampers. For the front panel of the cards, I used graduate silhouette images found by doing a Google image search. The female graduate is a free image file generously shared by Sue Cimini on her craft blog...thank you, Sue! "Class of 2012" is Amazone BT font and I used Arial font for the personalizations. Used MTC to make cutfiles for each and welded them into windows so the entire front panel would be one piece. Glued this to a piece of clear acetate, and added colored cardstock behind the name before adhering the panel to the front of the recessed window to create the shadowbox.
These didn't take too long to put together once I got started, and happily I had a chance to make each one a little different with some personalization.
Sunday, June 3, 2012
18 and Fabulous!
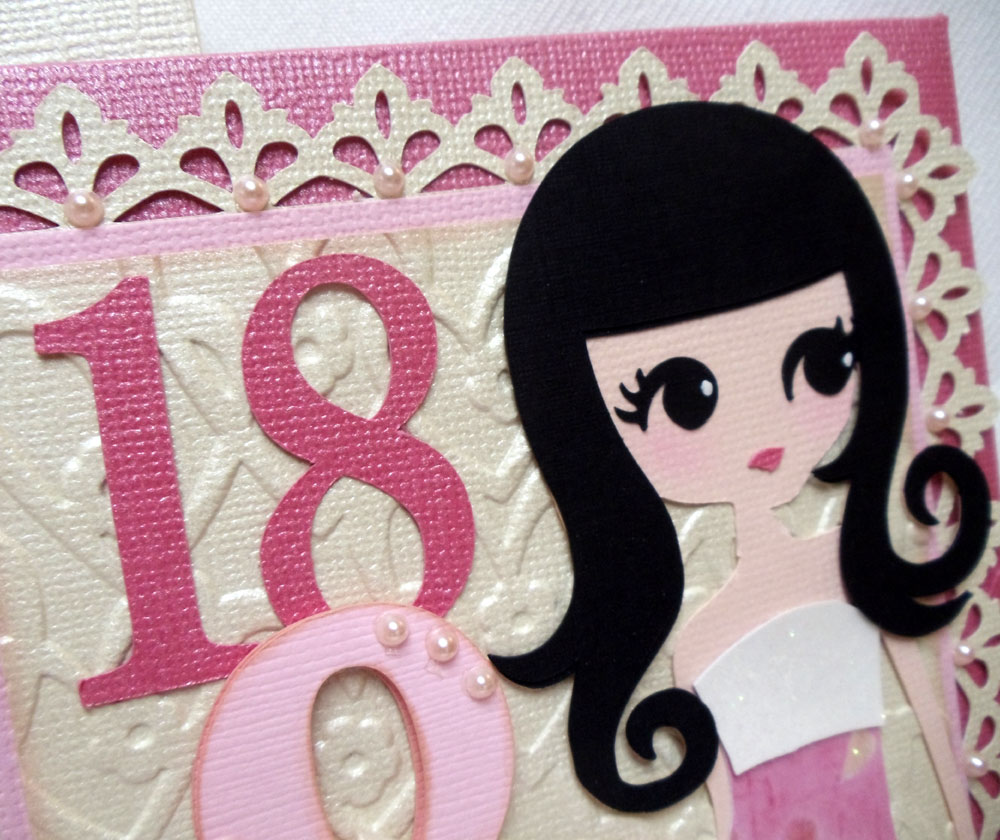
This is the card I created for my dear niece who recently celebrated her 18th birthday. This was my very first non-wedding related project after the wedding, and I really struggled to get my mojo back! This was also my first time trying out the very cool Sliding Money Card and tutorial posted by my best blogging pal Patti on her blog, Creations By Patti. Just made a few size adjustments to accomodate the larger front panel...
For the front panel of my card, I used "Lori" (page 29) from the Cricut Rock Princess cart. Didn't care for Lori's eyes on the original cutfile, so I used Design Studio to give her "Andrea's" eyes (page 34), which are larger, and much easier for my Cricut to cut! I used MTC to make cutfiles for the number "18" and the ampersand using Pharmacy truetype font, layering them on a panel embossed with a folder from Sizzix Valentine Set #2. The lacy border was also created in MTC using an image I found via Google image search.
The neatest thing about this card is that pulling on the tab on the right allows the front panel to slide to the side...
Revealing the card hidden inside....
...where I placed a panel to hold a small vellum envelope for a gift card or monetary gift.
A cut from Cricut's Lacy Labels cart was used to do the label with the Happy Birthday sentiments on the inside of the card. And I used MTC to create the other two lacy panels using images found on the internet and the word "Fabulous" using Freebooter Script font.
So you see, I haven't given up on my Cricut completely...LOL, I have both my Cricut and Cameo sitting side by side next to my computer so I can easily switch cutters as needed! On this particular card, I used the Cameo to do all the lacy label and border cuts and the word "Fabulous"; and the Cricut to cut everything else. As much as I love the precision of my new Silhouette Cameo, I must admit it's still much quicker to use a cartridge with ready made files on hand than having to go searching for an image or a file on the internet. I'm happy to have the best of both worlds!
Subscribe to:
Posts (Atom)