Monday, October 12, 2015

Patti's Disney Magic

On a recent visit, my dear friend Patti of Creations By Patti blog presented me with a most fabulous gift...this totally  jaw dropping, AMAZING Disney themed album!

Everything...every single page, from the front cover to the back is meticulously, carefully thought out and put together beautifully! This is the front cover with a very cool Viewmaster reel that actually spins...and a film strip frame to slide in photos to personalize it.


Are you ready for a magical tour of this amazing album? This is the inside cover and the first page of the album with side pockets beautifully embellished with a glittery castle and Mickey head. Don't you just love this Disney themed paper? Each of the tags inside the pockets has room to add photos on the backside.


Here's pages 3 and 4. Page 3 on the left flips up to reveal a pocket with more cool journaling tags. I love that cute camera! Page 4 flips open to the right with another pocket and journaling tags.


Page 4: Another glittered Mickey head, this time used as side pocket; and Page 5: Mickey head on this is a magnetic closure which opens to reveal lots of space for vacation journaling and more photos.

Pages 6 and 7: Two more beautifully decorated pages that flip open to the side with additional pockets and space for special memoirs.


Page 8 on the right is a pocket page; Page 9 is a creative gatefold. The colorful arrow embellishment is another magnetic closure to keep treasures securely inside its pocket.

Page 9: Opens up to layered waterfall style photo pages. Back cover: pocket on the right holds a mouse ear topped tag and flips open with lots of room for vacation memory keeping.


And then...to top it all off....each page in the album is topped with glittered mouse ears...index file folder style! Very, very cool!

I can't even begin to say how touched I was to receive this amazing gift from Patti. All the time and love she invested in creating this work of art shows and is truly appreciated. This special album will most certainly be a treasured keepsake in our family for a very long time.

Sunday, September 27, 2015

A Simple "Just Because" Card

You know how excited crafters can get when their kids do crafty stuff...well, I'm no different. When I recently learned that my daughter had suddenly taken an interest in the latest crafty craze of decorating planners, I got all excited. I know this sounds silly but I got so excited that I went out shopping for all sorts of cute stamps, stickers, washi and decorative tapes to send her so as to fuel her interest in her new hobby. And of course with all the goodies I had to send a card, right? I guess it's called a "Thinking of You" or "Just Because" card...no occasion, no reason...just because...

Wanted to mail the goodies out right away so had to keep the card quick and simple. I used the Cuddly Critter Koala cutting file from Cuddly Cute Designs...and by using black cardstock to cut his ears, eyes and arms and legs, I changed him to look more like a cutie panda instead of a koala! Then I added a little banner for him to hold by creating the flags in Make the Cut, adding the letters, and stringing them onto some embroidery floss.

Then on the inside, the cute and simple sentiment that explains the missing letter on panda's banner...
Later my daughter told me how she sadly searched the envelope her card came in for the missing "U", thinking it had fallen off...until she read the sentiment inside. Yes, dear daughter...I'm sadly missing "U" too!

Monday, September 21, 2015

"JAVA" Happy Birthday!

You know you're a Starbucks addict when...you've racked up so many drinks and gold stars that you could be a Starbucks Gold member twice over...who me?!!! Well, not ONLY me! My dear friend Heather is one too, and so for her birthday, I got her a Starbucks reusable cup and gift card so she can keep rackin' up those gold stars even faster.
Found what I thought was the perfect cutting file for her birthday card over at Marjorie Ann Designs called "Morning Coffee"...a set of five of the cutest mousies with their coffees. I chose to use the mousie with the takeout cup and pastries on this card....breakfast of champions, right?

I used white cardstock to cut all the pieces and Copics to color them up. This was a great alternative to using colored cardstock, especially since I didn't have any gray cardstock on hand. For the Starbucks logo on the cup, I simply imported the icon to my publishing program, reduced the size to fit, printed it and cut it out. Paper pieced mousie was then adhered to a label from Cricut's Elegant Edges cartridge.

Mmm...don't these Copic colored pastries look almost good enough to eat?

Added mousie and pastry paper piecings onto a Surprise Sliding Pop Up style card.

Pulling up on the ribbon at the top of the card makes the mousie on the front panel slide back and up to a standing position while revealing the sentiment underneath. The neat thing about this type of card is that it also makes a very cool gift card holder. The sliding tab attached to the ribbon pull was just the right size to attach my gift card to. Just thinking now how this might be a really fun way to give gift cards for Christmas!

Tuesday, September 15, 2015

Flying Easel Birthday Card

Over a year has gone by since I my first attempt at a flying easel card...it turned out to be a disappointing fail and since then I never cared to try another. But a few weeks ago while trying to come up with ideas for a birthday card for my mother in law, I decided it was time to give the flying easel card a second chance.

For my "flying" element, I chose to use a trio of paper lanterns with my Happy Birthday sentiment printed on them. Font used here is Chow Mein ttf. Lanterns were cut using a cutfile created in Make the Cut by welding circles and rectangles together. Colored them using Copics and ran them through a crimper to add texture, then hung them to the frame on a length of embroidery thread.

I used a label shape from Monica's Creative Room to create the frame and cut the window. Monica creates and generously shares some of the most beautiful labels,tags, doilies and cards in digital format on her site. If you haven't been there yet, you'll definitely want to check it out! My stamped and colored image is sweet Mei Li from Sister Stamps.

For the stop on my easel card, I used Make the Cut to create a cutfile of an image of a Chinese style medallion with a stylized character for long life found through an image search on the web. 

And here's what the finished card looks like opened to its display position.


Must admit that I was much happier with this second attempt at the flying easel card. The actual construction of the card is fairly simple; but trying to figure out how to decorate it was the hardest part for me. Hoping more ideas will pop into my head soon so I can try this card again!

Saturday, September 5, 2015

Domo Happy Birthday!

My dearest and long time friend Pat is a big fan of the mascot to Japan's NHK broadcasting company, Domo-kun, so I wanted to surprise her with some fun Domo-kun themed goodies for her birthday.

I started out by making this tiered chocolate birthday cake card. The cake, frosting and candles were created by welding basic shapes together in Make the Cut (MTC) and cut using my Silhouette Cameo. The little rosettes were cut from the Springtime Tea die from Cottage Cutz and lacey corners were cut using Spellbinders D-Lites Corner Flourish Two die. Used Stickles and a Marvy Glitter pen to add some fun shimmer and sparkle.

Made this into what I call an "open down" card...the top layer of frosting on the card keeps the card closed. Gently lifting up on this layer of frosting drops the front of the card down to open the card...

...and LOL, it's Domo-kun with frosting and candles on his head with a birthday wish!

The pop up Happy Birthday sentiment was created Make the Cut and Arial font.

And I had MTC trace an image found online to make a cutting file for Domo kun.

Next, I made this gift card holder to include as part of Pat's Domo kun themed birthday gift.


This is a trifold pop up type gift card holder inspired by Angie Leach on her blog, Too Cool Stamping. Comic Sans font was used to create the word "Celebrate" on the front of the card, and I found a cute Domo kun border online to add to the inside.

Then finally, as I was getting ready to wrap Pat's gift, I got a wild and crazy idea to decorate the box as well! I enlarged the Domo kun cutting file I had created for her giftcard to make a huge paper pieced Domo kun to add to the front of the gift box...LOL...so fun! Hoping Pat enjoyed her crazy Domo kun birthday surprise as much as I had fun putting this together!

Sunday, August 16, 2015

Sister Stamps BFF Birthday Celebration

Coming up with a card worthy enough to send to my dear and super talented friend Patti of Creations By Patti for her birthday is always a huge challenge for me. After weeks of scouring the internet for something fresh and new, I finally decided to try the 3-D Scenery Card I saw over at Card Making Downloads. I think I must have watched the video tutorial for this 10 times or more before I finally figured out the mechanics on how this card is put together. LOL, and even then it took me over a week to come up with a working template!

The neat thing about this card is that it's kinda sorta like a box card, but it has a window with shutters that slide open to reveal a scene inside. For the base of my card, I used MTC and tried to create a Japanese style house with shoji doors that slide open. On the outside of the house I used an image of a tree with branches found on the internet and rendered it into a cutfile with MTC. Filled the branches with sakura cut using the Petite Sakuras die from Frantic Stamper. The coolest thing about this 3 x 3" thin metal die is that you can die cut 29 blossoms (4 different sizes) at one pass! I only needed to run it through my Big Shot 5 or 6 times to get enough of the smallest size blossom to fill my trees...great time saver!

On the inside, I used my favorite BFF stamp from Sister Stamps, colored them with Copics and paper pieced their kimonos with washi paper.

The "chochin" or hanging lanterns were created in MTC by welding circle and rectangle shapes together.  I used Copics to color them and ran them thru a crimper to add some fun texture before hanging them onto some black embroidery floss.

Here you can see how the stamped image was adhered to a slider inside the box.

Here's a top view of the card from the front...

...and a view from the back where I added a birthday sentiment. A little hard to see, but that tab towards the bottom of the box is the end of the slider that holds the stamped image on the inside.

Here's the card with the shoji doors closed...

Sliding the shoji panels into it's closed position also collapses the card so it can be put into an envelope. Had fun learning how to re-create this new style of card. Still need to play around and tweak the template for this card a bit more before I try another. Maybe then it can be my new favorite type of card to make!

Sunday, August 2, 2015

Clothesline Baby Card

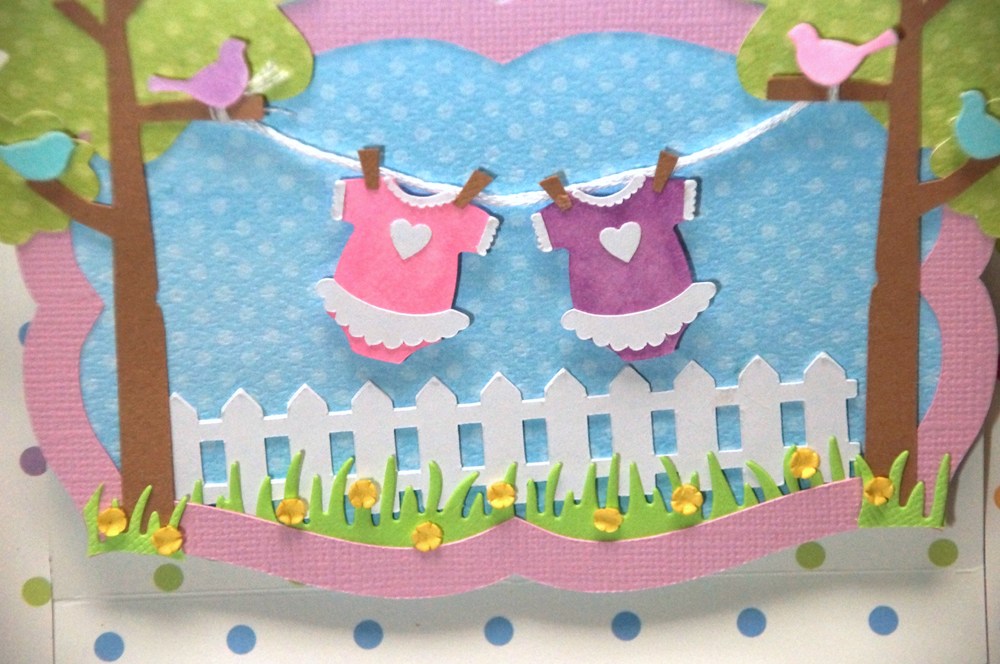
Had to come up with a quick card for a baby shower couple weeks ago for a friend at work who's expecting twin baby girls...and all I can say is, "Thank goodness for Pinterest!" Saw a lot of darling clothesline baby cards and hoped I might be able to put one together pretty quickly.

Found several pins for Onesies on Pinterest, and chose to use a freebie file offered over at the Quilling Patch. No time to spend on choosing colors so I just cut them in white and colored them in with Copics later when I had time to think. Trees are a cutting file from Miss Kate's Cuttables, and I created the picket fence in Make the Cut (MTC) by simply welding triangle and rectangle shapes together. Thin steel dies were used to cut the grassy border (DieNamics), birds (Memory Box), flowers (CheeryLyn), and fancy corners (Cuttlebug). Frame is another a freebie cutting file from Heather M. I cut a length of white of white embroidery floss and tied to the tree branches for the clothesline.

I decided to put my clothesline scene on a Surprise Pop Up Slider Card, instructions by Beate Johns can be found here. Pulling on the tulle bow at the top of the card slides the clothesline scene back and up, revealing a place underneath it for a message or sentiment.

This top view shows the slider attached to the tulle which pulls out with more room to add a message.

And here's a side view that shows how the front cover folds back and up in a way similar to an easel type card. Not at all fancy, but I think the sliding movement of this type of card always makes this a fun card to receive.