Monday, January 14, 2013

Fan Swing Card

Here's yet another swing/swivel type card I created using the MTC program. This time I decided to try something a little different and experimented with a fan shape for this birthday card for a very special friend. Getting the fan to be centered on the closed card was a little bit of a challenge but I think I finally got it to where I'm pretty happy with it.
Fan insert was cut using my Cricut and the Pagoda cartridge, sized in Cricut Design Studio to fit my card. Japanese kanji character "kotobuki" for "congratulations" and "long life" was cut on the Silhouette using a cutfile created in MTC.
I used the Sizzix Birds and Branches decorative strip die for the leaves and branches and medium and small Carl Sakura punches for the cherry blossoms. Flower centers were punched from a Punch Bunch mini flower center punch.

 
Here's the card opened to show the inside. Orignally the card looked kind of bare on the inside, so I decided to add my very first "ningyo-gami" or "Japanese paper doll" to liven it up a little. 

She was actually pretty easy and fun to make. I used tutorials I found on Pinterest like this one by Lina Conde and this one by Melanie Gray Augustin. Need to play around and practice a bit more with this, and hopefully, when I get better at it I may want to try a project showcasing these type of paper dolls.
 

Wednesday, January 9, 2013

Fabulous Pagoda Cascade Card

I'm sharing with you today what I consider the most fabulous handmade birthday card I have ever received in my life. And without a doubt, this incredible cascade card was created by my very special and talented friend Patti, of Creations By Patti.
 
I've had my eye on, and pinned what I thought were some really pretty cascade cards on my Pinterest board for quite awhile now, with the hope that I'd like to try one someday...but none of them even come close to being as clever and elaborate as this one. Woo Hoo! You can just imagine how excited I was to receive this stunningly beautiful card from Patti during our last visit to the Bay area.


Here's a view from the top of the card at a different angle to show all the intricate attention to detail that went into putting this card together...each piece of the red traditional torii gate, the Japanese girl, her kimono and teapot... every bamboo stem, each leaf, painstakingly inked and pieced together to create this very special one of a kind card.


You can find links to all the different svg cut files and learn about the techniques Patti used to create this little masterpiece by visiting her blog here. And while you're there, be sure to check out all the rest of her beautiful creations, guaranteed to amaze and inspire you to no end!

Sunday, January 6, 2013

Homemade Christmas 2012


Receiving anything homemade from friends during Christmas is always very special to me, especially since I know from experience how difficult it is to find the time and energy to get everything done during the holidays. Lucky for me, I have crafty friends who (unlike myself) are well disciplined in their time management skills...look at the little treasures they created!
  

My dear friend Heather (aka the amazing pastry chef) always comes through with the prettiest decorated cookies and yummilicious treats, not only during the holidays but all year 'round!

Awww...isn't this Christmas gift tag from Kris just the most adorable ever? I think I recognize him as the doggie from the Cricut Create A Critter cartridge. Love how Kris dressed him up in a scarf and Santa hat to be festive for the holidays!


Okay, so you had to pick me off the floor after I opened this amazing handmade gift created by my friend Gwen. Everything about this shouts "CUTE"! First check out the header to this little bag of snowmen chocolate treats...don't you just love that peeking Snowman? What a creative and clever way to use her Sizzix and Stampin' Up dies, embossing folder and punches! Now look inside the bag to find three of the most delightful stocking capped snowman Hershey chocolate nugget treats. I'm pretty sure those adorable little snowman caps are fingers to what once were some knitted gloves! CUTE, CUTE, CUTE!!! Now tell me, who's ever gonna eat those chocolates?...not ME!


Then a few days after Christmas, I received another delightful surprise from Gwen...a very classy looking thank you card, eh? Who wouldn't recognize that frosty beard, red belly and shiny buckle!
A warm and fuzzy thank you to all my very talented and crafty friends who put so much time and love into putting together these delightful holiday treasures. You all made me feel so very special!


Tuesday, January 1, 2013

Welcome 2013!


Happy New Year! We celebrated the first day of 2013 together with our extended family, spending time catching up on each others' lives, watching the bowl games on TV and eating way too much! I put together a dozen of these decorated gable boxes filled with homemade treats to share with each family. Originally, I had designed a box for my New Years treats back in November during the Sister Stamps Chinese Zodiac release. *Sigh* I had high hopes of getting started early on those in time for New Years, but as you can see that didn't happen!
I fell behind schedule before Christmas and didn't have time to start on the boxes till after Christmas so I had to keep the decorating  down to something quicker and simpler. I used Sister Stamps Year of the Snake image, mounted onto an octogon shaped gold cardstock run through a Cuttlebug embossing folder. Had my Silhouette cut the Japanese kanji character "Hebi" for snake. Red patterned paper background panel is from My Little Shoebox, Aiko Collection.
As it turned out, the original gable box design I had chosen to use back in November was a bit too small to hold my treats, so I ended up changing it at the last minute to this larger one (6-3/4"H x 6-1/2"W x 3-1/2"D), which could easily hold a dozen cookies.Template for this one was also found on the internet and converted into a workable cut file in Make the Cut.
Chinese New Year is coming up soon (February 10th) and these were pretty quick, so I'm thinking I may make up a few more of these....

Sunday, December 23, 2012

Christmas 2012

It's Christmas! Whew, I really struggled this year just to get a few projects done on time. Every year DH takes twenty jars of sweet cereal mix to work to share with his co-workers. I decided to go with a penguin theme this year to decorate the jars.
The cut file for these penguins came from a set of candy wrappers from Treasure Box Designs, and I used  Spellbinders Nestabilities Labels Four die for the labels. Thank goodness these were super quick and easy! In addition to the penguin, this candy wrapper set included cutfiles for 4 other adorable holiday characters: a gingerbread man, reindeer, snowman, and teddy bear. Maybe I'll do the snowman or reindeer next year.
Though I didn't have much time to do any Christmas crafting, I'm lucky enough to have friends and a mom that did! Mom put together these cute beaded wreath lapel pins for me to share with my friends at work. Thanks Mom, you're the best!
These two very special holiday treat holders were lovingly created by friends Kris and Lorna.
Isn't this chocolate filled Christmas tree from Kris stunningly yummy? Love it! Amazing what people come up with using a bit of cardstock, glue and ribbon. You can find the tutorial by Brenda Quinata at her blog, Qbee's Quest. I know it's a little too late for this year...or maybe not...how about keeping the kids at your Christmas dinner busy by having them make their own?
Once again, Lorna didn't fail to amaze us! This time she brought by these cute chimney boxes filled with goodies for each of us at work. Oh, look! Don't you just love the way she perched a chocolate Santa right on top of the chimney box. So clever!!!

Last year, for the first time in over twenty years, I didn't send out Christmas cards because we were so busy putting together my daughter's wedding invitations. This year, I thought, "It was so nice not having to stress over Christmas cards last year, maybe I won't do them again this year..." Let's face it, when you've done Christmas cards featuring photos of your only child every year for over twenty years, what is there to do when she gets married and moves away?


ANSWER: ...Christmas cards featuring a photo of your DOG!


LOL, I actually did include another photo of all of us together on the inside. For my card, I used the center step card template shared by Sandy Hulsart, Spellbinders Nestabilities Labels Four and Labels One dies, and a Sizzix Holly embossing folder to put sixty of these together.
Tomorrow's Christmas Eve, and I still have gifts to wrap...need to get hoppin'! Sending blessings to all for a very Merry Christmas!

Saturday, December 8, 2012

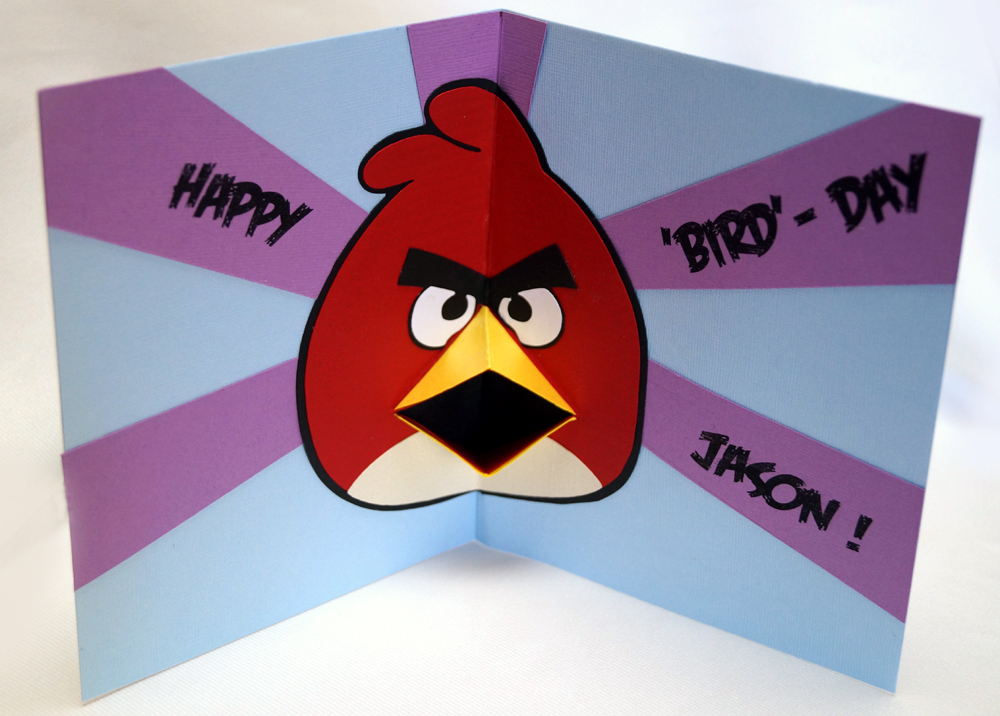
Happy "Bird" Day!

Okay, so I have to admit I'm a bit slow catching on to the latest trends. When Angry Birds merchandise hit the markets over a year ago, I didn't even know what they were about. Well I finally got me a smartphone a only few months ago, and downloaded the game...ok, I'm hooked! So when my son in law's birthday rolled around this year, I knew I had to try my first Angry Bird card. Searching the internet for ideas brought up tons of great ideas, but my favorite was the one created by Chris over at Calla Lily Studio. As you see, mine is a full on shameful copy of hers, but I liked her card so much I didn't want to change it up too much. I think the only difference is that Chris used  punches to create her Angry Bird while I created a cutfile in Make the Cut for my card.

Now, check out the fun v-fold pop-up on the inside! This fab template is the work of none other than pop-up master, Carol over at Extreme Cards and Papercrafting. Carol generously shares her template, complete with an easy to follow tutorial on her blog. Thank you, Carol!
Whew, thanks to the creativity and inspiration from both Chris and Carol, my Angry Bird birthday card didn't take too long at all to put together.
Then to add to the fun, I sent my son in law's card off with a box of Angry Bird Gummy candy with some birthday cash tucked inside. Hope he enjoyed it!

Saturday, December 1, 2012

Sister Stamps Chinese Zodiac Collection: Release Day!

Today is Release Day for the first two stamps in a series from Sister Stamps new Chinese Zodiac Collection! The cute snake and horse images are available for purchase at many of your favorite craft and scrapbook stores, you'll find them listed on the sidebar over at the Sister Stamps official blog.

For my card today, I chose to use the new Horse stamp from this collection. The thing I really love about these stamps are that they are so versatile...not only can they be used for all your creative New Years projects...they're so darned cute that you'll find yourself wanting to use them year round on many other occasions as well!
As an example, I decided to try a fantasy themed center step card.

Used copics to color the adorable horse in shades of pink, glittering her mane and tail and placed her on a bed of puffy clouds embossed with the Cuttlebug swirls folder...

 
Added a lavendar magical castle cut from the Cricut Once Upon A Princess cartridge in the background, a colorful rainbow and a few stars to complete a fun card perfect for any little girl's birthday.
I gotta admit that I'm not much of a stamper anymore, but I did have fun getting my fingers inky again for this new Sister Stamps release! Thank you, Jenny for allowing me to play along. Looking forward to joining you all again in February to kick off the release of the next two Zodiac animals in this series!