Tuesday, October 31, 2023
Black Cat Lanterns
Monday, October 30, 2023
For Fashionista Ghoul Friends
Monday, October 23, 2023
Double Spinner Square Pop Up
I knew I wanted to put together walking teddy bears for the front of my card but since I couldn't find a cutfile for one, I ended up using a combo of cutting files to create an image of teddy bears walking together. I used Marjorie Ann Designs' "Take Time To Smell The Flowers" and "Franklin Brain Freeze" for the teddy bears, hats and sunglasses; and Cuddly Cute Designs' Girl On Scooter for the sneakers.
On the inside of the card, I installed two sets of Karen Burniston's Spinner Square Pop Up mechanisms for a fun interactive card. As the card is opened, a panel on the left side with the word "Happy" swings up, while a panel with the word "Birthday" simultaneously swings down on the right side.
The pivoting mechanisms which create all the movement are hidden behind the decorated square panels. The mechanism on the right of the card was installed in the usual manner and the the mechanism on the left was installed upside down to get the spinner to rotate in the opposite direction. Karen Burniston's You Tube video tutorial here explains all the details. I've owned and used this Spinner Square Pop Up die to make cards for a couple years now, but only recently have felt confident enough to try two in one card. Don't know why I waited so long... it was easy and so fun!Monday, October 16, 2023
Pop Up Rubik's Cube Card
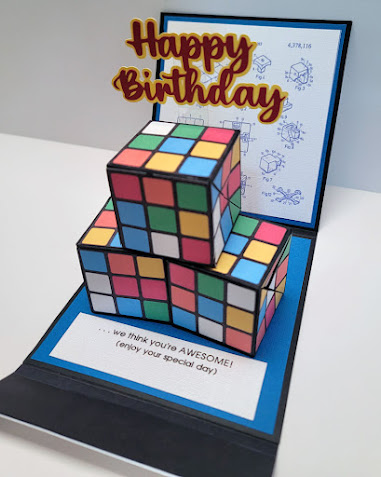
Many years ago when we first met our son in law (as our daughter's boyfriend), he used to wow and delight our family by demonstrating his speedy Rubik's Cube solving skills. I recall thinking back then that it would be cool to make some sort of Rubik's Cube themed birthday card for him, but it took me ten-plus years to finally come up with one for his birthday this year.
The paper pieced Rubik's cube I put together for the front of the card started off as an image I found through a Google search which was rendered into a svg cutting file using Make the Cut Design Studio.Monday, October 9, 2023
Simply Putt...
Kept the front of the card very simple. I used an old cut file I created a while back for the golf putter, and the shoes were a freebie svg file I picked up at SVG Cuts. Golfer's jeans were hand sketched to fit with the shoes, then traced in Make the Cut to create a cutfile. Happy Birthday sentiment was hot foiled and cut using Spellbinders "Be Bold Glimmer Sentiments" hot plate and die set.
I decided to create a Double Slider interactive card. As the tab on the right of the card is pulled out, the golf ball slides in the opposite direction to the left of the putter and appears to drop into the hole. I used a video tutorial on You Tube by Karolyn Loncon of MFT Stamps as a guide for the construction of the mechanism for this Double Slider Loop card, found here.
Slider cards have always been my nemesis because so many things can (and usually do) go wrong that prevent the slider mechanism from working smoothly. This time around, I did a bad job of cutting the channel for the ball to slide along, which caused the ball to get caught along the jagged edge. In an effort to avoid having to redo the entire front panel, I rubbed a candle along the rough edges of the cut line. The wax from the candle really worked to smooth it out and got my slider working smoothly... so happy!
I attached the slider front to a top fold slimline sized card and added my sentiment together with some golf clip art on the inside of the card.Monday, October 2, 2023
Rectangle Pop Up Card
My card today is a Rectangle Pop Up card together with a matching gift card holder.

I purchased the SVG cutting file, "Rectangle Pop Up Arbor" from the Lori Whitlock Store to create my card. The mechanism for this pop is the same as for the hexagonal pop up cards I've been making for a while, the only difference being that the shape of the base of the card is rectangular instead.
The original file for this card includes the flowering arbor, fence, tree and bird. Just to add a bit more fun, I also added a paper pieced Patches the teddy bear with a watering can from Marjorie Ann Designs "Take Time To Smell The Flowers". I also added a few additional die cut flowers using Spellbinders "Mini Blooms and Sprigs" die.Heres a couple of views of the card from the top and sides which show the struts where all the paper pieced embellishments were attached to.
Here's the card flattened, ready to go into its envelope. I added a birthday sentiment to the back of the card. I also created and included a small instruction sheet to enclose with the card, just in case the recipient needed help opening her card.
Then just for a little excitement, I used Karen Burniston' Slider Box together with the Bam Box Pop Up, and Surprise Cube Pop Ups for a fun presentation of a gift card.


