Monday, March 21, 2011

Butterfly Spiral Pop Up Card


Because she is so special, mom's birthday card had to be extra special too. The flower on her card was created by cutting the flower from the Plantin Schoolbook cartridge in five graduated sizes, then chalking the edges, and spraying with Tsukineko crystal spritz. Petals were shaped using the molding tool from the Punch Bunch embossing tool kit, then flowers were layered and glued together. Flower center is gold vellum punched with a Nellie Snellen punch and a flatback pearl. Leaves were also cut from Plantin Schoolbook, folded in half then run thru a paper crimper at an angle.


After spending considerable time searching through all the cartridge handbooks for a butterfly image to use (they are a lot!) I finally settled on the one from the Sentimentals cartridge. Cut several layers of the butterfly using different papers...gold vellum, gold cardstock, pink cardstock and pink patterned paper. I used  narrow strips of foam tape near the center of the wings so they would pop out an an angle.
Added a strip of white cardstock punched with  Martha Stewart's Graden Trellis deep edge punch and a swirly flourish cut from the Home Decor cartridge for background embellishments, and Nestabilities Labels One die to cut out my sentiment.
Here's how the card looks on the inside...


My very first spiral pop up card! Been wanting to try this for awhile now, and thought butterflies might look pretty cool on a spiral so I decided to give it a go. Found instructions and a video tutorial for this over at Splitcoast Stampers.
Butterflies were punched from various shades of pink cardstock and vellum using a Martha Stewart punch and adhered to the spiral with glue dots. For my spiral, I decided to use clear acetate instead of cardstock, thinking it would increase the illusion of the butterflies floating in mid-air.

Also added another large butterfly from the Sentimentals cartridge, and used a simple box pop up mechanism behind it. Flourish embellishment is the same one used on the front of the card from the Home Accents cartridge, and Nestabilities Labels One dies were used for the sentiment.
To assure that the flower and butterfly on the front of the card wouldn't get crushed, I definitely needed to put it in a box. Used the George cartridge and Design Studio to make a quick and easy box. Used my Martha Stewart Layered Arches edge punch for the belly band, and for the medallion, I used Stampin Up's Scalloped Circle punch and rubber stamp with another punched butterfly added to the center. I liked how the spiral pop-up with the butterflies turned out, although I did have to practice cutting the spiral quite a few times before I got it right. Definitely want to try this again...maybe with stars or snowflakes?

Tuesday, March 15, 2011

Always Our Princess

When it came time to make a birthday card for dd, I decided to do another waterfall card because I figured she'd get a big kick out of all the neat page flipping action. And after seeing the images of all the cute girls with "attitude"  on the Rock Princess cartridge, I knew they would be perfect for her card.
Pulling down on the tab on the bottom at the front of the card flips open the pages...


Using Design Studio to size the girls large enough, I cropped off the bodies so I could get just their head shots onto the pages. Then since I wanted it to look like they were all the same person (my dd), I used Design Studio to copy and paste the eyes of one of the girls (the "Andrea" image) onto the faces of all the other girls.
All patterned papers for the background are digital, from Lettering Delights, Designer Digitals (Mindy Terasawa), and Little Dreamer Designs (Nancy Kubo). I really like that with digital papers, I can print the papers together with the greetings, and just to the size needed, eliminating the neverending problem of having to stash more scraps.
After finishing my waterfall card, I glued it onto the front of another card, which opens up to reveal a pop-up card inside...

Here's what the pop-up card inside looks like from the top..
Really had fun doing this, it's sorta like making two interactive cards into one!

I used the Opposites Attract cartridge for the "YOU" on the inside of this card, George cartridge for the heart shape and a Sizzlet die from a set for the tag. Patterned cardstock on the inside is from the DCWV Glittered Sweet stack, and the cake was fussy cut from the same stack.

Tuesday, March 8, 2011

Splashin' Good Time!

Here's another whimsical card I made, this one for a little boy's first birthday celebration. The theme for his party was "Ocean Friends", and happily I found a plethora of cute ocean creatures to cut on the Life's A Beach cartridge to use on my card. I used the Don Juan font cartridge for the wording on the front of the card. I've found this font to be one of the easiest of the Cricut fonts to weld together with Design Studio and like that it remains easy to read after welding.
I decided to use a center pleated card format for this card, and used strips of clear acetate glued into the center pleats to hold my ocean creatures in place. I thought it was sorta neat how the clear plastic strips made the fishies appear to be suspended in air...or in this case, water!
If you look closely, you can see the strips of acetate. The birthday cake comes from the Stretch Your Imagination cartridge. The happy birthday greeting at the top was cut using a Quickutz cookie cutter die and computer generated greeting is Two Peas Flea Market font.


A detailed tutorial and a link to a video tutorial on making this type of card can be found at Extreme Cards and PapercraftingReally like that this type of card is quite simple to do and full of so many possibilities!

Wednesday, March 2, 2011

Have A Blast!

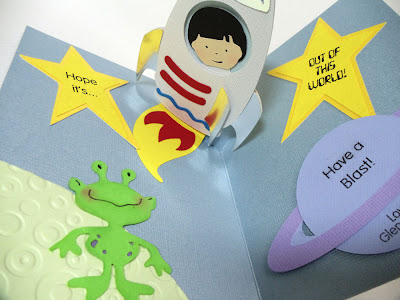
Making cards for the guys in my life is always such a challenge. Funny how cute stuff are okay for girls of any age, but for guys, cute stuff  just doesn't seem to work. Such it was with this card...I thought the rocket & astronaut were adorable on the B Is For Boys Cricut Lite cartridge and thought it would make a clever pop-up card.
I decided to use a V-fold pop-up on the inside so the rocket would pop-up when the card was opened and make it look like it was soaring into space...
Kinda cute, huh. Only thing was that this card was created for dd's fiance who was celebrating his 25th birthday! Lol, lucky for me, he has a good sense of humor and really does appreciate these homemade cards!

All cuts for this card are from Cricut cartridges...the saturn-like planet is from the Superman cart, stars are from George and funny little green martian from Everyday Paper Dolls. Also ran the martian's planet thru a Cuttlebug embossing folder to give it some fun texture. Had fun putting this together, but I guess it turned out a bit too boyish for a young man of 25!