Friday, March 30, 2018

Lindt Gold Bunny Boxes

Lindt Gold Bunny boxes! I have been wanting to make these for the longest time, ever since I saw the ones Elvira Hortner created and posted on her blog, Elvira's Stempelzimmer 2 years ago.

So you can imagine my excitement when I got my curvy keepsake box die couple weeks ago, knowing I could finally make gold bunny boxes just like Elvira's for Easter.

Well the craziest thing is that I ended up not using the curvy keepsake box die for my treat boxes after all! After struggling  for several hours to make this box using the cuts from the curvy keepsake die, I finally decided it would be much quicker and easier to create a cutting file for it in Make the Cut design program and have the Silhouette cut each out. This also allowed me to change the window shape to an oval and create a scallop frame for it.

Had so much fun decorating the front of the boxes using the bunny dies from Impression Obsession, Dienamics grass border die, and Punch Bunch mini flowers punch. I just love these little gold bunnies and was so happy to find them more readily this year. Been seeing lots of different versions of adorable boxes featuring these bunnies recently and hope to get a chance to try some of them next year too!

Saturday, March 24, 2018

Curvy Keepsake Box Bunnies

Got  my Curvy Keepsake Box die in the mail last week and just in time to play with it to make some fun Easter treat boxes.

Been seeing so many super cute critter treat boxes created using the Curvy Keepsake Box die posted on Pinterest and You Tube that I finally broke down and got myself one too.

Best part is how quickly all that cuteness comes together! Easy to create almost any critter you can think of with just a little imagination, and simply by changing the eyes, nose or ears. A dozen of these last minute bunny boxes were put together the night before and ready to share with my fellow crafting buddies the next morning at our meeting...super quick and easy! I'm looking forward to trying to make many of the different cute little critter boxes others have created using his die!

Saturday, March 17, 2018

For A Deer Friend

One of my "deer-est" friends celebrates her birthday early January. I'm usually going crazy working on New Years projects around that time, so up till now I've been writing "Happy Birthday" in her Christmas card...how terrible is that, right? Well now that I'm retired, I figured I should have more time, so no more excuses!  But as fate would have it, I fell behind and barely had time to make a decent card for my dear friend. Luckily, I came across the "Bridge Fold" or "U-Fold" Card.... and learned a super quick and easy card to put together!

I used Cricut Create A Critter cartridge for the cute deer and butterflies, and the tree is a svg cutfile from Doodlebug's Kitten Smitten.

With this view from the top you can see that this is very simply a gatefold card with a long strip adhered to the "gates". A strut is added inside where I glued the deer and a clear acetate strip for the flying butterfly. I kept my card super simple because I was in such a hurry to get it done, but there are some very beautiful, elegant and intricate Bridge Fold cards created by many talented crafters posted on the internet.

On the backside, I added my sentiment to a pocket so I'd have a place to slide in a gift card.

Here's the card flattened, ready to slide into an A6 size envelope. The beauty of this card is that it's super easy to alter the size of the card by changing the height of the card and the depth of the side folds to fit any size envelope you might have on hand.

Monday, March 12, 2018

Great Gramma's Birthday


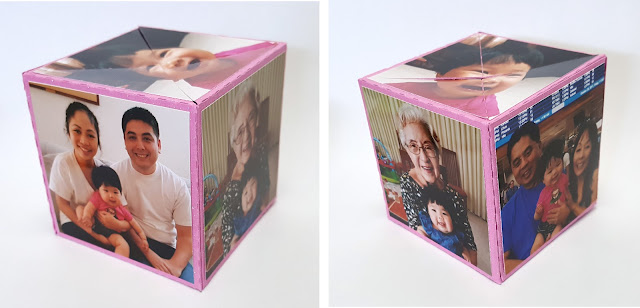
My mom celebrated her first birthday as a Great Gramma last year, so I thought she might enjoy an  Instacube card where I could showcase photos of her new great granddaughter.

Little Evie and her mom and dad had just come for a visit a couple months before my mom's birthday so the timing was just right to get photos for her card.

Used a photo of Evie on the top of the cube and photos of her with her great gramma, gramma & grampa, and her mom & dad on three sides of the cube. Our birthday sentiment went on the fourth side of the cube.

As with all  Instacube cards, this rubber band activated card folds flat to slip into a sleeve. I decorated the sleeve for mom's card very simply by using a print and cut image from Miss Kate's Cuttables and adhering it to the front with foam adhesive. Honestly, mom didn't seem too surprised or impressed about the pop-open action of her Instacube birthday card, but she definitely seemed pleased about the photos...that's good enough for me!


Monday, March 5, 2018

Happy Hinamatsuri!

Yesterday (March 3rd) was Hinamatsuri, or Girls Day when we celebrate the girls in our families and send wishes for their good health and well being. This is the Girls Day card I made to send to our granddaughter this year for her first Hinamatsuri.


Paper pieced Hinamatsuri prince and princess dolls, lanterns and screen were created in Make the Cut design program from coloring book images found on Pinterest. I wanted to keep the card style simple so I chose to make a Joy Fold type card. I used washi paper for the base card panel and embossed the left front panel using Darice Cherry Blossom embossing folder. Sakura punches from Carl and Punch Bunch were used for the blossoms on the inside flap.

The older girls in our lives got these Cherry Blossom boxes filled with homemade mochi.

I used Currency Gold cardstock to make lidded boxes, then made sleeves with light pink cardstock with a cherry blossom center to slide them into. Darice Cherry Blossom embossing folder was used to add texture and stickles for a little bit of sparkle.

To create the sleeves, I used an image of a cherry blossom, adding a curved cutting line to the center of the blossom. The flower was then welded onto a half circle shape in Make the Cut design program and I did a print and cut onto pink cardstock. Two were cut for each sleeve and adhered onto the ends of a retangular piece of cardstock to complete the sleeve.
See how the flowers on each side slip into each other to close the sleeve? Honestly, I thought this would be such a neat box but...BLEEEEP!!!  Design FAIL!!!  Problem was with the box in place, the ends of the sleeve barely reached to be able to slide into each other. I tried to remedy it by increasing the length on both slides but that caused it to be too loose. I ended up having to assemble the sleeve first, then slide the box into it. Looks the same, but still not the same, if you know what I mean!


I put my mochi into small plastic bento containers wrapped in Japanese textured paper and put them into the gold boxes. Sigh... still disappointed that the boxes didn't turn out quite like I had imagined. Lol, a paper engineer I am not!

Okay, in contrast to my poorly engineered box, now feast your eyes on this AHH...MAZING Girls Day treat box put together by my dear friend, Lorna! So super kawaii, right? Lorna created this adorable stand up kokeshi...with pink hair...just like those wildly popular Kimi Kokeshis...and placed her on a cherry blossom. Then she adhered this to a plastic flower shaped treat container...just so clever beyond words! Definitely gonna have to CASE this one!