Wednesday, October 31, 2012

Halloween 2012

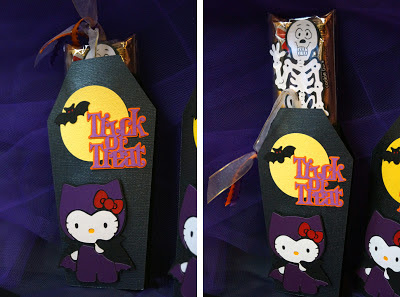
Really struggled this year with getting all my Halloween projects done on time! These two coffin shaped "boxes" were the first thing I completed...had to get them done early so I could mail them to dd and her hubby last week.
 So the original plan was to make and decorate coffin boxes filled with Halloween candies...I even purchased the cut file to do exactly that. But when it came time to cut the boxes, I suddenly changed my mind. I really wanted to try something more fun and different...with at least a little bit of an unexpected surprise factor...

 I started out by decorating the front of the coffin boxes. I used Tokidoki's CiaoCiao to dress up the top of one box and a spider and spiderwebs for the other. All cuts on these boxes except the bat, spider and CiaoCiao are free svg files created and shared by Bird of Bird's Cards. The bat and spider are from a Cuttlebug die, and the cutfile for CiaoCiao was created in MTC.
Then, instead of making a box, I decided to use the old candy bar pull idea. Remember that one? Here's how it works...


Pull up on the ribbon on the top and out slides a candy bar...with a skeleton!

 Pull up on the ribbon on the top and out slides CiaoCiao's soulmate, Adios!
You can find the tutorial for the basic candy bar pull by Selma over at Selma's Stamping Corner. I just changed mine up a bit by creating a "boxy" sleeve for my candy bar instead of a pouch. To create the sleeve, I used a piece of cardstock 5.25" x 5.5" and scored at 0.5", 2.5", 3", and 5". I then glued on a coffin shaped front and back to the sleeve.
Also did several more of these for friends using Vampire Hello Kitty...


The surprise pull up skeleton on these are a cut from Cricut's Paper Doll Dress Up cartridge. I thought he looked a little cuter than the one I had used earlier for the first coffin box I did.
As much fun as these coffin boxes were to make, admittedly they took more time than I had...I needed to come up with some treats that were quick but still cute. So this is what I came up with next...
The idea for these candy bar wrappers came originally from an article from Woman's Day Magazine online, complete with instructions and templates. The original templates for these fit a large size chocolate bar, and after creating a cutfile for these in MTC, I realized I would need more than 1 sheet of cardstock for each! That's when I decided to scale down the size of the template to fit a snack size candy bar instead.

Next thing I did was to change off the original vampire's head with Vampire Hello Kitty and Kuromi...

Added a bat and stamped Happy Halloween to the wings inside, and tied it closed with a bow. These were pretty quick to do and I was able to finish 20 of these just in time!

For our Halloween treats for our family, I decorated gift bags using a free cutfile from My Scrap Chick. This was originally a Friday Freebie tag svg which I enlarged to fit the bag.

If you have a cutting machine (like the Silhouette or eClips) that uses svg files, be sure to sign up for the My Scrap Chick newsletter to get access to the cutest new freebie svg files every Friday!

And...for my last Halloween project this year, I decorated these gift bags to hold doggie treats for Latte's doggie pals. Snoopy and jack-o-lantern image was found doing an image search on Google and having MTC create a cutfile for it.

Speaking of Latte...here she is, though not too happy...in her skeleton costume wishing you all a safe and Happy Halloween!

Sunday, October 28, 2012

Lorna's Amazing Haunted House Treat Box

Are you ready for Halloween? Nope...not me! I'm STILL working on my projects...so I can't post them just yet. But just had to share this fabulous haunted house treat box I received last week from my friend Lorna. Isn't this just AMAZING?!!!! The detailing on this haunted house is absolutely crazy...each of the four sides is different, so intricate...and beautifully decorated!
 Lorna used a Sizzix Gingerbread House Bag die to create her haunted house...so clever! She added texture by running her cut through an embossing folder and I love how she cut the icing part in green, inking it up in black to give her house a very cool eerie-ness. Cute skeleton, ghost, tree, and tombstone were cut with her Cricut using the Paperdolls Dress Up cartridge, fence is a Martha Stewart punch, and the adorable little witches are digital clip art images from Leigh's Wishing Well. The addition of the large circle cut full moon pulls everything together to complete this totally amazing project. But wait, that's not all....

Look at the surprises I discovered inside! Yummy candy coated chocolate "pearls" in festive Halloween colors...and a witches' broom!  Can't see too well from the photo, but the broom is actually a candy pop dressed in fringed tissue and twine...how cool is that!
Needless to say, I was simply blown away by all of this! And get this...Lorna later told me that she made SIXTY of these! Thank you, so much Lorna! Every minute, all the thought, and love you poured into creating this incredible treat box is truly appreciated!

Saturday, October 20, 2012

"Panda"monium!

Not sure exactly why but lately I find myself wanting to create things with pandas on them...these origami fold bags were made to be donated to my mom's senior group for sale at their craft fair fund raiser last month. Same tote bag I made earlier this year with a few changes.
I used cardstock for the handles instead of ribbon this time, and am much happier with how it looks. Also changed panda's face a little, I think he looks better now too. For the flower, I used the same sakura cutfile I had created earlier for the tag on our Cricut Club bag swap last month. Patterned cardstock is from My Little Shoebox, Aiko collection. Everything came together pretty quickly so I was able to make several of these in a short amount of time.
Then in addition to the Hello Kitty Post It Note Holders, I also made a bunch of panda ones. Super duper quick and easy...these are part of the Kyoto Kuties free SVG files shared by Jin over at Under A Cherry Tree. Sigh...I think mom was a little disappointed with all my little quick and easy projects, but at least I know everything did sell. Next year I promise to come up with something better, mom.
And here's yet another panda project....found this cute guy on the internet and couldn't resist creating another panda cutfile.
Used Make the Cut to create the cutfile and cut him in vinyl to decorate a cup for a special friend. Oopsie! As you can see I didn't do a good job of aligning the black vinyl onto the white...see the white showing through by his feet?  Cut panda one more time using cardstock to create a matching tag for my gift.
Got one more panda project to share, but will save that for another day...

Sunday, October 14, 2012

Hello Kitty...Hello Latte...

When it came my turn to "share a project" couple months ago at our Cricut Club meeting, I was lost for ideas and my mind drew a blank. Panic set in the week before the meeting when I still hadn't come up with any ideas. It definitely had to be quick and easy since I wanted to do 17 of them...then I remembered the cute panda post it note holder my pal Patti had sent me a while back. Patti had used a free SVG file shared by Jin of Under A Cherry Tree and her Silhouette to cut her post it note holder. I decided to try something similar, but with Cricut cartridges and Design Studio.
Using Cricut Design Studio and the George cartridge, I welded squares and rectangles for the body of the post it note holder as well as circles and ovals to create Hello Kitty's neck, arms and feet. Hello Kitty cartridge for her head. The original plan was to have them all made and ready for giving, but due to computer technical difficulties, I barely had all the pieces cut in time for the meeting. As a result this project turned into a make and take and everyone had to assemble their own...sorry, ladies!
After the meeting I cut and put together several more of these kitties to donate to my mom's senior citizen group for their craft fair. Lol, she wasn't too pleased with these at first..."what will people do with this?" But she told me later that they sold well...everyone loves Hello Kitty, right?
And finally... (yes, finally) I recently graduated from my dumb phone to a smart phone. Dh decided it was the better way for me to access the internet on my netbook. Well, truthfully, being that I'm not very tech savvy, I was more excited about how I wanted to try decorating my phone with vinyl than learning all the features of my new fangled phone....I tossed around the idea of creating a vinyl Hello Kitty decal to put on the back of my phone but....
...LOL! Instead of "Hello Kitty" I decided to go with "Hello Latte"!


Monday, October 8, 2012

Hydrangeas for Mom

I love hydrangeas! Been seeing so many beautiful hydrangea cards on the internet, and have always wanted to try making one too. Thought it would also be a good time to test the circle swing/swivel card cut file I created in MTC earlier this year.
The hydrangea cut file comes from the now retired Walk In My Garden Cricut cartridge. I wasn't happy with the leaves on the cartridge so I used a Marvy Uchida leaf punch instead. Leaves were then crimped with a crimping tool and stained with distress inks.
I chose two shades of blue Bazzill Bling for the flower, using the darker shade for the base and the lighter shade for the individual florets. Edges were sponged with blue and purple pearlescent pigment inks (Tsukineko Brilliance) and flowers were shaped with an embossing tool. Drops of glitter glue were added to the flower centers as the final step after the individual florets were glued in place.
Here's how the card swivels open. One of the leaves on the bottom had to be trimmed to allow the card to properly swing open. The trimmed off piece was then glued on to the base card.
On the inside of the card, I used a free SVG from Shery K Designs for the flourished round tag. Corner flourishes were cut from a sizzlit die from the Architectural Accents set and the "embossing" on the base card was done by using my Martha Stewart scoreboard and a bone folder to make scorelines 1 inch apart.
This card was created for my mil who celebrated her birthday last month. Really enjoyed making this, and am thinking I may want to do a few more, probaby smaller and maybe in white or pink. But first I still have a couple more swing/swivel cutfiles I need to test...