Monday, November 29, 2010

Happy Birthday, Super Guy!

When dh celebrated his birthday last month, I decided to have another go at an accordian flag book style card. This time I used a trifold style card as my base and added a ribbon tie to keep the card neatly closed. I used the From My Kitchen cart for this 3 layer cake slice cut for the front of my card and added a candle created with George and Design Studio.
I put my sentiment onto the inside flap of the card and added a border using the Superman logo.

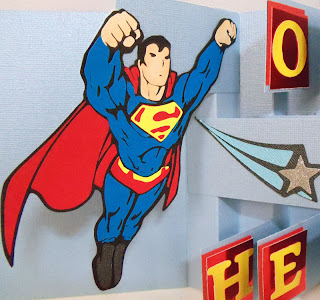
And here's the card stretched open to show the flags. I really like how the accordian folds in the center hold the layers of "flags". It's so much fun to stretch this open and hear the "flags" flap and line up in place! Here are some closeups and a view from the top to show how the "flags" are placed onto the pleated folds and how they line up.

I used Plantin Schoolbook for the letters on the "flags" and backed them with red foil board to add a little shine. The shooting stars come from the Superman cartridge,but Superman is actually a MTC cut created and generously shared by Zenita on her blog, Scrapping with Z. 
I liked Zenita's version of Superman better than the more detailed ones on the Superman cartridge because hers cut more cleanly and easily for the smaller sized cut I needed to fit my card.
You can find links to instructions on the construction of flag books over at my favorite place to go for interactive cards, Extreme Cards and Papercrafting.
And finally, this is the box I created to hold the card. These turn out to be quite bulky so I like to put them in a box rather than trying to force it into an envelope. Used a belly band decorated with a gold seal embossed with a Cuttlebug image of a birthday cake to keep the box closed. Since I couldn't wrap the golf clubs I got him, this was a fun way to give dh something to open for his birthday!

Tuesday, November 16, 2010

Thank You from the Heart

Awhile ago, my dear friend Kelly of Kreative Korner By Kelly surprised me with a very special rak of Nellie Snellen flower punches. Kelly often uses the amazing flowers she creates with these punches as embellishments on her beautiful cards and I have always been intrigued by them. So you can imagine how excited and delighted I was to receive these punches. Without question, the first card I made with these punches had to be my thank you card for Kelly.
Here's a closeup of what these flowers look like: Each Nellie Snellen flower punch set includes two tools, one to punch out the flower shape, and the second to emboss the texture onto the petals. The stamen is a separate punch. For my flowers, I used plain white cardstock spritzed with Maya Mists (Pink Grapefruit Metallic on the flowers, Gold Metallic for the stamens).
My card to Kelly had to be extra special, but at first I couldn't decide whether I wanted to do another easel card or a shaped card. Then I came across this lovely folded heart card created and posted by Cami on her blog, Capture A Heart. I knew then I wanted to try and incorporate both types of card into one. Using Design Studio, I welded together a cutfile for a re-sizeable scallop heart originally created by Okielady to make my shaped card and frame. Used the Cuttlebug Swiss Dots folder to emboss the frame, then weaved strips of nylon ribbon behind it."Thank you" cut on the front is from the Beyond Birthdays cartridge, and I used my Fiskars hand punch for the tiny hearts around the edge of the heart.
On the inside, I put my first sentiment and embellished with flatback pearls and flourish cuts from a Sizzlets set. The heart shaped card was then adhered to the front of an easel card, which opens to reveal the second sentiment.
Here, I used the Nestabilities Labels Four die, a Sizzix swirls die, and Martha Stewart edge punch. The "my friend" cut was created in MTC using Lettering Delights LD Elegance font.
And finally, the finished card standing in its easel position.
This was quite a challenge for me, as I am always more comfortable making cards of a more whimsical nature. But this time I felt I needed to go outside my comfort zone to try and express my heartfelt thanks and gratitude because it was for such a very, very special friend.

Sunday, November 7, 2010

Double Birthday Celebration

Here's another Asian themed birthday card I recently created with the Cricut Pagoda cartridge Design Studio, and Make the Cut. This one was for a double surprise birthday party for dh's aunt and uncle who both celebrate their birthday in September. I chose to use the koi, or carp image (from the Pagoda cartridge) since it is a symbol of strength and longevity in Asian culture. Since it was to be for a double birthday, I decided to use two koi.

In Design Studio, I rotated one of the koi shadows and welded them both together to create a frame for for the kanji. I knew I wanted to use the Chinese character for longevity ("shou" in Chinese or "kotobuki" in Japanese) for my card, but was disappointed that it was not one included in the Pagoda cartridge. Did a Google search on line for the character, copied one I liked, then used Make the Cut to render it into a cutfile and create a shadow for it.
Base of the card is String of Pearls Bazzill Bling, run through a Cuttlebug embossing folder from their Asian bundle. Sprayed the red koi pieces with Tsukineko gold spritz, and assembled everything with foam dots for dimension. I used metallic gold cardstock for the koi, currency gold cardstock for its shadows, and red foil cardstock for the kanji. Corners were cut with a die from the Sizzix Architectural corners set.