Monday, October 31, 2011

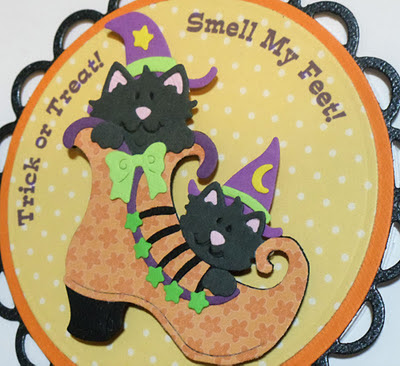
Trick Or Treat, Smell My Feet...Here's the last of my Halloween Treats!

When I first saw this adorable Cottage Cutz die, I thought it would be cute to use on tags to accompany my Witchy Shoe favor boxes. But after cutting out all the little pieces on this, I knew there was no way I would have the time!
Ended up making just one card using this die...gonna just have to put this die away for now and hopefully have more time to play with this again next year!
So instead of spending time on the tags, I decorated some gift bags for Halloween treats for Latte's doggie friends. A lot less pieces involved, and a lot quicker to put together!
Jack-o-lantern for this came from the Paperdolls Dress Up cartridge, and the doggie cut actually originates from a Christmas Dog and Sled Cottage Cutz die.
My last Halloween "project" for this year were these Jello treats I made to share at our Cricut Club meeting and for dh and I to take to work...
In keeping with the Halloween color scheme, I used orange Jello for the cream cheese layer and lime jello for the top. Decorated them with Jack-o-Lantern Peeps, which I cut apart and added green icing to for the stems.
And finally, here are some of the wonderful treats I came home with from our Cricut meeting on Sunday...
Red Velvet cupcake (delicious!) shared by Jean...she topped them off with a cutie patootie ghost from 3 Birds On Parade...
A plethora of Halloween treats created & generously shared by the Cricuteers!

A fun spooky pop-up card and adorable decorated snack cup from my special friend, Kris. Check out this card...see how the ghosts pop up from the mansion when you pull up on the tab? Very, very, COOL! And isn't Hello Kitty just adorable dressed up in her 3-D pumpkin outfit? LOVE it! Hope you are having a fun Halloween!

Sunday, October 30, 2011

For Fashionista Witches...

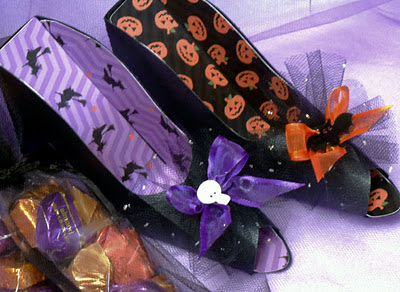
Okay, so I was all set to make little milkbox haunted houses to fill with Halloween treats this year... but then I came across these wickedly adorable Witches' Shoes created and shared by Cindy Louh on her website, Skip To My Lou.  There was no way I could pass up giving these a try!
I used the templates Cindy shared and had MTC trace them into cutfiles with scorelines. Used Bazzill Bling cardstock to cut the shoes so they'd have a bit of sheen to them. I especially loved that Cindy included a lining template for the shoes...I used some freebie  Halloween digital papers snatched from My Grafico to line my witchy shoes...really makes them look festive, don't you think?
Dressed up the front of the shoe with some black tulle dotted with stickles glitter, a sheer ribbon bow and some ghoulish shapes cut from a Cuttlebug Halloween die then glossed up with JudiKins Diamond Glaze.
Shoes were then filled with cellophane sleeves of deliciously sinful chocolates, wrapped in black tulle. Put together  a little over a dozen of these to share with my fashionista "ghoul" friends...a little time consuming, but so much fun to put together!

Saturday, October 29, 2011

Bone Rattling Fun

It's Halloween weekend already and I'm still trying to finish up all my projects! Honestly, I thought I started early enough this year, but everything seemed to take longer than I had expected. This fun card for dd's fiance was the first project I finished. I think it's called a double slider box card and it was inspired by one I received from my dear friend Kris two years ago. (See Kris' card here ) Loved Kris' card and have been wanting to try this but never had the chance till now!
See the green ribbon loop on the right side of the card? Pull on it and...
*Surprise*! Out from the left side slides a box filled with treats!
How cool is that! You can find the template for the box shared by Sharon (Sweetiepeas) on the Splitcoast Stampers forum. I have to admit that when I first got a look at Sharon's template, I thought "NO WAY"! In fact I had to stare at it and study it several times before I got enough nerve to attempt it. Don't worry...once you get started on it, it really isn't as complicated as it looks! I went ahead and created a cutfile for it in Design Studio using the George cartridge so I wouldn't have to worry about all the measuring next time I decide to do another one...maybe for Christmas? 
Front of the card was fun to do! Tombstones, tree and sentiment are from the Happy Haunting cartridge, stickle glittered moon was cut from a circle punch, and bats and skeleton are from old Quickutz dies.

Saturday, October 22, 2011

A "Berry" Special Someone

This was a simple card created for a friend at work who was recently blessed with a sweet baby girl. She named her new daughter "Ichigo", which is Japanese for "Strawberry"... so of course I couldn't resist using San-X's Berry Puppy for her card.
I used MTC to create cutfiles for Ichigo's name (Arial font) and Berry Puppy. (I thought it would be cute to add "chan" to baby's name, a suffix used by the Japanese to names when referring to young children.) Baby's name and puppy were cut several times and layered with foam tape for dimension. Used my Copics to add the details and shading.
For the base card, I used the round doily cut from the Cricut Cake Basics cartridge welded in Design Studio.  Strawberries are from the Simply Charmed cartridge and tiny scattered hearts were punched using a Fiskars hand punch.
When I first learned my friend had named her daughter "Ichigo", I thought it was such an unusual name for a little girl...but then, Gwyneth Paltrow named her daughter "Apple"... so maybe this is a new trend? When you think about it, there are so many cute strawberry decorated things for little girls out there...and I'll bet little Ichigo already has a roomful!

Saturday, October 15, 2011

Manhattan Rose Birthday Card

I'm not much into stamping anymore, but I still enjoy looking through the SU catalogs for all the other goodies they have to offer. When this Manhattan Flower embossing folder first became available a while ago, I knew I just HAD to have it, but it took me this long to finally decide it was time to play with it! Inked up with SU's Pretty In Pink stamp pad and ran it through my Big Shot on white gold cardstock and really liked the resulting embossed image.
I then cut out the roses and thought it might look neat layered inside a recessed window card. First saw this type of card created by my blogging friend, Michele over at her blog, My Simple Crafts, and just had to try one too. The tutorial for this by Lynn Mercurio is over at Splitcoast. Pretty much an easy card to do, and happily simple to alter, which I had to do since the roses wouldn't fit into the window using the original measurements. Roses were layered onto a piece of cardstock embossed with a Cuttlebug embossing folder from their Asian bundle and added a butterfly cut from SU's Beautiful Wings Embosslit die.
For my frame, I really wanted to use my Martha Stewart double loop edge and corner punches, but got frustrated when I realized it can only do set sizes (duh!), none of which would fit my window. After moping around a bit I finally had an "aha!" moment and decided to cheat a little...I used my punches to punch out the smallest rectangular frame it could create from black cardstock. I then scanned the punched frame, saved it as a .jpg image, and imported into Make the Cut to render into a cutfile. In Make the Cut I simply re-sized my frame to the size I needed to fit my card. If you look closely, you'll see that the cut is no where as precise and clean as an original punched frame, but heck, it was good enough for me!
Here's the inside of the card. For some reason, I really didn't like how the recessed window pops out on the inside of the card so I ended up covering the entire inside right panel of the card with a "box". Used another embossed rose and a couple leaves, punched and run thru a crimper to embellish. Added the sentiments and it was ready for giving to my dear mil on her birthday. Took me a while to put this togther, but had fun and learned so much!

Tuesday, October 11, 2011

Cricuteer Card Swap Part 3

Here's the last set of the twenty cards we each got to take home from our card swap.
Create A Critter panda magical marquee card by Pat
Jolly Holidays snowman joyfold Christmas card by Sharon; Pagoda anthurium and origami card by Robin K
Sweet Treats cupcake easel card by Cindy; Create A Critter ladybug gift card holder by Ev
Hello Kitty easel calendar by Cheryl T.; Simply Charmed chickie pop up by Kris
Create A Critter cupcake waterfall card by Bonnie
And that's it! Aren't these cards totally fabulous? Everyone is so talented, and to think, when we first got together to form our group two years ago, there were several amongst us who admitted they hadn't even taken their Cricut out of it's original box! Lol! Everyone in the group is such a pro now!

Sunday, October 9, 2011

Cricuteer Card Swap Part 2

Here are a few more of the amazing cards the Cricuteers came up with for our card swap this year...
Create A Critter pink fox birthday card by Lynette; Create A Critter monkey window card by Aileen
Create A Critter panda center stepfold card by Kelli; Doodlecharms ladybug card by Michele F.
Layered flower card by Cheryl N.; Stretch Your Imagination baby buggy window card & tag by Laura
Aren't all these cards terrific? I'm lovin' every one of them! I'm sure I won't be using any of them... except to keep me inspired! Stay tuned for the last of the twenty cards tomorrow...

Saturday, October 8, 2011

Cricuteer Card Swap

For our second year project, our Cricut club (we call ourselves "Cricuteers"...yeah, like "Mouseketeers"...) chose to do a card swap. There's twenty of us who meet monthly to share projects and crafty ideas...very inspiring, and so much fun to see how much everyone has grown! For our card swap, we each had to make twenty of the same card to swap at our September meeting. The only rule was that there had to be at least one element cut using our Cricuts on our cards.
That meant that each of us got to take home twenty different and very special card creations that day. Just for fun, I came up with these fun little "Cricuteer" bags so everyone would have a way to take home their stash of cards. Cricut icon is from the Car Decals cartridge, and "Cricuteers" was created using MTC and Ariel font. I posted the card I made for the swap last week, so as promised, I'll be sharing all the other wonderful cards inside my bag. Since that amounts to a lot of photos, I'll be posting them in 3 separate posts this week. Here's the first set...
Panda and pagoda pleated card by Michele C.; Winnie the Pooh sliding pop-up card by Robyn S.
Don Juan "Just Because" Tri-shutter card by Iris
From My Kitchen pop-up cupcake card by Jean
Storefront and George Origami fold card by Brian
Okay, I don't want to cause a creative overload, so I'll stop here for today and save the second set of cards for tomorrow.

Saturday, October 1, 2011

Wedding Card #4

Though I've titled this as "Wedding Card #4", in truth it was the first of the four wedding cards I made this summer. I decided to post this last because this was also the card I chose to use for our Cricut Club card swap (more about this later), and I wanted to wait till that was over before posting this.
Created in Design Studio, I used shapes from the George cartridge for the base of this gatefold card with it's heart cutout window. The one thing I always have trouble with when it comes to making  gatefold cards is trying to figure out a way to keep the card nicely closed...
...so I welded on little "tabs" to the top and bottom of the basecard to tuck in between the base of the card and the front embossed top layer, and that seemed to do the trick!

 Embellishing the card was fun...top front panels of the card were embossed using the Elegant Lines folder from Stampin' Up. The scalloped heart shaped window frame was created in Design Studio by welding circle outlines from Plantin Schoolbook to the heart shape in George. Swans are from the Wedding Solutions cartridge, four layers plus a shadow cut from gold foil cardstock. And leafy branch accents were cut using Stampin Up's bird punch.
 Here's what the inside looks like when the card is fully open. After spending so much time measuring and re-measuring and tweaking the cutfile for this card, I thought it would be a waste to make only one. That's when I decided I would use this as my card for our Cricut Club card swap as well. Coming up with twenty of these was a bit of a challenge...it's a good thing I got started early working on this! We had our card swap last weekend, and each of us went home with twenty different and amazing "Cricut" cards. Still haven't had a chance to photograph them all, but will definitely share them when I do...you are in for a treat!