Sunday, July 25, 2021

Christmas In July Gift Tags

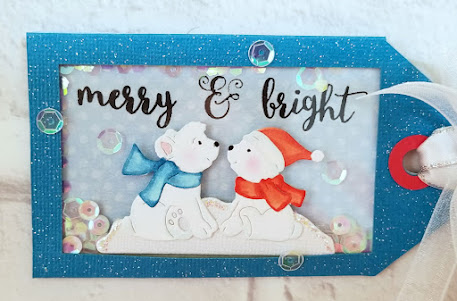
After feeling so much satisfaction from making Christmas tags in July for the first time last year, I convinced myself to give it a try again this July. I used the same tag svg cutting file I had created for my Christmas shaker tags last year but changed the colors and the image.

I chose to use nontraditional Christmas colors that are actually a better match for my blue foil holiday wrapping paper this year. Couldn't find any cute Christmassy stamps in my stash to use on my tags, so I decided to use this pair of die cut polar bears from Cottage Cutz' "Polar Bears with Birch Trees" instead. Inside the shaker I added iridescent clear and white sequins together with Recollections "Glitz" chunky glitter.

Polar bears and their hat and scarves were cut from plain white cardstock and quickly colored with Copic pens. Love that after coloring the scarves and hats, all that was needed was  a few quick strokes with the lightest shades of grey, pink and blue to add shadows and highlights to the bears. I die cut the bit of snow they're sitting on from textured pearlescent cardstock and added some Stickles for some contrast so the bears wouldn't disappear in the snow.

Instead of my usual computer generated sentiments, I stamped the words on my tags this year, using a mix of stamps from Kwellam's "Christmas Wishes", Waffle Flower's "Classic Sentiments" and Scrappers Den's "Christmas 1" sets. It took me a few days to put together a dozen of these, and the feeling of accomplishment afterwards was so satisfying! I even went as far as planning the layout for our family Christmas cards and ordering the photos that will be included in them already. Wow! Hopefully my unprecedented early start on Christmas projects will make the holidays a lot less stressful this year.


Sunday, July 18, 2021

Hello Kitty's Garden

Here's a Hello Kitty themed card I put together for my Sister-in-law's birthday. I guess sending a Hello Kitty birthday card to an adult might seem a little childish, but you'd be surprised how many of us senior citizens still find her adorable! I especially love that she was chosen to be the mascot for the 2021 U.S. Summer Olympic Team! 
 
Over time, I've collected several Hello Kitty coloring books, just so I can use the images to create cutting files for paper projects like this one. Lawn Fawn's "Stitched Hillside Borders" die was used to cut the grassy background; and all other cuts including the oval shape were cut on the Silhouette. "Happy Birthday" greeting  is from Lawn Fawn's "Party Animal" stamp set.

On the inside, I used Karen Burniston's Flower Pot Pop Up die to add a  flower pot filled with a peeking Hello Kitty and flowers from her garden.

 Cutting file for the flowers are from Lori Whitlock's "Mason Jar Box Card" file and foliage are from Little Scraps of Heaven "Bear Bouquet" file. Cutting file for paper doily under the flower pot is from Carta Bella Designs. I added topaz tinted flat back gemstones to the flower centers for some fun bling.

Here's a view from the top where you can see how the flowers and stems are adhered to the struts inside the flower pot. This was my third try at using this flower pot pop up die and I think I finally figured out the best way to arrange the flowers in the pot is by positioning the stems perpendicular to each other.

Although I was a little disappointed after my first try at using this pop up die, I think now that I've had the chance to play with it a bit more, I'm finally beginning to enjoy using it to make cards. I'm  especially liking the idea of having cute little critters pop up together with the flowers in the flower pot!

Sunday, July 11, 2021

Ice Cream Sundae Surprise

 
I had a "cool" idea I wanted to try with Karen Burniston's Parcel Pop Up die so I used it to put together this birthday card for a super sweet friend. I used the "Cool Treats" cutting file from Marjorie Ann Designs to make my paper pieced ice cream sundae which you can see through the clear acetate I used for the front panel of the card. The spoon (also from the "Cool Treats" set) and the die cut "Happy Birthday" from Whimsy Stamps and Hello Bluebird were glued onto the front bottom flap of this card. 

I also added a rounded flap to the top of the card, adding neodymium magnets behind the patterned paper to keep the card closed. As the card is opened...

Surprise! What appeared to be a scoop of chocolate ice cream in the sundae pops up to be a teddy bear with a cherry on top! Teddy Bear is also part of the "Cool Treats" cutting file.


If you know how much I truly love my ice cream and teddy bears, you'll understand how excited I was to be able to see my idea come to life, lol!  Yes, this Karen Burniston Parcel Pop Up die mechanism is fast becoming a favorite with me. Hope I can continue to dream up more fun ways to use it!

Sunday, July 4, 2021

Another Rockin' Rectangle Grad Card

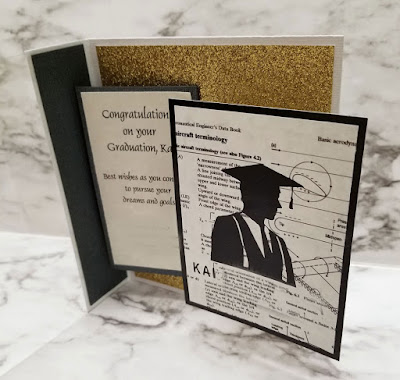
I had just enough time to finish a second graduation card this year; this one for my cousin's son. Since I was happy with how the first graduation card for my niece turned out (previous post), I decided to use Karen Burniston's Rockin' Rectangle pop up die again to animate this card as well.

 
Once again, I printed the graduate's school seal onto cardstock to add the the front of the card. I didn't have an oval punch or die in the right size so instead, I used the print and cut function on my Silhouette to cut the seal out. The seal was mounted onto a border of cardstock in the school colors and a piece of acetate was attached to this to be the front of the card.

My cousin had mentioned to me that his son's field of interest was aeronautical engineering so I searched online and printed a page from an aeronautical technical handbook to use for the front panel of my card. I then used an old graduate silhouette cutting file I had created many years ago to cut a stencil into the copy of the handbook page. I added a stencil cut of the graduate's name underneath using Arial font. (I edited his last name out in my photos to avoid privacy issues). The stencil cut page was then adhered to a panel of glossy black cardstock.

I added glittery gold cardstock on the inside of the card and the graduate silhouette and sentiment panels were attached to the Rockin' Rectangle mechanism.

As the card is opened, the graduate silhouette panel pops forward and moves to the right to reveal the sentiment panel underneath. I enjoyed putting these graduation cards together this year; my only regret is that I wish I had gotten started sooner so I could have finished more of these in time for all the graduates on our list. Will definitely consider doing a repeat of this card style for our graduates next year.