Saturday, December 25, 2010

In the Nick of Time (...barely!)

Our family Christmas cards barely got to the post office in time this year. (Note to self...no more paper piecing for Christmas cards!) Those little reindeer from Create A Critter are adorable, but piecing together 180 reindeer (2 per card) took way too long to do!
Our card this year was a swing style card. Took me a while to figure out, but I managed to create a cut file for it in Design Studio, which made cutting and scoring the card base pretty quick. I used Bazzill Bling (Feather Boa) for the base card and patterned paper is from the Provincial Princess collection at Lettering Delights, printed on ice gold text.
Holly and leaves are from a Martha Stewart punch, trees are Quickutz, and as mentioned earlier, the reindeer are from the Create A Critter cartridge. Font is LD Charming Bold. As a final touch,  a small red rhinestone was added  for one of the reindeer's nose.  Sadly, I didn't have time to do anything much else creative this Christmas, except matching tags for take out boxes filled with cereal mix for dh to take to work....
and a half a dozen more gingerbread houses, this time in a larger size, so I could fill them with pizzelles.

The larger sized houses were about 3-1/2 inches wide on the bottom. Photo on the left shows the relative comparison in size.

Wrapped these in cellophane and shared them with friends. Really had fun making these larger sized houses, they were a lot easier and came together a lot quicker than the earlier tiny version. Only wish I had more time to make more! Maybe next year...
Hope everyone had a wonderful Christmas this year! And here's our Latte....


wishing everyone a "Merry Chris-MOOSE!"

Friday, December 24, 2010

Cricut Club Holiday Gift Swap

This is the stationery set I put together for our Cricut Club Holiday Party gift swap this year. I've always loved the cute decorated note pads I've seen posted by others and have been wanting to try one too. Been on the edge for a long time now about getting a BIA but read so many negative comments about the system that I hate to spend the $$$ for it. Instead, I decided to try a method shared by my friend Iris, where I used my 1/4 inch hole punch and a sheet torn from the store bought notepad as a template for the hole placements. For the notepaper holder, I used a tutorial shared by Stampin' Gal Val. The rose border on the note paper is a Darcy Hunter digital image colored with Copics, scanned then printed. The die cut bears are also Darcy Hunter digitals, imported into MTC and rendered into cut files. Filigree corners on the notepad are from a Cuttlebug corners set.
Also want to share all the great gifts that were created by the rest of the club members for the swap. Everyone is so super creative, and it was such a joy to see what they came up with....
Here are just two pages of a scrapbook album put together by Lynette...beautifully done and so much work!
A darling stocking shaped gift card holder by Aileen....
An exquisite brocaide ribon wreath crafted by Bonnie (left); and a sweet panda checkbook/stationery set by Kelly (right)...

A super cute Hello Kitty acrylic cup by Michele F. (left); and a fancy embellished waterglobe frame by Robyn (right);

An adorable pair of potholders, sewn & stenciled by Pat (left); and a set Christmas tags, too pretty to use by Laura (right)...

A fancy folded hexagonal box filled with goodies by Kris (left); and a delightful mini purse set crafted by Ev (right),

A very cute and cool Roladex Birthday Reminder by Iris (left); and lovely decorated plaque by Cindy (right)... 

                          
 And more Hello Kitty treasures! A sweet pink embellished clock by Brian (left); and a complete collection of stationery accessories from Cheryl.

In addition to the gingerbread houses I made, we each also received a sweet and clever hot chocolate/candy cane holder shared by Iris and cute Hello Kitty treat bag from Cheryl!
 It was so much fun seeing all the wonderful gifts everyone came up with...so much creativity going on, and so much fun learning how each was creaated!

Monday, December 6, 2010

Gingerbread Villa

Inspired by an adorable milk carton birdhouse box recently created by my friend and fellow member of our local Cricut Club, Aileen H., I thought I would try a gingerbread house version to give out as favors at our Cricut Club Holiday Party. I was also inspired by a fabulous haunted house created by Michele of My Simple Crafts and this darling gingerbread house by Teri of big Ideas Fron A Little Girl. For mine, I used Design Studio to enlarge the milk carton cutfile I had used earlier this year to do my Easter milk carton boxes so the bottom would be 2-1/2 inches square.
The biggest challenge for me with these gingerbread houses was to figure out how to do the roofs. I knew I wanted to do it in a way such that the recipient could get to the goodies inside without destroying the whole house, but I couldn't remember how Aileen had done the roof on her birdhouse, and unfortunately, I had not yet seen the houses created by Michele and Teri.
My snowtopped roof was created by welding circles of various sizes to the edges of a rectangle, using the George cartridge and Design Studio. Scored and folded this 1/ 2 inch along the long edges and then in half. Notches were cut at the center point and mitered so that the angle of the roof would fit the top of the milk carton. The roof was then attached to the house by punching matching holes in the roof and milk carton and threading  ribbon through to hold it in place. I liked how the finished roof turned out, but truthfully, I knew it would be a pain to put back together once it had been opened.
Decorating the sides of the gingerbread house was fun. Welded circles to one edge of a rectangle in Design Studio for the snow border, welded a circle and a square for the door. Gingerbread boy is from the Paper Dolls Dress Up cartridge, frame for sign from George, peppermint candy from Simply Charmed, and trees and candycanes are old 2x2 Quickutz dies. I really liked Teri's idea of adding a sentiment to the back, but since I didn't have a stamp, mine had to be computer generated using LD Charming Bold and 2 Peas Flea Market fonts.
When I was finally ready to fill my gingerbread houses with candy, I stopped short of gluing the bottoms closed as orignally planned, thinking how difficult it would be to re-assemble once the roof had been taken off. Decided to try a slotted bottom closure by cutting off a square piece from each of the bottom flaps. Happy to say this worked perfectly, providing a really easy way to get to the treats without having to worry about any re-assembling afterwards. Wouldn't recommend using this type of closure if the contents of the box were too heavy, but for candies and treats, this works like a charm!

Monday, November 29, 2010

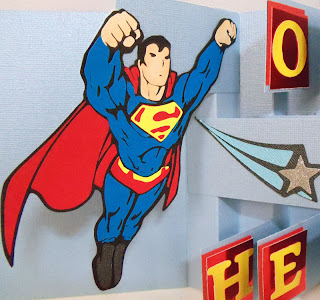
Happy Birthday, Super Guy!

When dh celebrated his birthday last month, I decided to have another go at an accordian flag book style card. This time I used a trifold style card as my base and added a ribbon tie to keep the card neatly closed. I used the From My Kitchen cart for this 3 layer cake slice cut for the front of my card and added a candle created with George and Design Studio.
I put my sentiment onto the inside flap of the card and added a border using the Superman logo.

And here's the card stretched open to show the flags. I really like how the accordian folds in the center hold the layers of "flags". It's so much fun to stretch this open and hear the "flags" flap and line up in place! Here are some closeups and a view from the top to show how the "flags" are placed onto the pleated folds and how they line up.

I used Plantin Schoolbook for the letters on the "flags" and backed them with red foil board to add a little shine. The shooting stars come from the Superman cartridge,but Superman is actually a MTC cut created and generously shared by Zenita on her blog, Scrapping with Z. 
I liked Zenita's version of Superman better than the more detailed ones on the Superman cartridge because hers cut more cleanly and easily for the smaller sized cut I needed to fit my card.
You can find links to instructions on the construction of flag books over at my favorite place to go for interactive cards, Extreme Cards and Papercrafting.
And finally, this is the box I created to hold the card. These turn out to be quite bulky so I like to put them in a box rather than trying to force it into an envelope. Used a belly band decorated with a gold seal embossed with a Cuttlebug image of a birthday cake to keep the box closed. Since I couldn't wrap the golf clubs I got him, this was a fun way to give dh something to open for his birthday!

Tuesday, November 16, 2010

Thank You from the Heart

Awhile ago, my dear friend Kelly of Kreative Korner By Kelly surprised me with a very special rak of Nellie Snellen flower punches. Kelly often uses the amazing flowers she creates with these punches as embellishments on her beautiful cards and I have always been intrigued by them. So you can imagine how excited and delighted I was to receive these punches. Without question, the first card I made with these punches had to be my thank you card for Kelly.
Here's a closeup of what these flowers look like: Each Nellie Snellen flower punch set includes two tools, one to punch out the flower shape, and the second to emboss the texture onto the petals. The stamen is a separate punch. For my flowers, I used plain white cardstock spritzed with Maya Mists (Pink Grapefruit Metallic on the flowers, Gold Metallic for the stamens).
My card to Kelly had to be extra special, but at first I couldn't decide whether I wanted to do another easel card or a shaped card. Then I came across this lovely folded heart card created and posted by Cami on her blog, Capture A Heart. I knew then I wanted to try and incorporate both types of card into one. Using Design Studio, I welded together a cutfile for a re-sizeable scallop heart originally created by Okielady to make my shaped card and frame. Used the Cuttlebug Swiss Dots folder to emboss the frame, then weaved strips of nylon ribbon behind it."Thank you" cut on the front is from the Beyond Birthdays cartridge, and I used my Fiskars hand punch for the tiny hearts around the edge of the heart.
On the inside, I put my first sentiment and embellished with flatback pearls and flourish cuts from a Sizzlets set. The heart shaped card was then adhered to the front of an easel card, which opens to reveal the second sentiment.
Here, I used the Nestabilities Labels Four die, a Sizzix swirls die, and Martha Stewart edge punch. The "my friend" cut was created in MTC using Lettering Delights LD Elegance font.
And finally, the finished card standing in its easel position.
This was quite a challenge for me, as I am always more comfortable making cards of a more whimsical nature. But this time I felt I needed to go outside my comfort zone to try and express my heartfelt thanks and gratitude because it was for such a very, very special friend.

Sunday, November 7, 2010

Double Birthday Celebration

Here's another Asian themed birthday card I recently created with the Cricut Pagoda cartridge Design Studio, and Make the Cut. This one was for a double surprise birthday party for dh's aunt and uncle who both celebrate their birthday in September. I chose to use the koi, or carp image (from the Pagoda cartridge) since it is a symbol of strength and longevity in Asian culture. Since it was to be for a double birthday, I decided to use two koi.

In Design Studio, I rotated one of the koi shadows and welded them both together to create a frame for for the kanji. I knew I wanted to use the Chinese character for longevity ("shou" in Chinese or "kotobuki" in Japanese) for my card, but was disappointed that it was not one included in the Pagoda cartridge. Did a Google search on line for the character, copied one I liked, then used Make the Cut to render it into a cutfile and create a shadow for it.
Base of the card is String of Pearls Bazzill Bling, run through a Cuttlebug embossing folder from their Asian bundle. Sprayed the red koi pieces with Tsukineko gold spritz, and assembled everything with foam dots for dimension. I used metallic gold cardstock for the koi, currency gold cardstock for its shadows, and red foil cardstock for the kanji. Corners were cut with a die from the Sizzix Architectural corners set.

Sunday, October 31, 2010

Kiss My Bones

My theme for my Halloween projects this year were the Skelanimals. I first met these little creatures while shopping at Target for Halloween treats last year. I thought they were adorable, and promised myself I'd remember to use them this year. So I visited the Skelanimals official website and learned that there are twenty four different ones, each with their own name and distinct personality! It was a tough decision, but I decided to select just three favorites to work with to start.
Meet "Diego" the Bat...
..."Chung Kee" the Panda...
...and "Kit" the Cat!
I used Make the Cut (MTC) to render my Skelanimals into cut files, then created the tent boxes for them in Design Studio using shapes from the George cartridge. Being that the images were already solid black & white, no further editing was needed and creating the cutfiles for them was super quick 'n easy...just my speed!
I cut several of each out with my Cricut and used them as Make and Take projects shared with friends at a craft club get together and Cricut Club meeting.
Here's how they looked from the back...
Tags were created in Design Studio and "happy halloween" is a stamped image from Good Stamps which I scanned and printed to fit the tags. Tiny bat, ghost and skull cut outs are from a Cuttlebug die.
The round Skelanimals "seals" were created using my new stamping toy...
From PSA Essentials, these stamped images fit into the self inking stamping unit and are all interchangeable. The stamp pads are interchangeable too, and are available in various colors, even ones that allow you to stamp the outer ring in a different color. Cool, huh. The best part about this is that I get a crisp, sharp image everytime...virtually no more boo boos...hurray!
After stamping my Skelanimals in black, I colored in their hearts, punched them out with a circle punch then backed them onto a larger black circle to create my "seals".
I also made several more tent box treats to share with friends at work...had to do these in white since I ran short on the colored card stock, but they came out looking okay.
Also used my Skelanimal friends to decorate gift bags for friends and family...
These smaller brown kraft bags held okoshi (puffed rice candy) and arare (rice crackers) for our aunties...
And these larger gift bags were filled with special goodies for my niece and bff Kris...
Used Cricut Blackletter Font to cut out the "happy halloween" on these.
Then at the last minute, I decided to add a fourth Skelanimal to my collection. Here's "Dax" the dog. Used MTC to create the cut file for Dax and Paper Pups cartridge for his bone.
These were filled with doggie treats for Latte to share with her fellow doggie friends.
Also want to share the many Halloween goodies I received this year...
This adorable Halloween card is from Kris. See how it opens up?
Super neat-o! I just love cards that pop up and move, and Kris is always surprising me with these! And don't you just love that neat "bat fence"? Lots of layering and dimension on this card too...makes this card such a treasure!
More devilishly fun treats from special friends....
From the top left, scary tombstone is from Iris, adorable Hello Kitty bag from Cheryl & Coleen, cute & funny jack-o-lanterns from Teri (black) and Kris (orange), and very cool folded candy holders from Gwen. I am lucky beyond words to have such talented and sharing friends!
And finally, here's the card I created on the Hallmark Cards website (with a little help from Latte) to send to family and friends...LOL! Can you tell that poor Latte was not too thrilled about her cute froggy costume? Though I must say that she has recently become a lot more tolerant of me photographing her in these silly outfits. I guess she has come to the realization that the more cooperative she is, the sooner the torture will end.
Latte: "...BUT I don't wanna be a FROG for Halloween!!!!"
(Have a fun and safe holiday!)