Saturday, December 26, 2020

Crafty Holiday Treasures

2020 was a year that we'll all likely remember for a long time. Things weren't always easy, and probably many, including myself found solace immersing ourselves in our hobbies. Maybe that could  explain the huge amount joy I felt in receiving so many wonderful handmade treasures this Christmas.


My long time friend Bev always wows us with her handmade Christmas cards, and this year was no different. I love the beautiful and intricate holly/star swirl design she used for the front of her card, not to mention her paper and color choices. 


But the best part of this "Peek A Boo" style card happens as you open it... the "Happy Holidays" sentiment in the window disappears and is replaced with a photo collage of Bev and her family engaging in a virtual meeting. With travel restrictions in place everywhere, many of us, including Bev and her daughters, could only spend time together "virtually". What a wonderful idea to use screenshots for her  holiday photo collage!

My always amazing crafty friend Lorna outdid herself again with this super creative tropical Sand "Snow"man under a coconut tree. 

The coconut tree is actually a tall box filled with candy canes and chocolates! And how adorable is this little "sand man" with his cool hat and shades and even a string of Christmas lights!

This adorable bonnet girl Christmas card and super kawaii Dandelion Designs kimono girls coaster magnet calendar were put together by my very special blogging pal, Karen of "Have A Scrap Happy Day" blog. Karen has made it a holiday tradition to send out her beautifully designed stamped cards and coaster magnet calendars every year. In fact it was she that inspired me to start making my annual Chinese lunar animal calendar magnets too.

How cute is this Hello Kitty snowflake ornament?!!! This meticulously paper pieced Hello Kitty angel was created by my dear friend Claire. I apologize that my photo does not fully capture all the intricate little details of this project, from Hello Kitty's garland of teensy. tiny flowers to her glittery little halo, dress and wings. Claire attached her Hello Kitty angel to a sparkly resin ornament topped with a shiny gold bell... cuteness overload!

This pair of handcrafted treasures was created by my sweet and crafty pal, Kris. 

This  super adorable fuzzy teddy bear with his watermelon is a "tear bear", which Kris created by layering and adhering many tiny pieces of felt together... truly amazing, right? After piecing her teddy bear together, she adhered him to the front of a notepad holder. Imagine this, a notepad with a mini plushie on it... love it!

Kris also put together this delightful matchbox Santa giftcard holder. I especially liked that she used glossy enamel dots to give his eyes that special twinkle! SVG cutting file for this adorable giftcard holder can be found at the Lori Whitlock store.

Here's a fun vintage style shaker card that was sent to me by my super creative blogging pal, Patti, of Creations by Patti blog. Did you recognize Siren, the two tailed mermaid in the center of the shaker of "snow" beads?

Yes, of course you did! That's because all the "patterned paper" that adorns this amazing gift card holder was cut from an actual Starbucks cup. Very clever, and so beautifully put together... definitely a keepsake piece!
Thanks for stopping by! Hope you enjoyed seeing the fun creations put together by some of my sweet crafty friends and that you may have been inspired by them as I always am. 

Friday, December 25, 2020

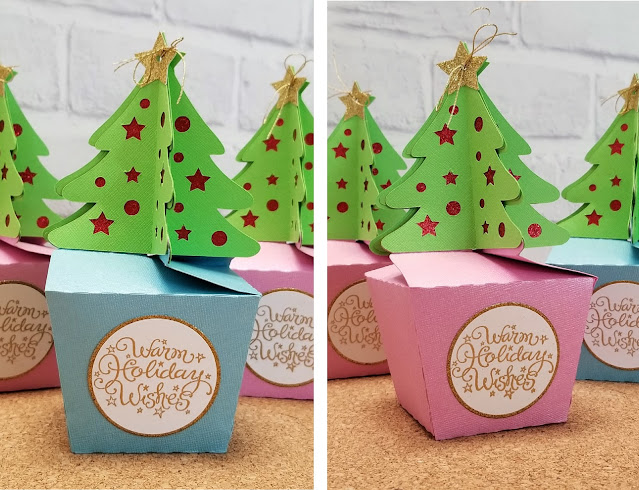
Holiday Gift Card Tree Boxes

 I put together a little over a dozen of these little tree boxes to use as my gift card holders for nearly everyone on my gift list this Christmas. 

Designed by Pebbles In My Pocket, the svg cutting template for these boxes can be found at their Etsy Digital Store. To be certain I 'd be able to get my giftcards to fit, I enlarged the template for the box as large as possible to fit onto a 12 x 12 mat.

Before cutting the trees, I joined various sized star and circle svgs to tree template so it would cut out as little stencils on the tree. I then added red glitter paper to the backs of the trees so it would show through the front as glittery round and star shaped ornaments on the trees. Then I added another tree shaped layer of green text weight paper to sandwich the glitter paper and box tabs in to give everything a cleaner look.

It takes four tree cuts standing back to back and meeting at center folds to create the desired 3 dimensional tree and keep the box closed. However, since my tree cuts were 3 layers thick, I couldn't get the trees to stand snug enough in place to keep the box nicely closed.  After a bit of fiddling, I ended up punching a hole in the center of the star, threading and tying a length of gold thread into a tight bow to keep the tree sides snug and the box closed.
I stamped and heat embossed a Christmas sentiment from a very old Inkadinkado stamp set in gold metallic powder and backed it with gold glitter paper to create the labels for the front of the boxes.


These pop up gift card holders were put together from a tweaked cut file of a Christmas card created by my dear friend Kris a few years ago. 

After the gift cards were put in the boxes, each was wrapped in a cello bag tied with gold ribbon. The final touch were these very simple round tags with a cut out tree and gold star. I really liked the finished look of these tree boxes and hope everyone enjoyed getting them as well.

Thursday, December 24, 2020

Holiday Treats From Our Kitchen

I decided to change the packaging for my holiday Chex Mix this year from the kraft takeout boxes I've using for the past few Christmases to these clear mylar bags. I like that they can be heat sealed and also have a zipper closure so they can be resealed after opening. Best of all, unlike boxes or bottles, they fold flat and take up hardly any storage space in my closet.

I came across an idea for labels on Pinterest that used this clever play on words: "Merry CHEX mas" for Chex Mix, and decided I wanted to use the same for our oval print and cut tags too. Used Cottage Cutz "Santa Bear In A Pot" die for the cute paper pieced peeking polar bear.

In addition to our usual Chex Mix, this year we decided to make a couple batches of  one of hubby's favorite local style snacks, Prune Apricot Mui to share with friends and family as well.

We packed the mui in plastic portion containers and created fun labels using print and cut for the wording and stamped Dandelion Designs' "You Make Me Smile" panda.

Wednesday, November 25, 2020

Thankful

Keeping true to a promise I made to myself when our granddaughter was born, this is the Thanksgiving card I made and sent to her this year. Now that she is 3, she enjoys interactive cards, and I of course enjoy making them for her! 

Here's a quick video to show the fun pop up surprise that I put into her Thanksgiving card.

The body of the pop up turkey is actually a rubber band activated hexagonal "ball" created with Karen Burniston's "Surprise Ball Pop Up" die.
I have to admit that when Karen Burniston first released this hexagonal pop up ball die a year ago, I really didn't think I would be buying it. But within a few weeks of its release, creative Karen Burniston fans and crafters began creating and sharing  the cutest little pop up critters, from unicorns to Baby Yoda and more using this hexagonal ball on Karen Burniston's Facebook fan page. It didn't take too long for me to realize I really NEEDED this die after all!

To create my turkey, I used parts from the turkey in Cuddly Cute Design's "Pilgrim Cuties" and glued them on to the hexagonal ball. The ball was then attached to the card with a brad, which allowed the turkey to turn and swivel inside the card. I glued an extra panel of cardstock to the backside of the finished card to hide the brad.
Then to keep the turkey flat and the card closed, I added a flap to the right side of the card and inserted  thin but strong neodymium magnets  in between the layers of cardstock of the flap and front of the card.

Cutting file for the paper pieced Pilgrim teddy on the front of the card comes from Cuddly Cute Design's "Pilgrim Bears".  She was adhered to an oval panel which was run through the "Three Dots" Sizzix Textured Impressions embossing folder from Birthday Set #2. A double layer of ovals was added behind this to create a frame. "Happy Thanksgiving" greeting was created using Expose font and the print and cut function on the Silhouette.

For the Indian teddy on the inside, I used the same teddy bear from the Cuddly Cute Designs "Pilgrim Bears" cutting file together with the Indian costume and corn from another Cuddly Cute Designs file called "Indian Mouse". I really had fun putting this card together and playing with the hexagonal ball pop up. I'm looking forward to experimenting and trying to create many more fun pop up critters with this ball!

Thanksgiving will be a little different  this year since we'll be limiting our celebration to our bubble of just three of us. Even so, I felt the need to connect with family so I decided to make a batch of Cheetos, Bugles, Fritos snack mix to share with those we'll be missing.

I put the snack mix into recycled  half gallon mayo and nut jars that I had been saving and decorated them very simply with just a band of printed paper and an oval matted label adorned with a cute paper pieced turkey. Slid the bottles into cello bags and added a bow as a final touch to make them look festive. Only had time to make half a dozen of these; really wish I had started earlier so I could have done a second batch.

Before I close, I want to share a couple sweet surprises I received from crafty friends this week...

I got happy mail! This adorable Thanksgiving mini shadowbox created by my sweet friend Bev really helped to brighten my day. Cute little squirrel and coordinating fall themed images were created using the print and cut function on her Silhouette and added to to struts inside and on the front of this fun shadowbox card. So darned cute!

Isn't this Pilgrim's Hat treat box created by my dear crafty pal Lorna the cutest ever?   I love how Lorna made this hat box designed by Snapdragon Snippets extra special by adding  the pretty paper pieced sunflower and polka dot hatband to add a touch of whimsy. "Thankful for You" was sketched onto the flower center by using the pen holder and sketching function on her Cameo... so cool!

Coping with all the changes and precautions needed to keep safe and healthy this year has been a bit stressful at times, but thankfully,  my passion for crafting and keeping in touch with close friends and family has helped a lot. Feeling so thankful and blessed. Happy Thanksgiving, everyone!

Sunday, November 15, 2020

In the Cookie of Life...

I recently made this fun card and matching gift card holder to send to a dear friend for her birthday.

   
While looking for fresh ideas for a birthday card, I came across this quote by author Salman Rushdie. Being that my friend happens to work part time at a bakery that bakes yummy gourmet cookies (that she sometimes shares with us!), I thought this would make a cute theme for her card.


I started my card by lightly blending distress oxide inks onto white cardstock to create the panel you see in the window. I added a paper pieced teddy from Marjorie Ann Designs' "Me and You Forever" cutting file and cookie jar from Kadoodlebug Designs' "Cutie Katoodles Cookie Jar Bear".

The cookie quote was done with Ballerina and Arial fonts as a print and cut with a label shape from Cricut Lacy Labels cartridge. Cutting file for the chocolate chip cookies were created in Make the Cut design studio, and window and frame were cut on the Silhouette. Digital patterned paper for the inset is from Phantasia Design's Teddy Bear Digital Pack on Etsy.

I adhered the panel with the teddy and cookie jar onto a Karen Burniston Rockin' Rectangle mechanism. Yup, I'm really making good use out of this die!

As the card is opened, the panel with the teddy and the cookie jar pops forward and rocks to the right  to reveal another teddy holding a cookie underneath.

Then, just for fun, I enlarged the cutting file for the cookie jar just enough to fit a gift card. I cut and pieced together two sets; one for the front and one for the back and adhered them together at the edges, leaving a pocket to slide the gift card in. Hope my dear friend enjoyed her birthday card and gift as much as I did putting it together!

Saturday, October 31, 2020

Have a SAFE Halloween!

Here's the card I created to send to our granddaughter for Halloween this year. Can you guess who she chose to dress up as? 
Just like so many little girls her age, she wanted to be Elsa from Disney's Frozen movie. Our daughter sent us a few pre-Halloween sneak peek photos of our granddaugther trying out her new costume, and it was so heartwarming to see the joy in her face as she modeled Elsa's glittery gown. I knew right away that I wanted to make an Elsa Halloween card!

I used a coloring book image of Elsa to render into a cutting file using Make the Cut design program and added a paper pieced jack-o-lantern from Miss Kate's Cuttables placed in front. I used glitter and pearlescent cardstocks flatback rhinestones and Stickles to give Elsa lots of sparkle (because that's what little girls --and me-- love, right?).

I put Elsa behind a clear acetate card front, and used Karen Burniston's Rockin' Rectangle mechanism to animate the card. I attached my sentiments to the front and inside of the acetate panel as a print and cut using Christie ttf and a fancy label cutting file.

As the card is opened, Elsa moves forward and little Olaf appears from behind! 

And finally, I used the back of the card to add our Halloween wishes for our granddaughter. 

I also made a second batch of cookies but with not enough time to spend making anymore treat boxes,  I simply packed them in cute Halloween cello bags tied with satin ribbons and added a fun tag.
 
My original plan was to make paper pieced tags, but after spending much time creating a cutting file for my design, I realized I would be cutting and piecing 6 layers of cardstock to create each tag. Yikes! I quickly had a change of heart and decided to switch it over to a print and cut file by stacking each of the layers in the correct order on the design screen. I thought printed image on the tags were cute enough, and it was much quicker to put together!

Before I go, I'm excited to share a  couple sweet and spooky cute treat boxes I received from my crafty buddies, Kris and Lorna. Kris put together this adorable Dracula and coffin treat boxes filled with yummy candies and antibacterial gel!

And how about Lorna's amazing Halloween rendition of children storybook characters from"Where the Wild Things Are" for this fun treat box! 

Thank you for stopping by! Please have a SAFE and Happy Halloween!