Sunday, March 26, 2023

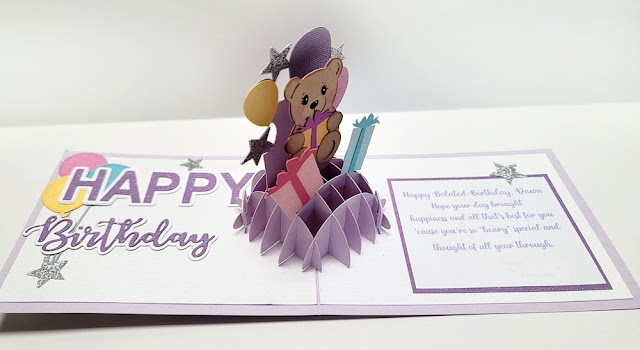
Sliceform Pop Up Birthday Card

 Today I'm sharing a birthday card and gift card holder that have fun new (for me) pop up mechanisms.
 
I kept the front of the card very simple, using mostly metal dies and punches. I used Craft Emporium's Balloons Galore dies for the stitched balloons, and paper punched stars from glitter cardstock. I also used a "Celebrate" word die from MFT and created a shadow for it in Make the Cut Design Studio.

Then on the inside...this super fun sliceform style birthday teddy bear pop up! I think I mentioned before how sliceform cards always intrigue me. So when Lori Whitlock came up with her collection of cute sliceform cards, I was over the moon!

Although the design of this sliceform style is very simple and basic, for me it provides a perfect starting point where I can play and experiment with new creative ideas. The neat thing about many of Lori Whitlock's sliceform cards is that they utilize the same sliceform base and you can interchange the decorations and embellishments on them to suit the occasion of the card you want to create.

For my card I chose to mix and match decorative elements from two different files, "Valentine Bear" and "Birthday Presents". Installing the sliceform base was a little fiddly at first but it doesn't take long to get the hang of it. 

I used Whimsy Stamp's "Birthday Word and Shadow" Set and Hello Bluebird's "Happy Birthday Words" dies together with the balloons on the inside of the card.

It was lots of fun trying this new style of pop up card for the first time. I'm looking forward to trying out different design elements on this base to come up with cards with varied themes.


I also made this matching gift card holder to go with the birthday card. This little box with sliding drawer was constructed from cardstock cut with Karen Burniston's "Slider Box Die". It's just the right size to hold a gift card, which pops up as the drawer slides open. The little box  you see right behind the gift card in the third photo is a rubber band activated "Bam Box"  which causes the gift card to pop up. This little "Bam Box" is also constructed from Karen Burniston dies and can be used to pop up all sorts of panels or embellishments in almost any card. I can hardly wait to use this little "Bam Box" to add pop up animation to my cards.

Tuesday, March 21, 2023

Popping Flap Birthday Gift Card Holder

Here's a Popping Flap style gift card holder I sent to a dear friend for her birthday. 

The Popping Flap card is a fun interactive pop up card that comes together fairly quickly and a favorite to make, especially when I'm running late and need to send a gift and card ASAP.

Since my sweet friend is a big fan of Hello Kitty, I searched in my collection of Hello Kitty coloring books and found this image to convert into a cutting file. I used Taylored Expressions' Sprinkles Confetti die for the cupcake sprinkles and Cuttlebug Wicker Weave embossing folder to add texture to the oval mat.

As the ribboned tab on the bottom of the card is pulled, a hidden card inside slides out and pops open.

For this card I created a very simple personalized sentiment to use as the pop up element. I used Arial and Ballerina fonts for the Happy Birthday message cut with glitter cardstock and added a shadow layer for the pop up. I then added a pocket to the bottom of the card for a place to add a gift card.  If you'd like to give this type of card a try, I followed a video tutorial on You Tube by Tamara of BeeHappiLea Craftin to learn this fun card style.


Sunday, March 12, 2023

Birthday Photo Collage

I am slowly trying to catch up on sharing my cards and projects from the end of last year that I haven't had a chance to post. I actually completed a few back posts of my New Years and Christmas projects recently but decided to keep the publish date in the month of the actual holiday just to keep things in  chronological order. If interested just scroll back and they should come up.

The card I'm sharing today was the one I created and sent to our daughter last year for her birthday. 

I found some cute photo themed cutting files - "So Photogenic" and "Captured" - over at Little Scraps of Heaven that I thought would be perfect for photo collage pop up cards. The paper pieced teddy behind the poloroid frame is "Bentley Bear" from Marjorie Ann Designs.

I told myself I would try to make one of these fun photo collage pop up cards for everyone in my family who gets birthday cards from us because these are truly as much fun to make as I think they are to receive. I used Karen Burniston's Photo Collage Pop Up die kit for the mechanism and mini photo frames for this card.

Die cut words "love you" are from Karen Burniston's  "Pop and Swap" die set and shadowed happy birthday sentiment was created in Make the Cut using Miss Elizabeth font. Hard to see the sentiment behind the photos. It reads " Happy Birthday to the little girl who has grown up to become such a beautiful woman. Thank you for  filling our hearts with so much joy and love and wonderful memories!"


Tuesday, March 7, 2023

Girls Day Treat Boxes

In celebration of Girls Day on March 3rd, I made these boxes to fill with chichi dango mochi and cookies to share with my girlfriends. 

The inspiration for my Girls Day boxes came from this adorable Chinese New Year slide and lock box treat holder created by my sweet crafty friend, Lori.  The round bunny scallop embellishment on the front of the box is actually a slider piece that "locks" or keeps the box closed. Her box is 2-3/4 inches square and an inch in depth; a perfect size for sharing wrapped chocolates with friends. Detailed measurements and instructions for assembly for this fun box by Brenda Quintana can be found here.

I really liked the concept of the sliding/locking embellishment and decided to try a larger version for sharing my mochi and cookies. The final size for my larger box was 4-1/2 inches square and 1-1/2 inches deep. Svg file for the kokeshi doll comes from Creative Fabrica. I used the tree die from Karen Burniston's Tiny Tree Pop Up die set for the branch and Frantic Stamper's Petite Sakura die for the cherry blossoms.

Another feature I like about this box is that it's pretty sturdy and can hold fairly heavy treats (like mochi!) thanks to the strip of printed cardstock that gets wrapped around the sides of the box.

Here's a side view of the slider/lock element which is made from 2 circles and 3 scalloped circles glued together. Original instructions calls for 4 scalloped circles but I swapped the scalloped circle on the backside with a plain circle so I could cut 2 elements out of a 12 x 12 sheet of cardstock.
    
Two of the scalloped circles were folded in half and glued to the back of the third, creating right and left "channels" to slide the box flaps into and hold them in place. Love that something so simple works so well! 

I was able to fit about 10 pieces of mochi or 10 medium sized sugar cookies into each box. These boxes are very quick to put together and can be easily sized up or down to your preference. It's also nice to know that the slider element can be almost any shape... definitely need to play around with that idea!

I have two more Girls Day treat holders to share before I close. Both of these amazing treasures were created by my dear friend Lorna.

This tag shaped box is so adorable with a kawaii kokeshi dressed in a washi paper kimono and origami obi. If you look closely, you'll see the beautiful 3 dimensional cherry blossm design that's been cut onto the pearlized cardstock behind the little kokeshi doll.

Then Lorna took that beautiful 3D cherry blossom design up to a completely new level when she incorporated it into the lid of this fabulous cube shaped box! Each of the four sides of this box has a different paper pieced kokeshi doll, intricately dressed and adorned with washi and origami papers. This wonderful keepsake box will be treasured for many years.