Monday, September 25, 2023

Welcome Fur Baby Basket

Recently my good friend welcomed an adorable Maltese puppy into her home. Just so happens her new puppy shares the same papa as my 2 year old Maltese; so being that they're half sisters, we're hoping they too will become good friends like their owners.

New puppy's name is "Jaz", and this is the pop up basket card I put together for her using Karen Burniston's Pop Up Woven Basket and Wide Woven Basket Box Card dies. 

The woven basket itself is pretty easy to assemble, but the really fun part is in filling and decorating the basket. The "Welcome Fur Baby" sign was designed in Make the Cut Design Program using Hello Valentica and Expose fonts. A strip of acetate was glued onto the back of the sign and attached to one of the struts inside the basket. Grassy borders and flowers were cut using dies that are included in the Woven Basket die set.

Sweet little Maltese pup was paper pieced using cuts from Marianne Design Eline's Puppy Die Set. Puppy's bone, bowl, duckie and ball were pieced using older svg cutting files I had created in the past just for these type of dog themed cards I love to make.

I added a personalized label to the front of the basket using an older lacy scallop oval shape cut file. Hard to tell from the photos but I used white glitter cardstock for both the sign and label for the basket and Stickles glitter glue on the flower centers for a little sparkle.

View from the side shows the depth of the basket; I used the smaller Woven Basket dies for the sides and the Wide Woven Basket dies for the front and back.

Then just for a little excitement, I added two Bam Boxes underneath so the basket would automatically pop open on its own as the recipient removes it from the envelope. If you look carefully, you can see where the two Bam Boxes were glued in to the right front and left back corners of the basket.

Here's the basket being held in it's flat position, ready to be slid into an envelope.


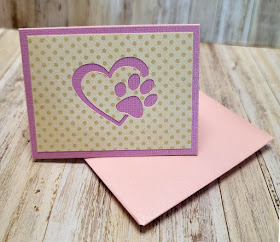
I used a cute paw and heart icon to stencil cut the front for a simple gift card holder to go along with the card.

And of course, last but not least I couldn't go without sharing a pic of the adorable little "Jaz"!

Monday, September 18, 2023

Flowering Tree Retirement Card

   This is the card and matching gift card holder I put together for a very dear friend who retired recently. 


This open box style card was inspired by Spellbinders Large Die of the Month for March called "Flowering Tree". I purchased the die earlier this year but was disappointed that the completed card from the dies in the set made a card that was a lot smaller than I expected. At that time I was trying to make a Mothers Day card and I ended up designing a similar but larger box card template in Make the Cut Design Program to better suit my needs. You can view my finished Mothers Day card here.

I decided to use that same larger template I created for my friend's retirement card. This time, I used a retired Stampin Up die to cut an adirondack chair to add to the second tier of the card. 

All the flowers and leaves were cut from the original Spellbinders "Flowering Tree" dies. I also added a few birds which were cut using the Memory Box "Resting Birds" die.

I used gold foil board for the die cut sentiment, " Happy Retirement" and added it to the bottom two tiers of the card. The die for the word "Happy" was included in the original set. The letters for the word "Retirement" were individually cut using an old Quickutz Alphabet die set, "Banana Split". Each letter was then adhered onto a strip of acetate before being glued onto the bottom tier.

This box card easily folds flat to fit nicely into an envelope. I used the blank panel on the back side to add a sentiment and personal message. 


Karen Burniston's "Slider Box" die was used to create a matching box to hold a gift card. Lawn Fawn's "Stitched Hillside Borders" die was used to cut the background, together with another adirondack chair die cut and more flowers, branches and leaves cut from the "Flowering Tree" die to embellish the top of the box.


If you've seen some of my past posts using this slider box as a gift card holder, you probably know that I've been trying to figure out for a while now, how to get the gift cards I put in these slider boxes to pop up as the recipient slides open the drawer of these boxes. Well, I think I finally got it to work the way I imagined. Watch the short video to see the fun!

In addition to the "Bam Box Pop Up" which I glued inside the box to pop the gift card up, I also needed to layer two pop up cubes on top of the gift card inside the box. These fun rubber band activated pop up cubes were assembled from pieces cut from Karen Burniston's "Surprise Cube Pop Up" dies. Love how fun these are and will definitely be using these often.


Sunday, September 10, 2023

You"re "SOY" Special

It's been awhile since I've done a sushi themed card so I decided it was time to give it a go again for a sweet friend who enjoys Asian themed cards.

The two Frannie teddy bears were cut and paper pieced using the "Heal the World" svg cutting file set from Marjorie Ann Designs. I also used very old cutting files from Pretty Paper Pretty Ribbons (now defunct) called "Silly Sushi" for the bottle of soy sauce and "Kawaii Sushi" print and cut images from SVG Cutting Files. The cream colored background label was cut using a freebie file shared by Images By Heather M and run through an embossing folder, "Hexagons" from Sizzix.
I added my finished bears and sushi to the front of a Surprise Sliding Pop Up style card.

Pulling the tab on the top of the card makes the panel with the teddies slide and stand upright near the top of the card, revealing the message underneath. As the pull tab is pulled out, the giftcard I had attached to it appears.

   Always love it whenever I get a chance to use a play on words or "punny" sentiment on my cards.  Made a fishtail banner using "You're SOY Special" and added "SOY glad we're friends" to the sentiment inside.

This Surprise Sliding Pop Up style card is always a favorite for me, especially since I usually make it as a single panel card with the pop up element on the front. This way, no need for me to worry about how I'm going to decorate the inside of the card.

Sunday, September 3, 2023

Ready to Rock First Grade

Hard to believe summer's over and the kids are already back in school! To cheer our granddaughter on as she returned to class, we sent her a few of her favorite twirl dresses together with this card and pencil shaped treat box.
 
I was first introduced to Pete the Cat by our granddaughter last year while she was a kindergartener just learning to read. Apparently she and her classmates became quite attached to Pete the Cat, as they read and were read to, quite a few Pete the Cat books. They even had a Pete the Cat stuffie in their classroom which the kids took turns taking home on weekends. 

I suppose Pete the Cat has now taken the place of Dr. Seuss' "Cat in the Hat" that we all loved and grew up with?  I found a couple coloring book images of this blue cat named "Pete" and used Make the Cut design program to render them into cutting files for my card.

On the inside, I installed two Karen Burniston's Spinner Square Pop Up mechanisms to create a fun double spinner card.  

As the card is opened, the mechanism on the top swings the rectangular panel with the word "First" upwards, while the mechanism on the bottom swings the panel with the word "Grade" down.


I decorated the square panels in front of the spinner mechanisms with "school stuff". The little blackboard was created using rectangular shapes together with DJ Doodlers Crayon and Comic Sans fonts. Cutting files for the pencil and scissors are from "Back To School Owls" set from Marjorie Ann Designs. Books and apple were die cut from Karen Burniston's Bookworm die set.

I also added a paper pieced Pete the Cat reading a book created from a coloring page image. Just for fun I added a tiny Pete the Cat image to the cover of the book using the Make the Cut print and cut feature.


I used Memo font and red mylar sticker paper to personalize this oversized pencil treat box. There are several templates for similar pencil shaped boxes on different websites to select from but I chose to use this one by My Paper Cute on Etsy because of it's unique flip top lid.  The box assembly was pretty easy once I watched the assembly video tutorial linked with the template purchase. I enlarged the template to as large as I could to fit onto my 12x12  cutting mat to be sure the 8 packets of Strawberry Cream Dipped Poky Biscuit Sticks I wanted to send for our granddaughter's after school snack would fit inside. Pretty sure I'll be making more of these cute boxes in the future... I think they might also work well at the end of the school year as a gift card holder thank you gifts for teachers.