Sunday, August 28, 2022

Gabby's Dollhouse Fabulous Flip Card

  
I made this Thank You card to send to our daughter and her family after we stayed at their home earlier this month. Our granddaughter had a week free prior to starting kindergarten, so gramma and grampa got to spend lots of time with her. While there, we learned that her new favorite animated series is Netflix "Gabby's Dollhouse" about a young girl named Gabby, who magically shrinks in size to go on adventures with her cat friends.


Just for fun I wanted to try to recreate Gabby's Dollhouse using a card style similar to Sam Calcott's four shutter "Fabulous Flip" Card as the base.

I used Make the Cut Design Program and a coloring page image of the dollhouse to create a layered cutting file for the kitty roof. After watching Sam Calcott's video tutorial for her 6x6 Fabulous Flip Card assembly, I made a template with a similar mechanism for my card. I imagined each of the shutters to be windows of the dollhouse and added clipart from Etsy of the different characters onto the shutters.


As the frame on the front of the card is pulled to the left, the shutters swing open to reveal images of four more of Gabby's kitty friends and a sentiment underneath on the right.  Still having so much fun making these Fabulous Flip cards!

I also want to share these box cards and paper pieced princesses my granddaughter and I had fun working on together during our stay.


The castle box card is from the Box Card SVG Kit from SVG Cuts, the Box Card Ice Cream Truck is from the Lori Whitlock Store, and the princesses were paper pieced from Karen Burniston Princess and Mermaid die set. I had precut all the pieces and made kits with pictures of the completed projects. It felt so satisfying just sitting there, crafting with my granddaughter! Looking forward to the next time we can work on more fun projects together.

Tuesday, August 23, 2022

Tiger Year Birthday


 My very dear friend was born in the auspicious Chinese Lunar Year of the Tiger, and being that 2022 is the Year of the Tiger, I wanted to send her a birthday card to acknowledge and celebrate this special milestone birthday.


I chose to use the Zoo Cuties paper pieced tiger from Cuddly Cute Designs for my card. He's actually on the inside of the card and peeking through the clear acetate window I created on the front of the card. Mama Elephant's Money Envelope die was used to add the Asian style frame, and I used Ballerina font to make the cutting files for the word "celebrate" and its shadow.


On the inside, I used Karen Burniston's Spinner Square Pop Up mechanism to add fun annimation to my card. As the card is opened, the tiger pops forward and his tail swings down together with a "Happy Birthday" greeting.  I added a paper pieced medallion with the Chinese character "long life" for the tiger to hold, and another with the Chinese character for "tiger" on the inside panel.

I added a pocket on the back of the card to hold a gift card. A silhouette image of a tiger found online was used to create a cutting file to embellish a simple gift card holder, and the word "celebrate" was cut from gold metallic cardstock using  Avery Elle's Sentimental Elle-ment die. 


Sunday, August 14, 2022

"Cool" Summer Treats

Best remedy for the summertime blues when you're missing your grandkids? Put together a care package filled with treats to send them!

My sweet and crafty friend Lori created this adorable set of stationery items, including matching notecards, decorated notepad and a super cute bookmark/clip. Whenever our granddaughter comes to visit us, we enjoy taking her for shaved ice at the shaved ice stand near our home so I knew right away I wanted to share this adorable set with her.

Then for some added fun, I put together this matching "Card in a Box" style card to send along with the trio of goodies. The svg cutting file for this shaved ice stand box card comes from the Lori Whitlock Store. I just love all the different kinds of box cards you can find there! 


The shaved ice stand box card included the signs, the cups of shaved ice on the stand and even the bottles of syrup but not the bears. The cut file for the paper pieced teddies are from Marjorie Ann Design's "Franklin Brain Freeze" set. After resizing and assembling the two bears, I attached one to the strut inside the stand to hold one of the bottles of syrup. I attached the second teddy with the shaved ice to the front of the stand using foam tape  After assembling everything, I used a small paint brush to add a generous coat of Stickles glitter glue to the cones of shaved ice for an icy sparkle.

I added our Happy Summer sentiment to the back of the shaved ice stand.

Like all box style cards, this one also folds flat to fit into an envelope for mailing, although in this case it didn't matter since it was packed in a box with other things for mailing.

This last photo was taken by my daughter when they received the "care package" of goodies. I asked her to send me a photo because I forgot to take one of the "jelly bag" you see in the back that I put together at last minute to hold some of the treats we sent. The cutting file for this "jelly bag" was offered as a free gift with purchase from SVG Cuts. It reminded me of those "jelly" bags and sandals that were all the rage while my daughter was growing up! It was surprisingly easy and quick to put together and I was really happy how it turned out. I hear it was quite a hit with our granddaughter as well!

Sunday, August 7, 2022

Flip Flap Shutter Wedding Card

I have another "Flip Flap Shutter Card" to share today. This one was created for a wedding we attended last weekend. The tri-fold invitation we received several months prior to the wedding was beautiful and included several photos of the couple walking along the beach. RSVPs to the event were taken online at a wedding website where guests could find details to the wedding, learn how the couple met, and enjoy many more photos of the happy couple together.
I downloaded one of the photos I liked from the website, thinking this would be a great chance to try another "Flip Flap Shutter Card".
 

I kept the front of the card simple with just the bride and groom's names knowing I would have to cut the front panel into thirds to fit onto the shutters. Cut file for the names and shadows were created in Make the Cut design program using Amazone font. Outline hearts were cut using "String of Hearts" die from Impress Cards and Crafts, which I cut apart and glued to the front panel. Wedding date was added to the frame as a print and cut. I used glitter and pearlescent cardstocks on the shutters and embellishments hoping to add some elegance, but was a little disappointed that card front still looked too plain.


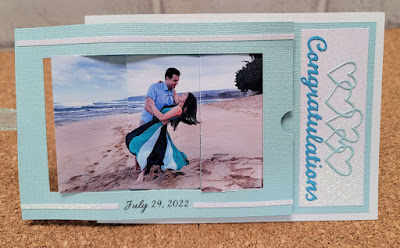
When the front frame of the card is pulled to the left, the three shutters swing to the left...

to reveal the photo of the couple on the reverse side of the shutters.

I was happy that after sizing, cropping and cutting the photo into thirds the image of the couple fit nicely onto the center shutter.  "Congratulations" was die cut using an Elizabeth Craft Designs die. If you'd like to give this style of shutter card a try, do a search on You Tube for "Flip Flap Shutter Card" for a selection of video tutorials. There are variations on the sizes of the cards and the number of shutters each crafter has chosen to demonstrate but the basic mechanism is the same for all. For my card, I used the video tutorial by Elaine Harding of Stamp With Elaine blog found here.

To create the matching gift card holder, I used the same font to create the word and shadow cut file for "love", added another die cut heart border and layered the same glitter and pearlescent cardstocks.