Sunday, May 30, 2021

Birthday Gift Surprise

Here's a fun interactive birthday card I recently put together for a special niece who is a fancier of Shiba Inu dogs. Last year I purchased a few Shiba Inu images from VectorStock.com and rendered them into paper piecing cutting files to use on my sister in law's birthday card, knowing I would probably be using them again the following year on a card for her daughter (my niece)
 
It's been awhile since I've used my Karen Burniston Parcel Pop Up die, so I thought I'd use it to make a fun pop up card. I used clear acetate for the front of my bottom fold card so the wrapped present in the card would be visible. I used a freebie cutting file from Bird's Cards to create a puffy bow for the front of the card to hold the magnet which keeps the card closed. The second magnet was glued under the flat bow on the giftbox  inside the card.

As the card is opened, surprise! Another doggie pops up from inside the present...so fun!

Remembering how to install the mechanism for this pop up was a little tricky for me so I had to watch Karen Burniston's video tutorial several times before attempting it on my card. I'm really pleased at how this card turned out and  am looking forward to using this mechanism die more often so I can become more familiar with installing it into my cards.

Monday, May 24, 2021

Housewarming Surprise Pop Up Slider Card

 My cousin's daughter's family recently purchased their new "forever home" in Cali and this is the housewarming card I put together to send our congratulations.

While trying to decide on a style of house to use on my card, I thought it might be fun to create a  paper pieced house that looked like their new home.  I found photos of their house still posted on Zillow and came up with this house. I used basic shapes (squares, triangles) to create the house and roof lines together with some older files I created a few years ago for the windows, door and fence. Flowers and foliage for the flower boxes were cut from old mini punches from Punch Bunch. Unfortunately my paper pieced house didn't turn out looking too much like their new house after all, except maybe for the colors. But that's okay, it's still a kinda cute house anyway, lol.

I decided to make a Surprise Pop Up Slider style card so I could attach an envelope for a gift card onto the sliding mechanism. As the recipient pulls up on the tab at the top of the card, the house slides up to an upright position. and reveals the card sentiments.

This is one of my favorite interactive slider type cards to make because it doesn't take too long to put together and I think it has a pretty big "wow" factor. There are a lot of tutorials easily found on the internet to make this type of card but my favorite is by Beate Johns here.

Here's a view from the top of the card fully open which shows the slider on the top of the card where I attached the envelope for my gift card. It's a little hard to see since I die cut the envelope out of the same cloud patterned paper that I used for the background.


Sunday, May 16, 2021

Doc Mcstuffins' "Time For A Check Up" Birthday

About a month ago, our granddaughter who was turning 4 in April excitedly told us that she was having a Doc Mcstuffins themed birthday party to celebrate with her preschool classmates. Of course, this clueless gramma had no idea who Doc Mcstuffins was so  I had to quickly do the "Google/Wiki/You Tube Internet Search" to find out. Even sat down to watch several episodes from the series so I could regain some sort of cool gramma status, LOL.
 
I learned that the Doc Mcstuffins series is a fairly new (2012) addition to Disney Channel. She's a young girl who aspires to be a doctor like her mom, and she talks to and heals her broken toys and stuffies.  Happily I had no trouble finding lots of coloring book images, ideas and logos for Doc Mcstuffins on the internet to help me create this personalized themed birthday card for our granddaughter.

On the inside, I was excited to finally get a chance to try out the Photo Collage Pop Up die by Karen Burniston...

I've had this pop up die for awhile but never felt I had enough images to create this collage until now. I printed images from the internet of Doc Mcstuffins and her friends onto glossy photo paper, sizing them to fit into the die cut frames that are included in the pop up die set. 

This fun pop up looks like it might be complicated to assemble but I'm happy to report that I was able to put this collage together on my first try with the help of Karen's You Tube video assembly tutorial.

Cutting files for all the paper pieced embellishments on this card, including the paper pieced Doc Mcstuffins on the front were created in Make the Cut design program from coloring book images or icon clip art. This is a fun pop up card to make and receive; the only drawback being that I rarely have enough photos to create a collage. I guess I need to start taking more photos of people instead of only paper projects!

Prior to the themed party, my daughter asked if I could help put together some "Doc bags" for the party guests.


This is what Doc Mcstuffins' doctor bag looks like. I was happy to find lots of freebie templates online to recreate this as a treat bag for birthday parties....

But then I was told that all this stuff (stethoscope, clipboard and "Big Book of Boo Boos) had to fit into each bag... what?!! (The guests would all be playing doctors who would be doing "check ups" on their stuffed animals at the party)

Since the bags needed to be at least 8 inches high to accommodate the clipboard, we decided to use ready made lavender colored gift bags, trim off the handles and attach a glittery handled topper. The back flap of the topper was glued onto the bag and I used strong neodymium magnets for the front closure.

Cutting files for the glittery handled topper and this "most important" paper pieced Doc Mcstuffins bandaid logo were created in Make the Cut design program.
Themed birthday parties are always so much fun and I'm so happy that I had the chance to help with the bags. 

Wednesday, May 12, 2021

Touched by Kindness

As promised, today I'm sharing some fun crafty treasures I recently received from two very sweet and thoughtful friends.

My dear friend Bev warmed my heart again this year with another beautifully handmade Mothers Day card. I love the clever design of this box card shaped as a tea cup with brightly colored blooms! Bev's thoughtful gesture of sharing her love with the cards she creates during Mothers Day and other special occasions always brings much cheer and has inspired me to try to do the same.

This fun spa inspired Mothers Day gift is from my amazingly creative friend, Lorna. Lorna wrapped a bar of scented soap with delicate Japanese tissue and embellished with this totally adorable paper pieced bubble bath girl. Definitely outside the box creative, right? And Omgosh, how cute is that little rubber duckie!

But wait, don't put your cuteness monitor away just yet! This super kawaii Boys Day treat box, also designed by Lorna pushes the cuteness level sky high!  I love how she rolled washi papers to make flying carp windsocks and suspended them in air with beads strung on fishing line. Isn't it amazing what a little paper, beads, ribbon and fishing line can create when you have the creative prowess of Lorna?

Before I sign off today, I wanted to let you know that I was recently notified that Feedburner will no longer be providing email notifications for my blog posts. I honestly thought it had ceased to function a while back, but if you'd like to receive some sort of notification, the platform I currently personally use is Bloglovin'.


Sunday, May 9, 2021

Mothers Day Shaker Card

Happy Mothers Day! I decided to make shaker cards for Mothers Day this year. I got started working on my cards early, because I wanted to make extra cards to send to special friends and  because shaker cards always seem to be a bit of a challenge for me to put together.
 
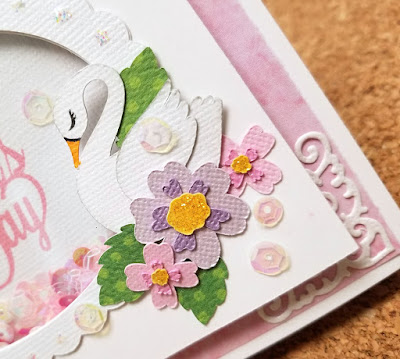
I started by printing "Happy Mothers Day" word art from the Silhouette Design Store on the inside panel of my shaker. Scalloped oval frame is a freebie svg cutting file shared by Heather M on her blog here. Lacy corners were cut using the Filigree Corner die from Lala Land Crafts.

I used Lori Whitlock's Decagon Pop Up Swan svg for the paper pieced swan and blossoms, adding stickles to the flower centers and scattering a few extra sequins for some bling.

On the inside, I used Karen Burniston's Cake Pop Up die (AGAIN!) to create the hexagonal platform for the crowned swan and blossoms.  I added more die cut filigree corners and an oval matted in gold for the sentiment. The sentiment shown here is for the cards that I made for my special "mom friends".

I knew I had to have this swan cutting file from the first time I saw it in the Lori Whitlock Shop. I've always thought of swans as being beautiful, graceful, magical, and a symbol of motherly love... so I felt this would be perfect to use for my Mothers Day cards.

The original cutting file for the swan (Lori Whitlock's Decagon Pop Up Card - Swan) creates a very impressive ten sided stand alone pop up card, but since I already had my mind set on creating a pop up inside a card, I used Karen Burniston Cake Pop Up die to install a hexagon pop up platform in the card.

I've been having way too much fun using this hexagon pop up platform in my cards recently so I'm pretty certain everyone on my list to receive a card will probably get one... or more! 
I also have a pair of amazing Mothers Day surprises I received from my crafty friends that I want to share, but will save for my next post. Till then, please have an enjoyable, relaxing Mothers Day!