Saturday, July 29, 2017

Softball Grad

This is the last of the 3 graduation cards I made for the ball playing graduates in our family this year. Did another "before and after" trifold card using the same girl portrait paper piecing similar to the first one I posted earlier.


As with the first card I made, I searched the web to get an idea of what this graduate's high school softball uniform looked like and tried my best to recreate it. And since she graduated in formal Hawaiian attire instead of the traditional cap and gown, I dressed my paper pieced girl accordingly. I added a ruffled neckline similar to the muumuu she wore and used Cuttlebug Jamara embossing folder to add some texture to her dress.

Her haku head garland was made with mulberry flowers from All Natural Accents and sprigs of green using the Martha Stewart branch punch. I used Stampin' Up's Little Leaves Sizzix die for her maile lei, layering the leaf branches around her neck to form a lei.

Kept my trifold card closed for mailing with a bellyband with her high school coat of arms seal. Hoping the graduates all enjoyed their personalized cards!

Saturday, July 22, 2017

Baseball Grad

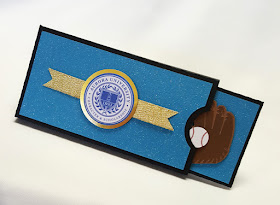
Here's the second graduation card I made this year for a ball playing graduate. Just so happens he's also the brother of the softball player who I made the card for in my previous post. Decided to do another Instacube style card from the Lori Whitlock Shop for him.

Had fun decorating the sides of the cube. Graduation cap is a free cutting file  generously shared by Kay from Clever Someday blog. Cutting file for "Class of 2017" was created in Make the Cut Design program using Varsity font and I added a tassel made from embroidery floss. Baseball, glove and college team logo were also rendered into cutting files using Make the Cut.

I used the print and cut function to do the school seal and added a strip of metallic ribbon to embellish the sleeve which holds the flattened cube. This rubberband activated card pops into a cube when removed from the sleeve. These Instacube cards are so fun and I think they are just perfect for making cards for guys. LOL, they may not appreciate all the work you put into decorating it, but at least you'll know they'll love the poppin' action!

Saturday, July 15, 2017

All Star Graduate

We had three graduates this summer in our family, and since all three were ball players while at school, I thought it might be fun to use that as a theme for their graduation cards. For the first one, I used my girl portrait paper piecing to do kind of a "before and after" trifold card.

For the "before" portrait, I searched the internet for photos of the graduate's high school softball team and tried to recreate a paper pieced uniform similar to what their uniform looked like.  And for the "after" portrait, I dressed her in the attire similar to what she graduated in, a gold cap and gown with a brown stole and tassel. And of course, I had to give her the traditional Hawaiian style maile lei, which was created by layering die cut leaves from Stampin' Up's Little Leaves die. Diploma is a piece of vellum rolled and tied with gold ribbon and tassel was made using embroidery floss.

Our sentiment was added to the center panel. "All Star Graduate" word art was created by combining Sebastiana and Brisk fonts in Make the Cut, both are freebies you can download from DaFont. I especially liked how the fun swashes included with Sebastiana font really gives that look of a baseball team logo.

As a final personal touch, I added a belly band with the graduate's class year and school mascot to keep the card closed. I think it's fun to make personalized graduation cards so the recipient knows you made their card just especially for them.

Saturday, July 8, 2017

Clothesline Baby Shadowbox Card

I have another layered shadowbox style baby card to share today. This one was created for a friend's granddaughter, Baby Emma who was born a month before our granddaughter.

The inspiration for this card came from a Hallmark card that was sent to my granddaughter at her birth. I thought it was so cute, and wanted to try the same idea in a shadowbox style card. The cutting file for the little onsie is a freebie from Quilling Patch. (I added the heart and ruffled skirt to make it more girly).  Panties, socks and bib are from Cricut Baby Steps cartridge; and hanging teddy is one of my drawings rendered into a cutting file in Make the Cut program.

Added a fun personalized touch by adding baby's name, using Pharmacy font and Make the Cut to create a cutting file for the front of the card.


View from the top shows the two layers that were added inside for the shadowbox effect. As you can see from the photo, my layers are not aligned quite right...I'm learning that accurate placement of the layers is essential!

And here's the back of the card where I added our sentiment. Still having fun and learning as I continue making more of this type of card.

Saturday, July 1, 2017

Popping Up with Pochacco!

I have another Instacube Box card to share today. As mentioned in my earlier post, I am totally having too much fun making these pop up cards and...LOL!... just might make one for everyone on my birthday card list!

This Pochacco decorated one is actually the first Instacube Box I attempted, made for my bestest crafting buddy Kris for her birthday. This rubberband activated box from the Lori Whitlock Shop folds flat and slides into a sleeve for giving and pops into a cube when removed from it's sleeve...so super cool!


I added paper pieced Pochacco images using cutting files created in the Make The Cut design program to decorate 3 sides of the cube and the sleeve.  A Happy Birthday cutting die from Elizabeth Craft Designs was used for the top of the cube. I enlarged the size of the cube slightly from the original 2-1/2 inches to 3 inches so I'd have an easier time getting the  Happy Birthday die cut and Pochaccos to fit nicely onto the panels.

Here's how the card folds flat to slide into it's sleeve. Once I had all the pieces cut, I watched Lori's instructional video on Youtube for the assembly instructions and found this pretty easy to put together.

Before I go, I have another card I'd like to share....some happy mail I recently received from a very special blogging friend, Dale...
Dale made this super sweet coffee take out cup shaped card to celebrate my recent retirement. (Ahhh...she knows my crazy addiction to coffee!)


The coolest thing about this card is how a gift card slides up from inside the cup when you open the card...neato! Thank you, Dale! I love this card and you made me feel so-o-o special!