Wednesday, December 28, 2016

Wrapping It Up

Made several of these polar bear gift card holders for the many gift cards we gave out at Christmas again this year. Finding it so much more enjoyable staying home to put together these card holders than having to deal with going to the mall, struggling to find parking, standing in long lines and fighting the crowds.

These are the same gift card holders I made earlier this year for birthday gifts but this time I just swapped the head out for a polar bear head. Cutting file for the polar bear and his snowflake are from Cuddly Cute Designs. Merry Christmas was cut using an Elizabeth Craft Designs die, and Sizzix Framelits Tag Set was used for the gift tag with our sentiment.

For our very special Mail Lady, I put together this mini holiday mailbox to hold her gift card.

Cutting file for this comes from My ScrapChick, and the simple wreath embellishment on the front is a file from Kadoodle Bug Designs.

Loved these polar bear with snowflake tags from last year so much that I made them again this year.

And I made these polar bear with candy cane tags for those who got the snowflake ones last year, lol. Round tag was cut using Lawn Fawn's "Stitched Circle Tags" die, bear was cut using Cottage Cutz "Santa Bear" die, snowflake is from Die Namics "Let It Snowflake" die, and candy cane is from Little Scraps of Heaven's "Candy Cane Penguin" svg cut file. And I guess that just about wraps it all up for my holiday projects this year! 

Tuesday, December 27, 2016

Christmas Chex Mix

We decided to go with the same take out boxes we used last Christmas to box up our holiday chex mix again for hubby to share with his coworkers.


Used a cute but simple paper pieced reindeer from My Scrap Chick for my tags and added a punny sentiment inside.
One jarful of snack mix went to the sweet folks at Latte's vet. The paper pieced pup is my favorite "Puppy Love" doggie from Little Scraps of Heaven, and her snowflake is from Cuddly Cute Designs "Polar Bear" file. Cuttlebug's Snowflake folder was used to emboss the round backdrop for puppy.

Monday, December 26, 2016

Holiday Greetings to Friends and Family

Now that the holidays are over, I've come to the realization that I really do need to start working on my Christmas cards much earlier in the year. It took me way too long trying to decide on a design for our card this year so I had a late start and barely finished in time. That left me with almost no time left to do much else creative for the holidays. Such a disappointment since there's always so many neat holiday crafts I wish I had the time to try.

The layout for the card front of our Christmas card this year was inspired by a beautiful card created by Lin,  posted on her Sending Hugs . For our card, I used the Cuttlebug Snowflakes embossing folder to add texture, and snowflakes were cut using Die-namics' Let it Snowflake die.

I loved Lin's idea of using a Polaroid type frame; it was perfect for adding a photo we had taken of our furbaby Latte with our outdoor Christmas lights display in front of our home.The original photo was cropped in Photoshop and placed in a faux Polaroid frame shared by Megan on The Nerd Nest blog. The frame is a free download and Megan includes a tutorial to make it all easy.

On the inside, the card opens to my favorite Pop Up Accordion Panel card.

 Added a photo of us from our Hokkaido vacation on the inside, and tried to keep the embellishing to a minimum with just the snowflakes...but even then assembling 80 of these did take longer than I had expected! Thank goodness hubby helped with much of the scoring and die cutting!

And finally, here's a side view showing the V-fold mechanism that creates the fun pop up movement on this card. There are quite a few tutorials with free templates available on the web for this type of card, just search for "Pop Up Panel Card". 

Sunday, December 11, 2016

Turkey Treats and Birthday Surprises

I'm sorry to say I've been MIA on my blog lately due to me struggling to finish our Christmas cards. I think I bit off more than I could chew when I chose a design for my cards this year...funny how making one card always seems simple enough but having to do multiples always takes so much longer. Anyway, I'm taking a break from that to share these little turkey treat holders my sweet friend Lorna made for us at work before Thanksgiving. Aren't they just absolutely adorable?

The body of these turkeys is a piece of cardstock scored and adhered at the top to create a tent shape to hold little chocolates inside. I think Lorna used a flower shaped cutting file for the tail feathers and circle punches for the fun cute eyes, a triangle for the beak and a teardrop punch for the wattle. Isn't it amazing how Lorna manages to make clean and simple look so darned cute? Love it!


Then to my surprise and delight, a few days after Thanksgiving, my dear friend Kris delivered these goodies for my birthday!

Isn't this paper pieced teddy with his honey jar that Kris used to decorate the gift bag just adorable?

And goodness, how kawaii is this Pochacco birthday card? 
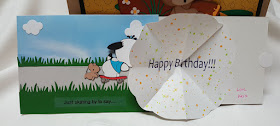
But wait...we all know how talented Kris is with creating the best moving and interactive cards, right? So watch what happens when you pull on the little tab on the right side of the card...


Pulling on the tab makes Pochacco roll down the street on his skate board while something starts to unfold from inside the card...

Whoa! How cool is that! How did she do that!
Haven't had the time to sit and figure this one out yet...but I'm hoping Kris will teach me how she does this super fun interactive card!


And this is the little carnation Latte look a like who visited me at work again this year with loving birthday wishes from hubby and Latte!

Okay, gotta get back to working on my holiday cards and projects... I may not have a chance to post again till next year, so here's wishing you all a very Merry Christmas. See 'ya in 2017!