Sunday, December 23, 2012

Christmas 2012

It's Christmas! Whew, I really struggled this year just to get a few projects done on time. Every year DH takes twenty jars of sweet cereal mix to work to share with his co-workers. I decided to go with a penguin theme this year to decorate the jars.
The cut file for these penguins came from a set of candy wrappers from Treasure Box Designs, and I used  Spellbinders Nestabilities Labels Four die for the labels. Thank goodness these were super quick and easy! In addition to the penguin, this candy wrapper set included cutfiles for 4 other adorable holiday characters: a gingerbread man, reindeer, snowman, and teddy bear. Maybe I'll do the snowman or reindeer next year.
Though I didn't have much time to do any Christmas crafting, I'm lucky enough to have friends and a mom that did! Mom put together these cute beaded wreath lapel pins for me to share with my friends at work. Thanks Mom, you're the best!
These two very special holiday treat holders were lovingly created by friends Kris and Lorna.
Isn't this chocolate filled Christmas tree from Kris stunningly yummy? Love it! Amazing what people come up with using a bit of cardstock, glue and ribbon. You can find the tutorial by Brenda Quinata at her blog, Qbee's Quest. I know it's a little too late for this year...or maybe not...how about keeping the kids at your Christmas dinner busy by having them make their own?
Once again, Lorna didn't fail to amaze us! This time she brought by these cute chimney boxes filled with goodies for each of us at work. Oh, look! Don't you just love the way she perched a chocolate Santa right on top of the chimney box. So clever!!!

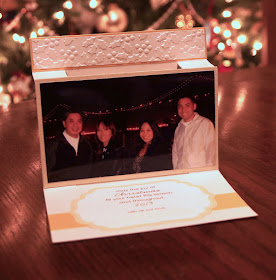
Last year, for the first time in over twenty years, I didn't send out Christmas cards because we were so busy putting together my daughter's wedding invitations. This year, I thought, "It was so nice not having to stress over Christmas cards last year, maybe I won't do them again this year..." Let's face it, when you've done Christmas cards featuring photos of your only child every year for over twenty years, what is there to do when she gets married and moves away?


ANSWER: ...Christmas cards featuring a photo of your DOG!


LOL, I actually did include another photo of all of us together on the inside. For my card, I used the center step card template shared by Sandy Hulsart, Spellbinders Nestabilities Labels Four and Labels One dies, and a Sizzix Holly embossing folder to put sixty of these together.
Tomorrow's Christmas Eve, and I still have gifts to wrap...need to get hoppin'! Sending blessings to all for a very Merry Christmas!

Saturday, December 8, 2012

Happy "Bird" Day!

Okay, so I have to admit I'm a bit slow catching on to the latest trends. When Angry Birds merchandise hit the markets over a year ago, I didn't even know what they were about. Well I finally got me a smartphone a only few months ago, and downloaded the game...ok, I'm hooked! So when my son in law's birthday rolled around this year, I knew I had to try my first Angry Bird card. Searching the internet for ideas brought up tons of great ideas, but my favorite was the one created by Chris over at Calla Lily Studio. As you see, mine is a full on shameful copy of hers, but I liked her card so much I didn't want to change it up too much. I think the only difference is that Chris used  punches to create her Angry Bird while I created a cutfile in Make the Cut for my card.

Now, check out the fun v-fold pop-up on the inside! This fab template is the work of none other than pop-up master, Carol over at Extreme Cards and Papercrafting. Carol generously shares her template, complete with an easy to follow tutorial on her blog. Thank you, Carol!
Whew, thanks to the creativity and inspiration from both Chris and Carol, my Angry Bird birthday card didn't take too long at all to put together.
Then to add to the fun, I sent my son in law's card off with a box of Angry Bird Gummy candy with some birthday cash tucked inside. Hope he enjoyed it!

Saturday, December 1, 2012

Sister Stamps Chinese Zodiac Collection: Release Day!

Today is Release Day for the first two stamps in a series from Sister Stamps new Chinese Zodiac Collection! The cute snake and horse images are available for purchase at many of your favorite craft and scrapbook stores, you'll find them listed on the sidebar over at the Sister Stamps official blog.

For my card today, I chose to use the new Horse stamp from this collection. The thing I really love about these stamps are that they are so versatile...not only can they be used for all your creative New Years projects...they're so darned cute that you'll find yourself wanting to use them year round on many other occasions as well!
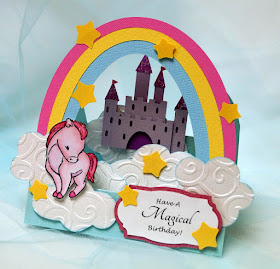
As an example, I decided to try a fantasy themed center step card.

Used copics to color the adorable horse in shades of pink, glittering her mane and tail and placed her on a bed of puffy clouds embossed with the Cuttlebug swirls folder...

 
Added a lavendar magical castle cut from the Cricut Once Upon A Princess cartridge in the background, a colorful rainbow and a few stars to complete a fun card perfect for any little girl's birthday.
I gotta admit that I'm not much of a stamper anymore, but I did have fun getting my fingers inky again for this new Sister Stamps release! Thank you, Jenny for allowing me to play along. Looking forward to joining you all again in February to kick off the release of the next two Zodiac animals in this series!


Friday, November 30, 2012

Sister Stamps: Year of the Snake

Every year on New Years Day our extended family gets together for an entire day of feasting, partying, watching football and renewing family ties. I usually like to bring boxes of homemade goodies for each of the families. but being the procrastinator I am, I always go crazy the week after Christmas struggling to get these done on time.
Hopefully, this year will be different! I've already begun working on the boxes, using Sister Stamps adorable Year of the Snake stamp to decorate gable boxes to hold my treats.

Found a template for the gable box by doing a Google search online (there's so many to choose from!) and importing one I liked to Make the Cut to create a cutfile for it. The year, 2013 was also created with Make the Cut using Beach truetype font. Gold cardstock and printed origami paper were used for the backing and a bit of gold ribbon tied in a knot to finish it off.

Also added a tag for the box, using the kanji characters for "Gashou" or Happy New Year in Japanese. All elements for the tag including the kanji characters were designed in Make the Cut and cut with the Silhouette. Used my favorite embossing folder from the Cuttlebug Asian bundle to add texture...now...just gotta get crackin' on a dozen more....
Don't forget to check out the Sister Stamps blog as well as the blogs of the rest of the Sister Stamps Guest Design Team for their creative projects using the two new Chinese Zodiac stamps!

Patti: Creations by Patti
Linda: Simple and Sassy Creations
Laura: By TKG

P.S. Tomorrow (Saturday) is Release Day for the first two stamps (snake and horse) in this fun Sister Stamps Chinese Zodiac Collection!

Thursday, November 29, 2012

Sister Stamps Release #10: Chinese Zodiac Collection

Have you heard? Sister Stamps will be releasing their first two stamps of a very special Chinese Zodiac Collection this Saturday. I'm especially excited about this new collection of stamps for two reasons...one being that I've been waiting for and wanting a set of cute Chinese Zodiac animal images like these to use on New Years projects for the longest time! And secondly, because I was given the honor of being invited by Jenny to join her team of super talented guest designers for this release.
One of the nicest things about working with these stamps is that it gave me a chance for an early start on my New Years projects!
 
 
For my first project, I used copics to color up the adorable snake and horse to decorate a wallet sized calendar/appointment book.


This particular one is a two-year calendar, which really made it perfect for using both the Year of the Snake (2013) and Year of the Horse (2014) stamps.


Used the Make the Cut program and Silhouette machine to create and cut out the octogons, years and the kanji characters for snake and horse. Tiny sakura blossoms were put together using Punch Bunch and Carl punches.  Ran the gold octogon pieces through a Cuttlebug embossing folder (Asian bundle) and adhered everything to a piece of patterned paper (My Little Shoebox, Aiko collection) cut to fit the calendar.
Wouldn't you agree that these are the most adorable snake and horse Chinese Zodiac images ever? Denise did a fabulous job of creating these sweet critters, and just wait and see... you'll find yourself wanting to add all twelve of these cuties to your collection! Get a preview of all twelve of the stamps (which are scheduled to be released two at a time throughout 2013) here at the Sister Stamps blog.
And if you haven't done so already, you must go and check out the amazing projects created by the rest of the guest designers for this release. Here are the links....


Sunday, November 18, 2012

Home Sweet Home

Dh and I just got back from a mini vacation visiting with our daughter and son in law at their new home in Cali. For our housewarming card to them, I thought it might be fun to try a house shaped card...
Been seeing so many different styles of very cool fence, door, and window dies in all different sizes being released by many of the companies specializing in thin dies lately. And seeing all the beautiful cards and paper crafts that others have created with them really made me want to run out and buy some too! Ahhh.....but at 10 - 15- 20 dollars per die...I just couldn't justify the spend. And how often would I actually use them? Better to try and create my own using the Cricut cartridges I already own and Design Studio or search for some images to trace in Make the Cut.

I admit it did take a lot longer to do than simply buying the ready made dies, but in the end I had cutting files that can be changed, re-sized or re-designed to fit my future needs.
It's difficult to see in the photo, but the roof on the house was actually inked and pieced as three separate scalloped, overlapping layers for some dimension.
The tiny flowers and leaves along the fence and in the window box were punched from a mini Punch Bunch blossom punch and Martha Stewart small branch punch.
For the front of the house, I used MTC and the Silhouette to design and cut the door. I used my Cricut, Cricut Design Studio and the George cartridge to create the windows and windowboxes; Picturesque cartridge for the picket fence and Wild Card cartridge for the mailbox.


Really had fun with the mailbox! I made a teensy-weensie envelope to fit inside the mailbox, and couldn't resist decorating the mailbox with some personalization. Does that look familiar? Yes! It was inspired by Carl and Ellie's painted mailbox from one of my daughter's favorite Pixar animated movies, "Up".
Open the card to the inside of the house and there you'll find a little white doggie perched on a comfy couch. (LOL, this is the little doggie my son in law has been promising to get once they got a place of their own...) The sign on the wall above the couch reads "Home Sweet Home".
Couch and doggie are Cottage Cutz dies and the sign was created in Design Studio.
 

As a final step, I decided to add an easel to the back of the card so it could easily stand up for display.
I inked up a Cuttlebug embossing folder (Tiny Mosaic) to try to create the look of a front sidewalk, and placed on it a charming old Irish saying framed with cuts using the Nestabilities Label Four die.
Whew! Took me quite a while to put this one together...but I have to admit I did have fun with it!

Sunday, November 11, 2012

For My Hubby the GEEK

Last month was such a busy birthday month! Three of the most important people in my life, DH, DD, and my son in law all celebrated their birthdays in October. That's two guy cards for birthdays less than a week apart...no wonder my brain hurts!
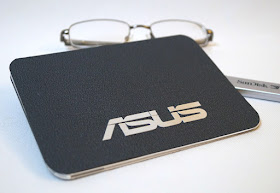
This "mini" laptop card was for my DH the computer geek. In my search for guy card inspiration, I was delighted to come across several very cool cards made to look like a miniature Apple MacBook and knew I had to CASE the idea. But being that DH has always shunned the Apple Operating System, I naturally had to change it up to look more like his own Windows based PC. Simply used Make The Cut to trace and convert the ASUS logo into a cutfile and cut them from silver metallic cardstock.
On the inside, I used rounded squares and rectangles popped up with foam tape to look like a keyboard and used MTC (and Arial font) to create the alphas, cutting them out of white vinyl.
I used the computer screen to display my sentiment placing it behind a piece of acetate. DH always reminds me about how lucky I am to be married to a "computer doctor", so I thought he might get a kick out of this. I have to admit he's right though....because he has always been there for me and our family whenever we run into any computer problems!

Sunday, November 4, 2012

Heart Frame Easel Card

Had so much fun making my first card using the flowered frame cut from the Cricut Love Struck cartridge couple months ago, that I couldn't resist playing around with that cut again for another thank you card. I had been toying around with the idea of a frame or window type easel card in my brain for some time and decided it was time to give it a try.
The frame cut comes from Cricut Love Struck cartridge (now retired), flower layers are from Plantin Schoolbook cut in various sizes, and mini butterflies are from Memory Box Butterfly Delights die.
For the stop, I used branches punched and trimmed from Stampin' Up's Two Step Bird punch. The card base was created in Cricut Design Studio by welding the black out cut of the flowered frame at the top. A Robins Nest dewdrop is the center for the blossom on the top of the frame and I used Viva Liquid Pearl Pen to do the centers for the rest of the flowers.
This is what the card looks like when returned to it's flat position...
 
...and a peek of the card on the inside.
 I was happy how this card looked once it was propped up, but a little disappointed that it turned out kind of flimsy...lol, or maybe I should say "delicate"....  because the width of the leafy stem part that forms the heart shape of this frame was probably too narrow. And since I used another frame cut instead of  a solid piece of cardstock as the folded easel support, the finished card front might have seemed a little confusing to a recipient who is not familiar with how an easel card works. Fortunately, this card was created for my blogging friend Lynn of Ben Franklin's Lynn's Craft Blog (who is a seasoned and "pro" at crafting), for a very special surprise RAK I won on her site. Lynn always inspires me with her beautiful creative craft ideas and I love to visit her blog to stay in the know of the newest and coolest crafting tools and ideas hitting the market. Thanks so much, Lynn!


Wednesday, October 31, 2012

Halloween 2012

Really struggled this year with getting all my Halloween projects done on time! These two coffin shaped "boxes" were the first thing I completed...had to get them done early so I could mail them to dd and her hubby last week.
 So the original plan was to make and decorate coffin boxes filled with Halloween candies...I even purchased the cut file to do exactly that. But when it came time to cut the boxes, I suddenly changed my mind. I really wanted to try something more fun and different...with at least a little bit of an unexpected surprise factor...

 I started out by decorating the front of the coffin boxes. I used Tokidoki's CiaoCiao to dress up the top of one box and a spider and spiderwebs for the other. All cuts on these boxes except the bat, spider and CiaoCiao are free svg files created and shared by Bird of Bird's Cards. The bat and spider are from a Cuttlebug die, and the cutfile for CiaoCiao was created in MTC.
Then, instead of making a box, I decided to use the old candy bar pull idea. Remember that one? Here's how it works...


Pull up on the ribbon on the top and out slides a candy bar...with a skeleton!

 Pull up on the ribbon on the top and out slides CiaoCiao's soulmate, Adios!
You can find the tutorial for the basic candy bar pull by Selma over at Selma's Stamping Corner. I just changed mine up a bit by creating a "boxy" sleeve for my candy bar instead of a pouch. To create the sleeve, I used a piece of cardstock 5.25" x 5.5" and scored at 0.5", 2.5", 3", and 5". I then glued on a coffin shaped front and back to the sleeve.
Also did several more of these for friends using Vampire Hello Kitty...


The surprise pull up skeleton on these are a cut from Cricut's Paper Doll Dress Up cartridge. I thought he looked a little cuter than the one I had used earlier for the first coffin box I did.
As much fun as these coffin boxes were to make, admittedly they took more time than I had...I needed to come up with some treats that were quick but still cute. So this is what I came up with next...
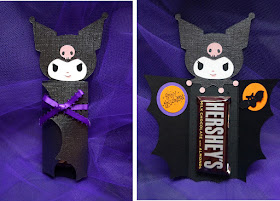
The idea for these candy bar wrappers came originally from an article from Woman's Day Magazine online, complete with instructions and templates. The original templates for these fit a large size chocolate bar, and after creating a cutfile for these in MTC, I realized I would need more than 1 sheet of cardstock for each! That's when I decided to scale down the size of the template to fit a snack size candy bar instead.

Next thing I did was to change off the original vampire's head with Vampire Hello Kitty and Kuromi...

Added a bat and stamped Happy Halloween to the wings inside, and tied it closed with a bow. These were pretty quick to do and I was able to finish 20 of these just in time!

For our Halloween treats for our family, I decorated gift bags using a free cutfile from My Scrap Chick. This was originally a Friday Freebie tag svg which I enlarged to fit the bag.

If you have a cutting machine (like the Silhouette or eClips) that uses svg files, be sure to sign up for the My Scrap Chick newsletter to get access to the cutest new freebie svg files every Friday!

And...for my last Halloween project this year, I decorated these gift bags to hold doggie treats for Latte's doggie pals. Snoopy and jack-o-lantern image was found doing an image search on Google and having MTC create a cutfile for it.

Speaking of Latte...here she is, though not too happy...in her skeleton costume wishing you all a safe and Happy Halloween!