Saturday, April 28, 2012

Making of a Wedding: the Favors


I guess it goes without saying that a lovebird themed wedding would have birdhouse favors...and so it was with this one. Dd had requested birdhouse favors very early on so I had quite a bit of time to put these together. Inspired by Cricuteer club member Aileen and her cute milkbox birdhouse box, the original plan was to do something similar. Later, I came across and fell in love with another style of birdhouse box designed by Jani Lewis (Paper Compulsions). My final design was inspired by both styles, created in Design Studio using shapes from the George cartridge.

Here's a view of of the backside of the box, stamped with the date of the wedding and names of the bride and groom. Custom made stamp was purchased on eBay from seller Loongchai74...very reasonable prices!
First, the box templates were cut & scored from Bazzill Bling Diamond cardstock on my Cricut. Then after gluing on clear acetate for the heart windows, I stamped the boxes, with the help of a Fiskars Stamp Press to ensure each impression would be correctly centered on the back.
Six hundred little lovebirds were cut using the same Quickutz lovebird die that we used for the placecards. For these, I added wings, which I punched using the Stampin' Up Bird Builder punch. Eyes are 2mm black adhesive backed gemstones.
To add a bit of texture and interest, roofs for the houses were run through the Dots & Diamonds embossing folder from the Sizzix Hello Kitty Spring Set. Dh took on the job of scoring and marking each roof with guide lines for easier assembly. Leafy sprig and tiny hearts were also punched from the Bird Builder punch.
After all the pieces were finally cut and prepped, we began the tedious process of gluing and assembling. With the patient help of my bff Aunty Pat and sil Aunty Sherry, we finished assembling three hundred little birdhouses in two weekends.
The bride and groom took care of the final step of filling all the boxes with Big Island Candies' yummy lemon shortbread cookies when they arrived...

Ahhh....and here's a glimpse of what the tables looked like at the wedding reception. Bird cages for the centerpieces were purchased from Stumps, battery powered LED candles from Costco, and floral arrangements inside are by Spinning Web Florist. Thank you to groom's cousin Kiki for the photo. LOL, I was so busy enjoying myself that I completely forgot to take any pictures!

Friday, April 20, 2012

Making of a Wedding: The Placecard Holders & Table Numbers

The making of the placecard holders for the wedding was a collaborative effort of many people... my mom's plastic canvas wizardry, my dad's die cutting, dh's sanding & baking, my new son-in-law's paper cutting, and the crafting skills of my bff. LOL, it took more people to put these together than any of the other wedding projects!
First, my mom spent countless hours and alot of patience lovingly stitching up over 200 of these placecard holders on plastic canvas. I decided to dress them up a bit to fit the wedding's lovebirds theme.
I created a simple tent style easel made from Bazzill Bling cardstock which I purchased online on sale at Joann's. But because they messed up on my order, the only way I could get the paper in time was to have them send it to dd's address in California. I ended up sending the cutting instructions to dd and my dear son in law cut all the cardstock to size before mailing it to us in Hawaii.

The little pair of pink lovebirds were die cut using an old lovebird Quicktuz die and inkjet printable shrink plastic. We put my dad to work cutting over 600 of these birds on my Big Shot machine, and Dh took charge of baking and shrinking them on cooky sheets in the oven. The photos above show the die cut birds before they were baked and from the oven window while they baked. They curl up as they shrink and finally flatten out in about 2 to 3 minutes in a 325 degree oven. I then colored the them using Copic pens and each bird was glued onto large pearl head pins which dh had sanded down for a flat surface. Bows were made from gold lame ribbon.
Then together with the help of my bff, Aunty Pat, we spent a weekend and lots of hot glue assembling all 280 of these. Whew! Had I known it would take so many of us and so much time to put these together, I don't think I would have even attempted this. Funny how the first sample I came up with came together so quickly...I guess I really need to work on my time assessment skills...
Happily, the table number cards were a lot easier to do. Much quicker to finish too, since I only had to make 30 of them! I used Cricut Design Studio together with George and Elegant Edges cartridges to create a cutfile for these simple tent style number cards.
Up next...the favors...

Thursday, April 12, 2012

Making of a Wedding: The Card Box and Escort Cards

Once dd had decided on a lovebirds theme for her wedding, she started coming up with a lot of creative projects for me to work on. But by far the most challenging was her idea for a birdhouse shaped card box for the reception table. Truthfully, I had no idea of how I was going to pull this off... and at first I started collecting and saving all shapes and sizes of corrugated boxes, thinking I would cut them apart and reassemble them somehow to resemble a birdhouse. However, after searching online for a suitable paint to use, I learned that warping would be a problem with the corrugated board. Then while browsing at a local art supply store, I came across some foam board, and this turned out to be  the perfect solution!
I sketched my "pattern" onto some graph paper and proceeded to cut the panels of the birdhouse from the foam board. This was my first time working with foam board, and I was pleased to find that it cut so easily and smoothly with an exacto knife. After cutting the panels for the birdhouse, I sprayed them with several thin coats of Rust-oleum metallic spray paint (Pearl Mist) until I got the desired shimmer.
After the paint dried, the birdhouse was assembled using a combination of hot glue and tacky glue. The roof was made so it would easily lift off like a cover to a box, with a slit where guests could easily slide their envelopes into the the box.
Next, the fun part...decorating! Added rows of large pink scalloped "shingles" to the roof  (scallop border from Cricut Accent Essentials cartridge welded to rectangles from George cartridge in Design Studio)  using Bazzill cardstock cut with my Cricut and chalked. Fancy flourishes on the front are from From the Nest cartridge and the heart frame for the opening from George. Perched two pretty feathered doves on the front to finish it off. 
Considering this was my first attempt at constructing something out of foam board, I guess it didn't turn out too bad. Only problem is that due to my lack of spatial reasoning, this turned out way larger than expected, standing about 2 feet high, and 10 inches in depth. LOL, now that the wedding is over, I have no idea what to do with it!
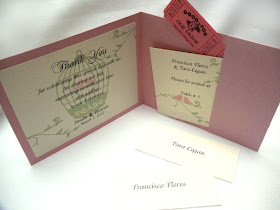
And this is the reception card that was passed out to the guests. To keep with the theme, I used the same graphics and embossing folder that I had used previously on the invitations...

On the inside was a short thank you note from the bride and groom and a pocket that held each guests' beverage tickets, table seating assignment and name plates for their placecards.
I found these photo storage boxes on sale at Pricebusters and covered them with pretty Basic Grey papers and Bazzill cardstock to hold all the cards...

.... filed alphabetically so the girls at the reception desk could easily pass them out to guests as they arrived.
Okay, that's it for this time. I hope you will bear with me as I do have a few more "Making Of A Wedding" posts to do. Afterall, this was my one and only dd getting married, and our family and friends lived, breathed and crafted "wedding preparations" for the past 12 months!

Saturday, April 7, 2012

For Some Bunny Special and All My Favorite Peeps

Taking a break from posting wedding stuff to celebrate Easter! These Easter projects were the first things I created as soon as the wedding was over...sure missed making cutesy stuff!
This cutie patootie peeking bunny is part of a covered slider card which I used to hold a gift card for my niece.
Pulling on the tab on the top reveals our Easter greeting and makes bunny rise up in the basket with a little surprise. Original instructions and template for the covered slider card are from Chia Wald. Basket and egg cuts are from Cricut's Doodlecharms cartridge, and cute lop-eared fuzzy bunny are from my new favorite paper piecing site, My Scrapchick.
For my Easter treats, I came up with these gable boxes to hold cookies and lemon pizelles.
Cute bunny and chickie faces on the boxes are from the Spring Faces mini set, also from the My Scrapchick. Love that these were so quick and easy and yet so adorable! The gable boxes are 6.5" tall (including the handle) by 4.5" wide, roomy enough to hold about 10 mini pizzelles or a dozen small cookies. The cutfile for these were created in Cricut Design Studio using and welding shapes from the George cartridge.
Then at the last minute, I spied Lexi's irresistable "Peep S'Mores kits" pinned all over Pinterest...just HAD to give these a try! These were great as a last minute Easter treat idea...so much fun and super duper quick and easy to put together.
Simply used cellophane bags to put the Bunny Peeps, chocolate and graham crackers in and sealed them with my old Seal-A-Meal machine. Then I created a little topper for the bags decorated with little Bunny Peeps graphics I found on the internet, adding "To One of My Favorite Peeps".  On the backside, I added the instructions for making your own "Peep S'Mores". Made forty of these in just a couple hours, and all ready for passing out to dh's and my friends at work.
LOL, no more children at home, but here I am still having fun with Easter. Guess I'll never outgrow it! Hope you all have a fun and special Easter too!