Sunday, August 29, 2010

Just Peeking In...

This is the card I created for my blogging friend Joy, to send along with a few peeking puppy die cuts she requested. It was the perfect chance to try out a neat pleated pop up I had seen over at one of my favorite blogs, Extreme Cards And Paper Crafts.

For the front of the card, I used several different flower cuts from the Walk In My Garden Cartridge and a Quickutz doggie die...see his tail poking out from behind the flowers?
Here's what the card looks like when you open it. It's a little difficult to see from this angle, but the peeking pup and flower stems are glued into different valley folds of the pleats at the center of the card to create different layers of dimension.
Here's a back view with the pleats more readily visible...


Pretty much an easy card to do. You can find a link to a video tutorial for this type of card, plus a detailed photo tutorial (with some very helpful hints and improvements to the construction of this card) over at Extreme Cards and Papercrafting. (Thanks, Carol...you're amazing!) BTW, if you haven't been to visit her blog yet, you are missing out! This lady creates and shares the most incredible paper crafts... if only I didn't have to eat or sleep...I would try them all!

Sunday, August 22, 2010

Asian American Wedding

This card was created for Dh to take to the wedding of one his golfing buddies last month. I was pretty certain after seeing the wedding announcement that the bride was probably born and raised in Japan, so I wanted to do something with an Asian flavor.

I used the kanji character for "love" from the Pagoda cartridge, cut from glossy mylar cardstock, and shadowed it a couple times with Bazzill Diamond Bling cardstock. For the background, I used the same Bazzill cardstock, run through the Cuttlebug Sakura embossing folder.

Then for a Westernized twist, I decided to use the dove cut from the Wedding Solutions cartridge. I layered the doves several times and although it doesn't show up in the photo, I used DCWV white glitter cardstock for the shadow layer. Unlike here in the U.S., doves are not considered a traditional symbol of love in Japan, so at first I felt a little uneasy about placing them on the card. But after I placed a piece of washi paper down behind the doves, it seemed to work out much better.

I kept the inside plain and simple, traditional Japanese wedding white and gold, with a pocket on the side for the monetary gift.

Sunday, August 15, 2010

You Rock Baby!

Hurray! Dd survived her most rigorous final exams ever and is ready to begin a new school year of rotations. This is the card I sent with a care package to congratulate her and let her know how proud we are of her.

For the front of the card I used a cut from the Hello Kitty Greetings cartridge, and added a star from the George cartridge to create my "rockin' kitty". Electric guitar comes from the Indie Arts cart.

Here's how the card looks opened up...
This was my first try at creating a "flag book" type of card. Though I have seen many different variations of this posted everywhere on the internet, I always thought it looked too complicated to do. I finally had the chance to see this type of card in "person" at a recent Cricut Club meeting when two wonderfully creative ladies, Sharon F. and Kelli S. shared several beautiful flag book cards they had created. I was so impressed with their cards that I just had to try one too!

The neatest thing about this card is that it is so much fun to open and see all the flags line up in place. And the best part is that it really is so easy to make!

I used lots of glitzy sparkly paper to make sure the card would shout out its sentiment! Silver and black glitter carstock is from DCWV, pink prismatic paper is from Best Occasions. Lettering for the flags was cut using Studio font from Quickutz, and musical notes were created in Design Studio using welded shapes from the George cartridge.
I got my instructions from a book called Fast And Fun Folded Cards from Annie's Attic but I also found a couple links to free tutorials over at one of my fave blogs, Extreme Cards and Papercrafting. What's nice about this card is that it's easy to customize it to increase or decrease the number of flags you want to include simply by adding or subtracting the number of accordian folds.

The only thing is, the more accordian folds you add, the thicker your card becomes. My friends Sharon & Kelli used ribbon ties attached to the the front and back to keep their cards nicely closed. But due to my poor planning, I forgot to add the ties. My card with 5 flags in 3 rows became nearly 3/4" thick, so instead of trying to make a bulging envelope for it, I opted to make a box with a belly band, which did the dual duty of keeping the card contained and closed till opened.

Sunday, August 8, 2010

Expecting Two?

One of the girls at my workplace is expecting twins! We held a baby shower for her couple weekends ago, and this is the card I came up with. This was the first time I had done a card for twins, so I was a bit stumped for ideas at first. Surfed the internet for some ideas, and finally decided to use this stork and baby cut from the New Arrivals cartridge.

Did a mirror image of the baby cut on Design studio for the second twin in the stork's bundle, and layered all the cuts several times. Used the Cuttlebug Swiss Dots folder to emboss the blue bundle (yes, it's gonna be baby boy twins!) and added the eyelet corners cut with an old Marvy Uchida corner punch. Library label for the sentiment comes from the Tags Bags Boxes & More cartridge.

Here's the inside of the card. Used a Martha Stewart doily edge punch, duckies from the Wild Card cartridge, and hearts are another Marvy Uchida punch, run through the Swiss Dots embossing folder. Font is Catchup.

And here's a view of the finished card, opened and standing as an easel card. Really am enjoying these easel cards and how quick and simple they are to put together!

Sunday, August 1, 2010

Grandpa's Menagerie

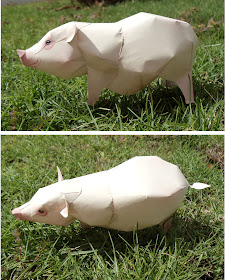
In response to dd's request, my post this week is dedicated to showcasing my dad's fairly new hobby of creating these awesome paper animals. Both mom and dad have always enjoyed crafting, and for as long as I can recall, there was always some craft project going on at home as I was growing up. So I guess it was only natural that I developed the same love and appreciation for crafts!

These incredible paper creatures come from Canon's Papercrafting website, Canon Creative Park, where you can find a plethora of fun paper crafting projects. After printing them from the website and cutting out each piece, dad made each of these animals come to life by meticulously gluing them together.

What's most amazing is that no one would ever guess by looking at these intricate creations that dad suffers from a debilitating condition which causes his hands to tremor.
It is heart wrenching beyond words to see a man who once enjoyed so many creative hobbies... photograhy, wood and paper crafting, computer graphics... to name a few... have to come to terms with the loss of control of his hands.

The tremors are to the point now that even the simple task of using a mouse to navigate on the computer has become very difficult for him. I imagine it must take a lot of concentration and hours and hours of patience and determination to finish each of these critters... which of course makes me appreciate these creations even more.

This past week I asked for permission to take dad's menagerie home with me to photograph so he would be able to share pictures of them with friends and family.

I took them outdoors and had fun taking the pictures, but had to be very careful as they would blow away with even the slightest bit of wind!

Some of these guys are quite small, no more than 2 or 3 inches high, so I had to lay down on the ground with them to take their pictures!

This Kingfisher may not look too much different than the rest of the creatures, but it took dad several weeks to put complete because he had such a difficult time assembling the bird's feet...

Each one of the bird's claws is a separate piece, rolled into a hollow tubes then glued together. Crazy! I tried on one occasion to help, but gave up after a few tries!

This maneki neko or Japanese "welcoming cat" is his largest creation to date. The finished size is nearly 12 inches tall, and dad says it took 10 sheets of 8-1/2 x 11 paper to create!

Needless to say, we are all extremely pleased that dad has found a new passtime to enjoy. Most importantly this new hobby has definitely boosted his own self image and confidence. We may be overly optimistic, but we are hopeful this might also help him gain some control of his tremors.

Currently, dad is working on a 3 dimensional mini model of the Byodo In Temple in Japan. I'm not sure how large the completed project will be, but we're told it takes over a hundred pieces, cut out and glued together. Can't wait to see it, dad!